
Track
Data Engineer in Python
40 hr
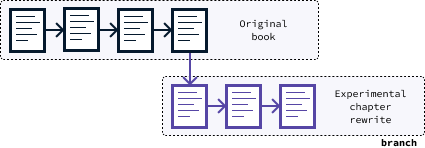
Imagine you're writing a book and want to experiment with new ideas without messing up the original. You could start a new notebook for each idea, keeping your drafts separate.
Git, a version control system, allows software developers to do the same with code through "branches." Each branch is like a separate path of development, allowing you to explore changes without affecting the main codebase.
In this article, I'll guide you through using git clone, focusing on cloning specific branches. If you want to learn more about Git, I recommend this Introduction to Git course.
Let's start with a short answer for those of you in a hurry. After that, we'll dive into more details.
To clone a specific branch from a git repository, use the command:
git clone --single-branch --branch <branch_name> <repository_url>Replace <branch_name> with the name of the desired branch and <repository_url> with the repository's URL. This command creates a local copy of the specified branch, allowing immediate, focused development on that branch.
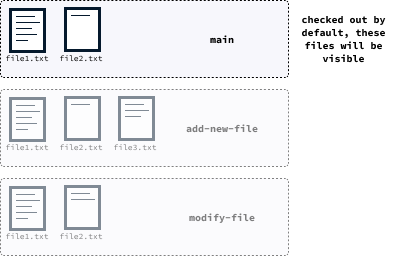
Throughout this article, we’ll use this repository. You can use it to try out the commands you learn on your machine. The repository contains three branches:
main: The default branch with two text files.add-new-file: A branch where a third file has been added.modify-file: A branch where the second file has been modified.This is how we can clone the branch add-new-file:
git clone --single-branch --branch add-new-file https://github.com/fran-aubry/git-clone-example.gitgit clone?By default, git clone is designed to copy the entire repository into a new directory on your local machine, cloning all branches. Here’s the syntax:
git clone <repository_url>To clone the example repository, we can do the following:
git clone https://github.com/fran-aubry/git-clone-example.gitAfter executing this command, all branches will be copied to your local machine. However, only one branch's files are visible at a time, called the checked-out branch. After cloning a repository, the default branch (usually called main or master) is the one that is checked out.
After a full clone, we can change (checkout) to the desired branch by using the git checkout command. For example, to checkout the modify-file branch, we’d do the following:
git checkout modify-file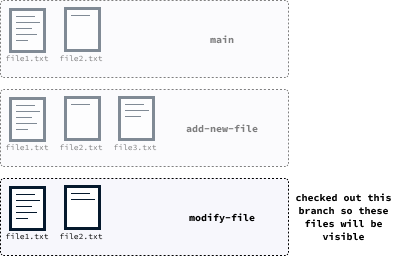
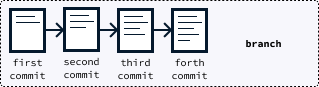
When working with git, changes to a branch are saved by committing them using the git commit command. Each commit creates a new state of that branch, which you can later revert to if needed. Think of each commit as creating a snapshot, with git keeping track of all those snapshots. You can revert a branch to any of these snapshots at any time.
The git clone command, when used without options, downloads every commit of every branch to your local machine. Depending on the project size, this could take up a significant amount of space in your local storage. If you know you won't need the entire history, you can use the --depth parameter to specify how many commits (or snapshots) you want to clone.
To clone the main branch while loading only the most recent commit, use the following command:
git clone --depth=1 https://github.com/fran-aubry/git-clone-example.gitWe learned how to clone a repository using git clone. By default, this command clones everything to your local machine. Often, you may only be interested in working on a specific branch, so it’d be more efficient to clone only that particular branch. This approach saves disk space and allows you to start working immediately without needing to switch branches after cloning.
In the book writing analogy, consider being assigned work on the rewrite of the second chapter of a book. In this case, you should clone only the branch where this task is being carried out, as it is unnecessary to have access to branches related to the revision of other chapters.
You can instruct git to clone a single branch by adding the --single-branch and --branch arguments followed by the name of the branch:
git clone --single-branch --branch <branch_name> <repository_url>Let’s break down the command:
git clone: This is the basic git command used to copy a repository from a remote source to your local machine.--single-branch: This option tells Git to clone only a single branch. If no branch is specified, the default branch will be cloned.--branch <branch_name>: This option specifies the branch to clone. The <branch_name> is the name of the branch you want to clone.<repository_url>: This is the URL of the repository.For example, to clone only the modify-file branch from our repository, we can do the following:
git clone --single-branch --branch add-new-file https://github.com/fran-aubry/git-clone-example.gitWhen working on a branch, there are three essential operations you need to do:
git commitIn Git, saving your work is called creating a commit. This process takes a snapshot of the branch's current state that you are working on.
The state of the branch is saved on your local machine after each commit, allowing you to navigate between the various stages of progress.
To commit your changes in git, you use the git commit command. However, before committing your changes, git needs to know which files you wish to include in the commit. You specify the files to be saved using the git add command. The syntax for this command is as follows:
git add <path_to_file>In the syntax, <path_to_file> is the path to the file you want to commit. For instance, if we are on the branch modify-file from our example repository and have added a paragraph to file2.txt, you would add that file by executing:
git add file2.txtAfter adding all the files you want to include in your commit, you can proceed to commit by executing:
git commit -m <message>Here, the <message> argument should be a concise message enclosed in double quotes, briefly describing the changes. For example:
git commit -m "Add paragraph"Here are some conventions for the commit message. They are essential for ensuring clarity and understanding among everyone working on the project:
git pushWhen you commit, you create a snapshot of the changes on your local machine. For others to access your changes, you need to upload them. To do so, you use the push command.
The basic syntax of the push command in Git is:
git push <remote> <branch>Let’s break it down:
<remote>: This is the name of the remote repository where you want to push your changes. By default, when you clone a repository, the remote repository is called origin.<branch>: This is the branch name whose changes you want to push to the remote repository. If you skip this argument, Git will push changes based on the current branch and the remote tracking configurations.Here are some common use cases for git push:
git pushgit push origin <branch>git pullGit enables large teams to work concurrently on the same project. When colleagues edit the same branch you're working on, your local branch can become outdated compared to the remote branch.
To download other people’s commits, we use the git pull command. The basic syntax of the push command in git is:
git pull <remote> <branch>Here’s what each parameter does:
<remote>: This is the name of the remote repository from which you want to pull. By default, this repository is named origin.<branch>: This is the branch name from which you wish to pull changes. If not specified, git uses the current branch along with its upstream branch.Here are some common use cases of git pull:
git pullgit pull origin <branch>When using Git, I recommend frequently pulling updates to ensure your local branch remains up-to-date. I advise adhering to the following best practices:
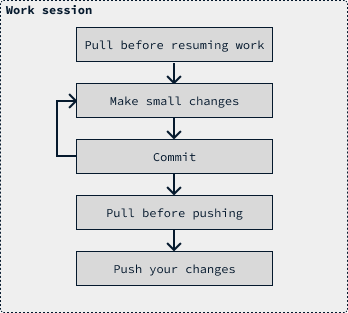
When executing the git pull command to download changes from a remote repository, it's possible to encounter a scenario where another commit has modified the same lines as your local commits. Git tries to automatically merge changes, and in many cases, it succeeds. For instance, if changes are made to different parts of the same file, Git can seamlessly merge these because the commits affect distinct sections.
However, if you and another contributor have edited the same paragraph, git will be unable to determine which version to keep, resulting in a merge conflict. In this situation, you will need to manually resolve the conflict by deciding which changes to retain.
For further guidance on resolving conflicts, I recommend reading this article on how to resolve merge conflicts in Git.
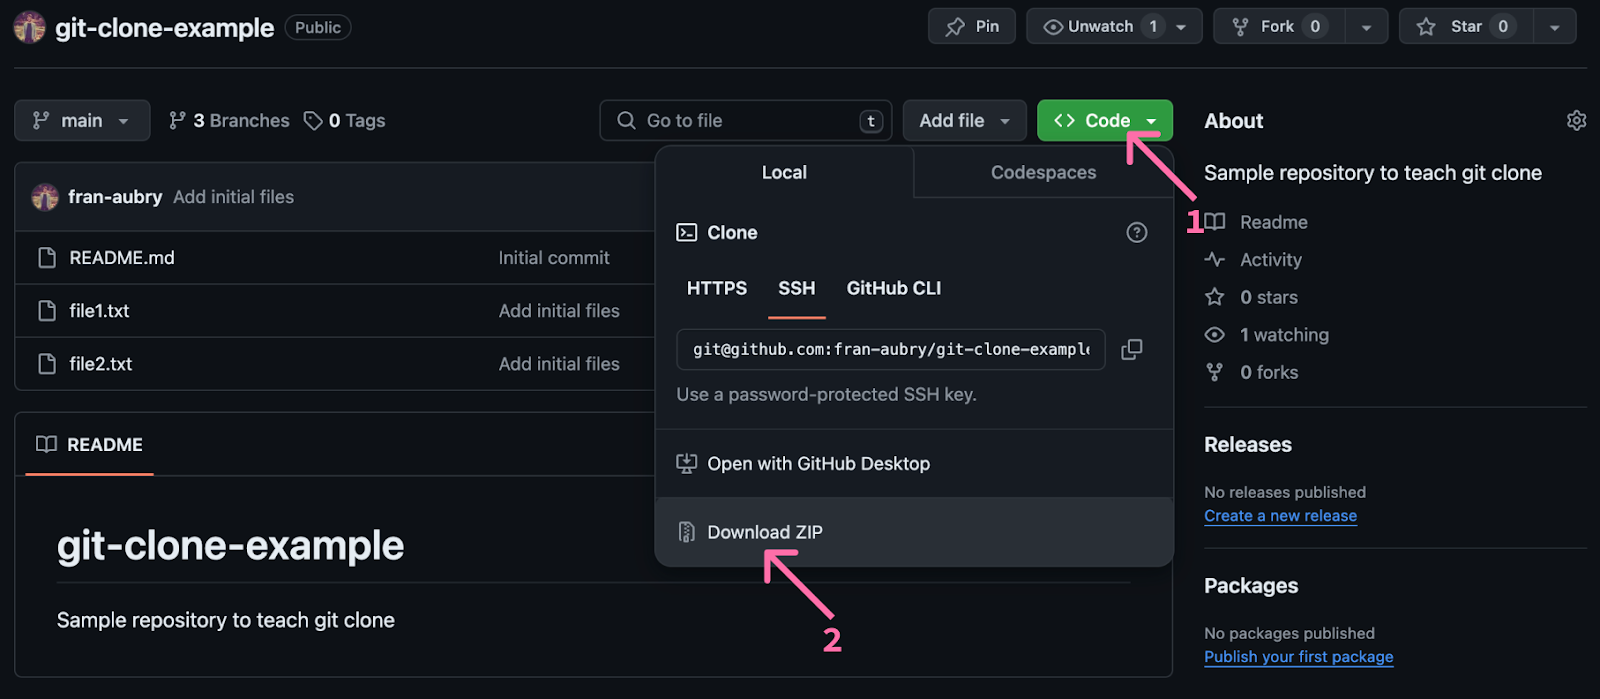
In certain scenarios, you want a local copy of a repository for use without the intention of modifying it. If it’s a public repository, there's no need to install Git on your local machine. You can directly download the repository from GitHub by clicking the Code button followed by the Download Zip button, as shown below:
Git cloning allows you to copy a Git repository to your local machine, enabling you to utilize the code or expand upon it by adding new functionality. When cloning a repository, all branches are downloaded, which can consume a significant amount of disk space.
Branches are utilized to work on specific changes or features. Cloning a specific branch enables you to contribute to those changes without downloading unrelated work, thus requiring much less disk space and keeping your local disk cleaner.
If you want to learn more about the subject, I recommend this GitHub and Git Tutorial for Beginners.
Learn Git with these courses!
Track
Course
Tutorial
François Aubry
Tutorial
Bex Tuychiev
Tutorial
François Aubry
Tutorial
François Aubry
Tutorial
François Aubry
Tutorial
François Aubry