Course
Building AI Agents with Google ADK
1 hr
6.6K
The Gemini team recently introduced Gemini 2.5 Computer Use, a specialized model that can see a live screen and act on it by clicking, typing, scrolling, and navigating the web like a human operator.
In this guide, we’ll skip abstract benchmarks and build something practical. A Streamlit app that uses Computer Use to control a real browser, search Google for job postings, apply a filter, and export results to CSV without any third-party search APIs.
In this tutorial, you’ll learn how to:
By the end, you’ll have a job search agent that will curate accurate job postings for you.
If you want to learn more about Gemini 2.5, I recommend checking out our Gemini 2.5 Pro tutorial, which covers features, tests, access, benchmarks, and more. You should also learn about Gemini 3 Pro, the latest model from Google.
Gemini 2.5 Computer Use is a specialized (preview) model and tool in the Gemini API that lets you build browser-control agents. Instead of calling site-specific APIs, the model works from screenshots. It can see what’s on the page and then act by emitting UI actions like navigate, click_at, scroll_document, etc.
The client code receives those proposed actions, executes them, and sends back a fresh combination of a screenshot and URL so the model can decide the next step.
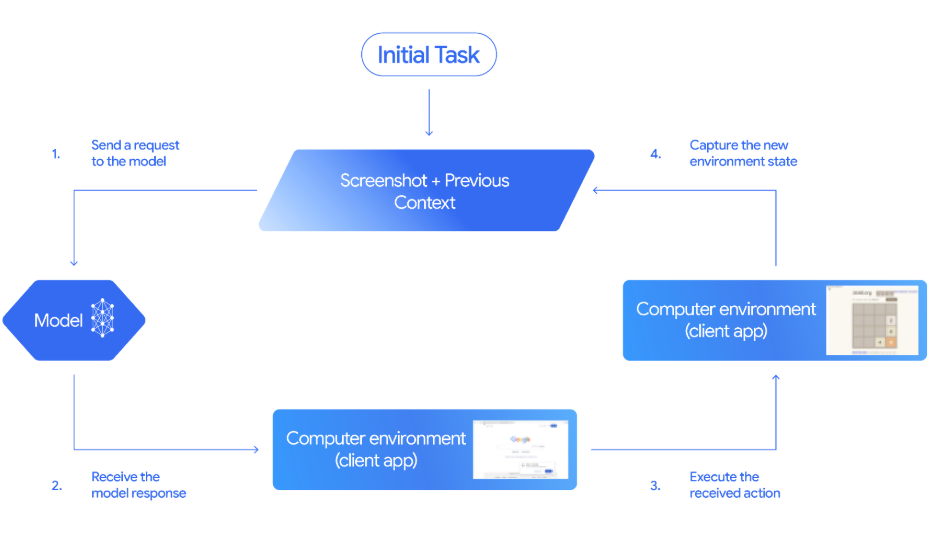
Source: Gemini Documentation
Here is how the above agent loop works end-to-end:
click_at or type_text_at) and a safety decision.FunctionResponse that contains a fresh screenshot and the current URL.see–decide–act–observe cycle until the task completes, an error occurs, or the user or model chooses to stop.In this section, we’ll build a Streamlit-powered jobs search agent that drives a real browser using Gemini 2.5 Computer Use and Playwright, then exports results to CSV.
Here’s how it works:
Under the hood, the app enforces an allowlisted domain for safe navigation, supports optional human confirmation for risky steps, and uses the Computer Use loop for easy debugging.
A few responsible use cases and site policies include:
First, ensure you have the following imports installed:
python -m venv .venv && source .venv/bin/activate
pip install streamlit google-genai playwright python-dotenv
playwright install chromium
The above commands set up a virtual environment and installs all core dependencies needed to build the app, namely Streamlit for the UI, google-genai to call the Gemini API, Playwright for browser automation, and python-dotenv for loading environment variables and Chromium for Playwright.
Now we have the dependencies installed, next we set up the Gemini API Key from AI Studio.
Now, create a .env file in your project folder and add your API Key there:
GOOGLE_API_KEY=YOUR_REAL_KEY
ALLOWED_HOSTS=google.com
The python-dotenv package will load GOOGLE_API_KEY at runtime so the app can call the Gemini 2.5 Computer Use model.
Now, let’s prepare for runtime, which includes imports, constants, model ID, and authentication. This ensures the app talks to Gemini and that navigation stays safely within an allowlisted domain.
import os, io, time, csv, base64, urllib.parse
from typing import List, Dict, Tuple
import streamlit as st
from dotenv import load_dotenv
from playwright.sync_api import sync_playwright
from google import genai
from google.genai import types
from google.genai.types import Content, Part
W, H = 1440, 900
MODEL = "gemini-2.5-computer-use-preview-10-2025"
load_dotenv()
API_KEY = os.getenv("GOOGLE_API_KEY")
if not API_KEY:
    st.stop()
ALLOWED_HOSTS = {h.strip().lower() for h in os.getenv("ALLOWED_HOSTS", "google.com").split(",") if h.strip()}
client = genai.Client(api_key=API_KEY)
We start by importing the core libraries like Streamlit, Playwright, google-genai, and small utilities (dotenv, os, io, csv, time, urllib) for configuration and I/O.
A fixed viewport (W, H = 1440 × 900) keeps screenshots and coordinate mapping consistent for Computer Use, and the preview model is set to gemini-2.5-computer-use-preview-10-2025.
The API key is loaded with load_dotenv() and os.getenv("GOOGLE_API_KEY"). The navigation is set up by an allowlist (default google.com) for safety.
Finally, genai.Client(api_key=API_KEY) initializes the Gemini SDK so the app can run the agent loop and render results in Streamlit.
Before we move on to the core of the app, we need to set up a few helper functions. They help with safety checks, coordinate conversion, execute actions for Gemini’s function calls, SERP scraping, and export results as a CSV.
We start by adding a backend helper that powers safe browser control. This includes a domain allowlist check function to constrain navigation, a coordinate converter function to map the model’s 0–999 grid to the fixed viewport, and an action dispatcher function that interprets Computer Use function calls and executes them via Playwright.
def host_allowed(url: str) -> bool:
    try:
        netloc = urllib.parse.urlparse(url).netloc.lower()
        return any(netloc.endswith(allowed) for allowed in ALLOWED_HOSTS)
    except Exception:
        return False
def denorm(v: int, size: int) -> int:
    return int(v/1000*size)
def exec_calls(candidate, page, viewport, *, approve_all=False) -> List[Tuple[str, Dict]]:
    W, H = viewport
    results = []
    for part in candidate.content.parts:
        fc = getattr(part, "function_call", None)
        if not fc:
            continue
        name, args = fc.name, (fc.args or {})
        sd = args.get("safety_decision")
        if sd and sd.get("decision") == "require_confirmation":
            reason = sd.get("explanation", "Model flagged a risky action.")
            log_box.warning(f"[SAFETY requires confirmation] {reason}")
            if not approve_all:
                st.stop()
            results.append((name, {"safety_acknowledgement": "true"}))
        if name == "navigate":
            target = args.get("url", "")
            if target and not host_allowed(target):
                log_box.error(f"[BLOCKED] Non-allowlisted host: {target}")
                results.append((name, {"error": "blocked_by_allowlist"}))
                continue
        try:
            if name == "open_web_browser":
                pass
            elif name == "navigate":
                page.goto(args["url"], timeout=30000)
            elif name == "search":
                page.goto("https://www.google.com", timeout=30000)
            elif name == "click_at":
                page.mouse.click(denorm(args["x"], W), denorm(args["y"], H))
            elif name == "hover_at":
                page.mouse.move(denorm(args["x"], W), denorm(args["y"], H))
            elif name == "type_text_at":
                x, y = denorm(args["x"], W), denorm(args["y"], H)
                page.mouse.click(x, y)
                if args.get("clear_before_typing", True):
                    page.keyboard.press("Meta+A"); page.keyboard.press("Backspace")
                page.keyboard.type(args["text"])
                if args.get("press_enter", True):
                    page.keyboard.press("Enter")
            elif name == "scroll_document":
                page.mouse.wheel(0, 800 if args["direction"] == "down" else -800)
            elif name == "key_combination":
                page.keyboard.press(args["keys"])
            page.wait_for_load_state("networkidle", timeout=10000)
            results.append((name, {}))
            time.sleep(0.6)
        except Exception as e:
            results.append((name, {"error": str(e)}))
    return results
Let’s understand how each function fits into the pipeline:
host_allowed() function: This function parses the target URL, normalizes the hostname to lowercase, and checks whether it ends with any domain in ALLOWED_HOSTS listed in the .env file. denorm() function: This utility converts the pointer coordinates into actual pixel units for the current viewport. It’s crucial for precise clicks, hovers, and typing, especially when you change screen sizes or run headless.exec_calls() function: Finally, the execute calls function scans the model’s response for function calls and dispatches each to Playwright. It blocks navigate calls to non-allowlisted hosts, executes the supported actions, waits for network idle to stabilize the page, and records a per-action outcome (including errors). These results are then used in the next step to construct FunctionResponses back to the model.Together, these functions enforce boundaries, keep pointer math accurate, and log granular results.
After executing actions, the agent needs feedback to decide the next step and return useful outputs. This step provides three helper functions as follows:
def fr_from(page, results):
    shot = page.screenshot(type="png")
    url = page.url
    frs = []
    for name, result in results:
        frs.append(types.FunctionResponse(
            name=name,
            response={"url": url, **result},
            parts=[types.FunctionResponsePart(
                inline_data=types.FunctionResponseBlob(mime_type="image/png", data=shot)
            )]
        ))
    return frs, shot
def scrape_google_serp(page, max_items=10):
    items = []
    anchors = page.locator('div#search a:has(h3)')
    count = min(anchors.count(), max_items)
    for i in range(count):
        a = anchors.nth(i)
        title = a.locator('h3').inner_text()
        link = a.get_attribute('href')
        snippet = ""
        snips = page.locator('div#search .VwiC3b')
        if snips.count() > i:
            snippet = snips.nth(i).inner_text()
        items.append({"title": title, "link": link, "snippet": snippet})
    return items
def to_csv_download(rows: List[Dict], name="results.csv"):
    if not rows:
        return None
    out = io.StringIO()
    writer = csv.DictWriter(out, fieldnames=["keyword", "title", "link", "snippet"])
    writer.writeheader(); writer.writerows(rows)
    b = out.getvalue().encode("utf-8")
    href = f"data:text/csv;base64,{base64.b64encode(b).decode()}"
    st.download_button("Download CSV", data=b, file_name=name, mime="text/csv")
Let’s see how each post-action helper function works:
fr_from() function: This captures a fresh PNG screenshot and the current URL, then builds a FunctionResponse for every executed action. This embeds visual context for the next inference turn and preserves an auditable trail of what happened.scrape_google_serp() function: Next, we extract titles, links, and snippets from Google’s first results page using resilient selectors like a:has(h3) for titles/links and .VwiC3b for snippets. The scraper caps results at max_items and returns clean, structured rows ready for analysis or export.to_csv_download() function: This function generates an in-memory CSV with consistent headers and exposes it via Streamlit’s download_button() function.Now we have all the helper functions in place, next we can build a Streamlit application around them.
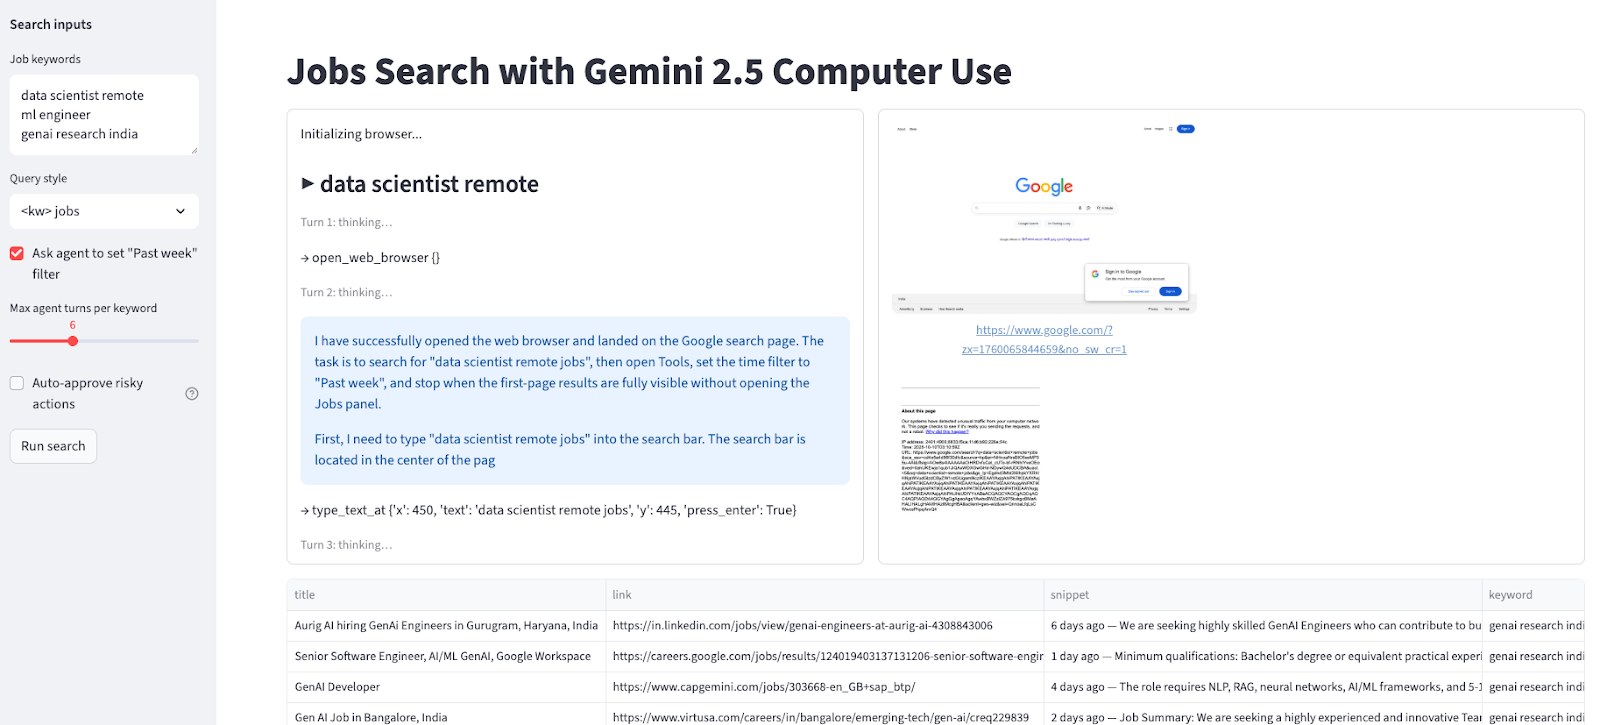
This step connects the Streamlit UI to the Computer Use agent loop. It renders the interface, manages how the user interacts with the agent, and ensures the output matches their needs.
st.set_page_config(page_title="Jobs Search with Gemini Computer Use", layout="wide")
st.title("Jobs Search with Gemini 2.5 Computer Use")
with st.sidebar:
    st.markdown("**Search inputs**")
    default_kw = "data scientist remote\nml engineer \ngenai research india"
    kw_text = st.text_area("Job keywords", value=default_kw, height=120)
    query_mode = st.selectbox("Query style", ["<kw> jobs", 'site:linkedin.com/jobs "<kw>"'], index=0)
    use_past_week = st.checkbox('Ask agent to set "Past week" filter', value=True)
    turns = st.slider("Max agent turns per keyword", 3, 12, 6)
    auto_confirm = st.checkbox("Auto-approve risky actions", value=False, help="If model requests confirmation (e.g., CAPTCHA), auto-approve instead of pausing.")
    run_btn = st.button("Run search")
log_col, shot_col = st.columns([0.45, 0.55])
log_box = log_col.container(height=520)
shot_box = shot_col.container(height=520)
table_box = st.container()
if run_btn:
    keywords = [k.strip() for k in kw_text.splitlines() if k.strip()]
    all_rows = []
    log_box.write("Initializing browser...")
    pw = sync_playwright().start()
    browser = pw.chromium.launch(headless=False)
    ctx = browser.new_context(viewport={"width": W, "height": H})
    page = ctx.new_page()
    try:
        for kw in keywords:
            log_box.subheader(f"▶ {kw}")
            page.goto("https://www.google.com", timeout=30000)
            initial_shot = page.screenshot(type="png")
            base_query = f'{kw} jobs' if query_mode == "<kw> jobs" else f'site:linkedin.com/jobs "{kw}"'
            goal = (
                f'Search Google for "{base_query}". '
                f'{"Open Tools and set time filter to Past week. " if use_past_week else ""}'
                'Stop when first-page results are fully visible; do NOT open the Jobs panel.'
            )
            contents = [Content(role="user", parts=[Part(text=goal), Part.from_bytes(data=initial_shot, mime_type="image/png")])]
            cfg = types.GenerateContentConfig(
                tools=[types.Tool(computer_use=types.ComputerUse(
                    environment=types.Environment.ENVIRONMENT_BROWSER
                ))]
            )
            for turn in range(turns):
                log_box.caption(f"Turn {turn+1}: thinking…")
                resp = client.models.generate_content(model=MODEL, contents=contents, config=cfg)
                cand = resp.candidates[0]
                contents.append(cand.content)
                narr = " ".join([p.text for p in cand.content.parts if getattr(p, "text", None)])
                if narr:
                    log_box.info(narr[:400])
                fcs = [p.function_call for p in cand.content.parts if getattr(p, "function_call", None)]
                if not fcs:
                    log_box.success("Agent stopped proposing actions.")
                    break
                for fc in fcs:
                    log_box.write(f"→ {fc.name} {fc.args or {}}")
                results = exec_calls(cand, page, (W, H), approve_all=auto_confirm)
                frs, shot = fr_from(page, results)
                contents.append(Content(role="user", parts=[Part(function_response=fr) for fr in frs]))
                shot_box.image(shot, caption=page.url, width='stretch')
            rows = scrape_google_serp(page)
            for r in rows:
                r["keyword"] = kw
            all_rows.extend(rows)
            log_box.success(f"{kw}: collected {len(rows)} results")
        if all_rows:
            table_box.dataframe(all_rows, width='stretch')
            to_csv_download(all_rows, name="jobs_google_results.csv")
        else:
            st.warning("No rows collected. Try fewer keywords or fewer turns.")
    finally:
        browser.close()
        pw.stop()
Let’s understand this pipeline in detail:
To run this app, simply run the following bash command in your terminal:
python -m streamlit run app.pyTip: Always launch Streamlit from your venv to avoid “ModuleNotFoundError” issues.
Top DataCamp Courses
Course
Course
Course
blog
Alex Olteanu
8 min
Tutorial
Abid Ali Awan
Tutorial
François Aubry
Tutorial
Aashi Dutt
Tutorial
Aashi Dutt
Tutorial
Abid Ali Awan