
Track
AI Fundamentals
10 hr
Even though image generation models have become extremely powerful recently, they have always lacked in one area: image editing. Making precise changes to text, replacing colors, transforming style, using different camera angles, or consistent characters across generations ; these were highly desirable applications that no image model was universally good at. Until, that is, Google released the Gemini 2.5 Flash Image model and changed the game with its conversational editing approach.
In this tutorial, you’ll learn how to set up and use Gemini 2.5 Flash Image through Python, master specific prompt engineering techniques for different visual styles, and work with advanced features like multi-image composition and character consistency. By the end, you’ll have practical tools for professional image generation workflows.
If you’re interested in exploring other Google AI image generation tools, you might also want to check out our comprehensive guide to Imagen 3, which covers Google’s alternative image generation API with different strengths and pricing models. You can also see our guide to Gemini 2.5 Computer Use, to see how the model can see your screen and act within it autonomously, and see the latest on Gemini 3 Pro.
Finally, you can also check out our guide to ChatGPT Images, a new competitor to Nano Bana Pro.
Most image generation models create great visuals from text prompts. But they struggle with editing. If you want to change the lighting in a photo, you usually have to start over. If you need the same character in different scenes, most models can’t keep them looking consistent. This makes these tools harder to use for real projects that need tweaks and revisions.
Gemini 2.5 Flash Image solves these editing problems. Google built this model with specific features to handle the tasks that other models struggle with:
These features work together to create a more flexible image generation system. Here’s how the character consistency feature works in practice:
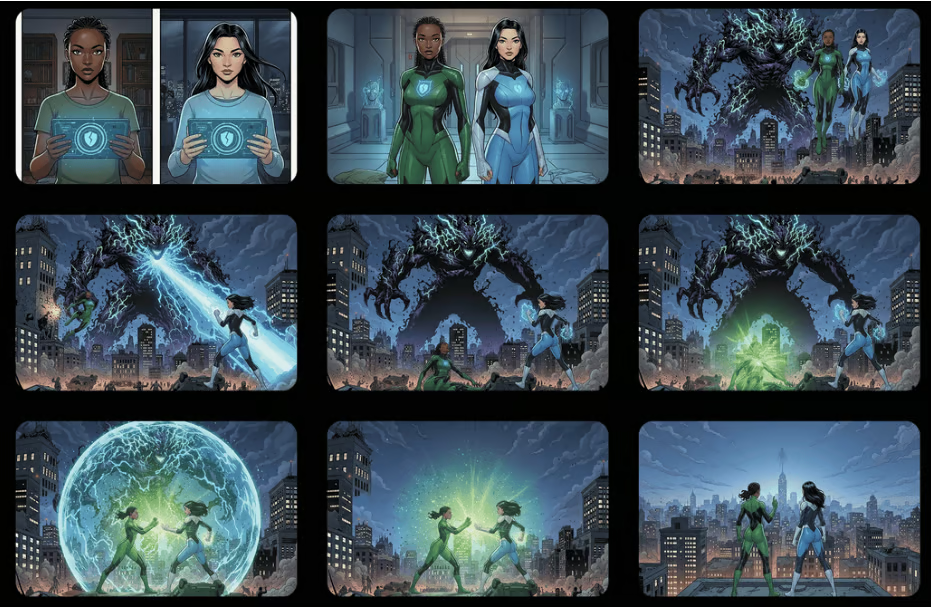
Character consistency feature in action: The same cartoon characters appear consistently across different scenes, maintaining visual identity while adapting to new environments and contexts.
Google tested this model on LMArena benchmarks, where the team internally referred to it as “nano banana.” The results show it performs better than other leading models, especially for image editing tasks. The model also generates images faster than most competitors. Speed can vary based on how complex your image is and what edits you’re making.

Performance benchmarks: Gemini 2.5 Flash Image demonstrates superior performance in image editing tasks compared to other leading AI image generation models.
The pricing works differently from other image models. Instead of paying for each image, you pay for tokens. Each image uses about 1,290 tokens, which costs roughly $0.039. The full rate is $30 per million tokens. Both generating new images and editing existing ones use the same token amount, so the cost stays predictable whether you’re creating from scratch or making changes.
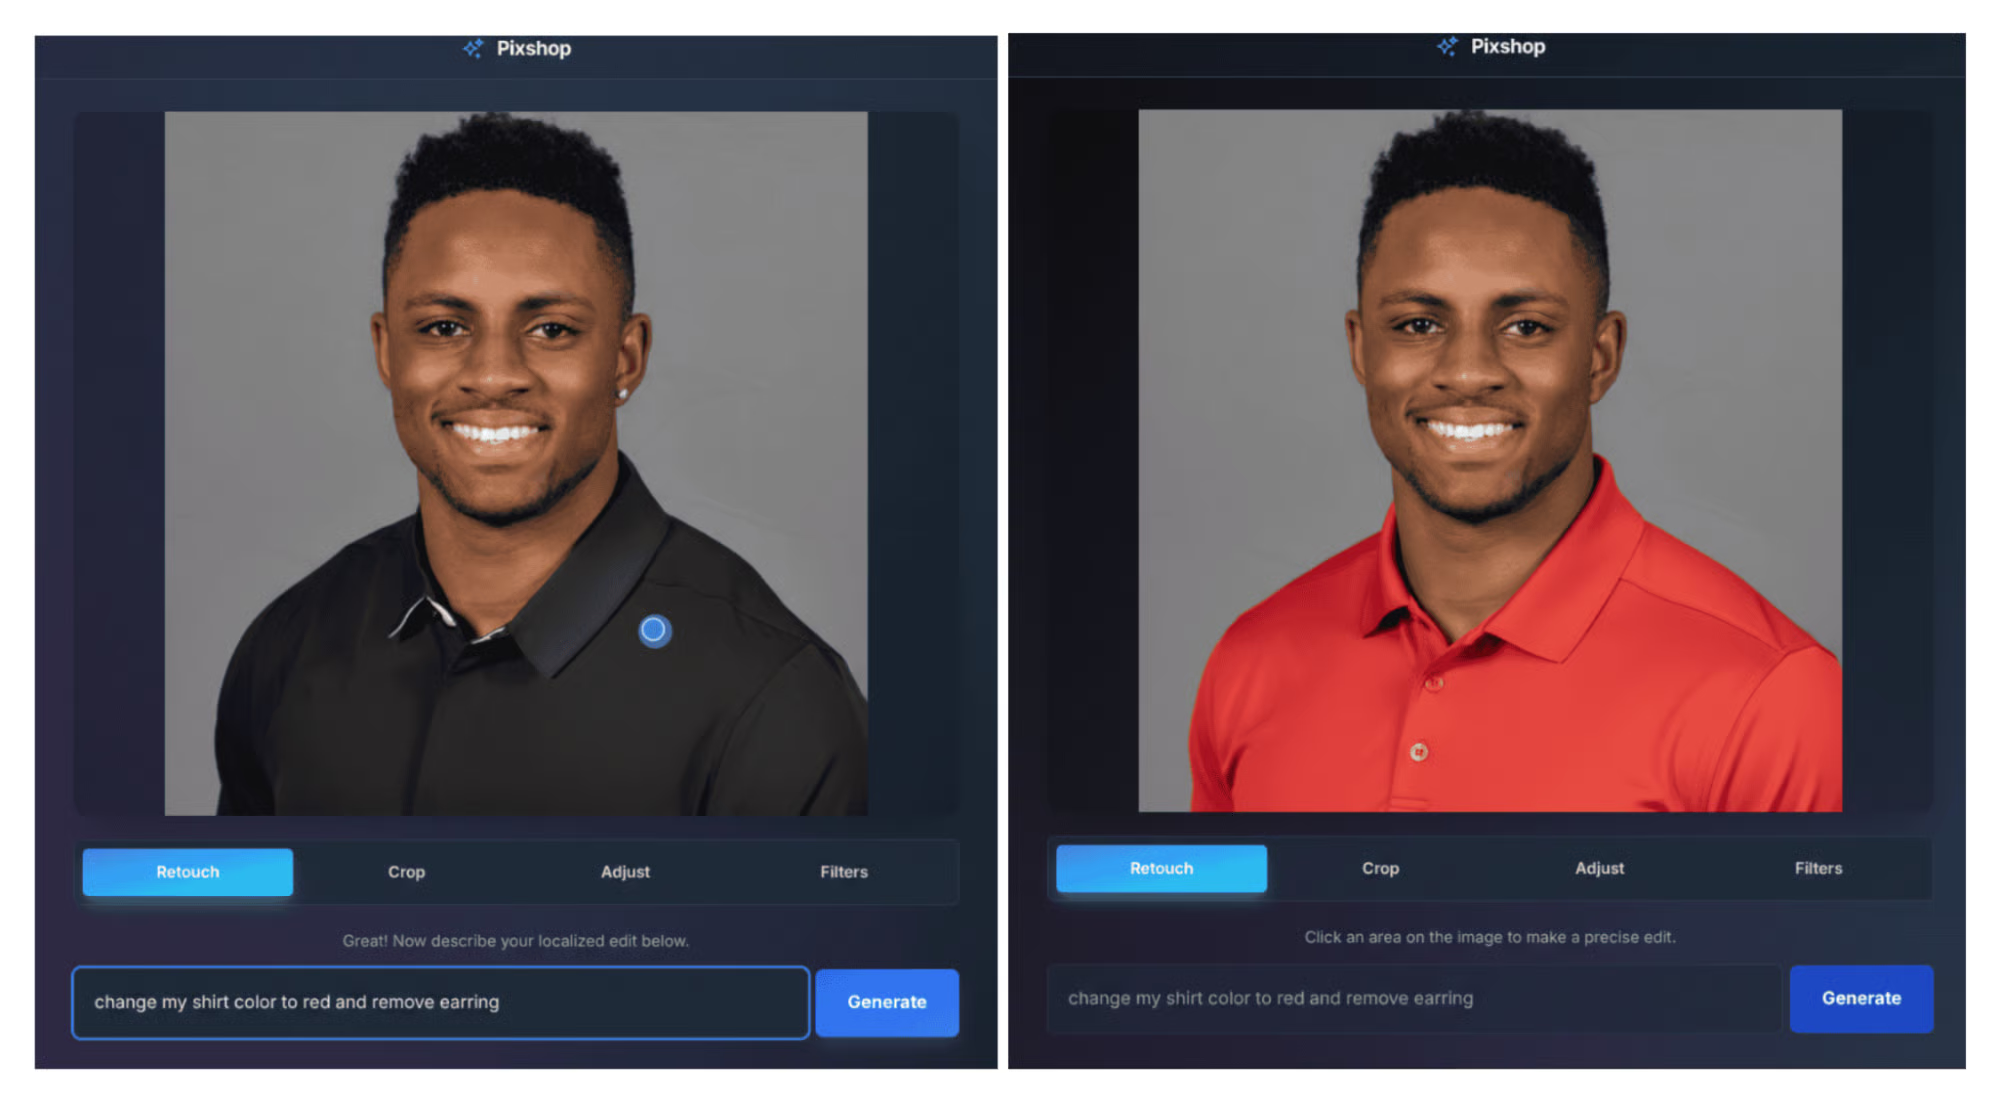
Conversational editing workflow: Examples of precise image modifications achieved through natural language prompts, showing the model’s ability to make targeted changes without full regeneration.
Now that you understand what makes Gemini 2.5 Flash Image different, we can move on to getting your hands on the technology. The next step is setting up your development environment so you can start using it.
Although this guide deals primarily with accessing Gemini 2.5 Flash Image via the API, you can also generate images with the tool using just your Google account.
After logging in, you can choose to access the Nano Banana model through either Gemini or in the Google AI studio. However, when using via Gemini, you will have a watermark on your images.
Before you can start generating images with Gemini 2.5 Flash Image, you need to set up your development environment. The process is straightforward, but getting the authentication right is important for security.
You’ll need a few things before we start:
python --versionTo use Gemini 2.5 Flash Image, you need an API key from Google. This key acts like your password to access the service. Here’s how to get one:
At this point, Google AI Studio will ask you to choose a project. Projects help organize your API usage and track your quotas. You have two options:
Most people should choose the new project option. Click it, and Google will create both a project and your API key automatically.
4. Copy the generated key immediately — you won’t see the full key again
5. Store it somewhere safe — you’ll need it in the next steps
Security note: Treat your API key like a password. Don’t share it publicly or save it in code that others can see.
Now that you have your API key, let’s set up your Python environment. Create a new directory for this tutorial and install the packages you’ll need:
# Create project directory
mkdir gemini-image-tutorial
cd gemini-image-tutorial

# Initialize UV project
uv init

# Add required packages
uv add google-genai python-dotenv pillow
Here’s what each package does:
google-genai: Official client for talking to Geminipython-dotenv: Keeps your API key securepillow: Handles image filesYou need to store your API key in a way that keeps it safe but lets your code access it. The best way is using environment variables with a .env file.
Create a .env file in your project directory:
# Create .env file
touch .env
Open the .env file in any text editor and add your API key:
GEMINI_API_KEY=your_api_key_hereReplace your_api_key_here with the key you copied from Google AI Studio.
Next, create a .gitignore file so you don't accidentally share your API key if you use Git:
# Create .gitignore
echo ".env" >> .gitignore
echo "__pycache__/" >> .gitignore
echo "*.pyc" >> .gitignoreLet’s make sure everything works by creating a simple test. Make a file called test_setup.py:
import os
from dotenv import load_dotenv
from google import genai

# Load environment variables
load_dotenv()

# Initialize the client
client = genai.Client(apikey=os.getenv("GEMINIAPI_KEY"))

# Test with a simple text generation
try:
   response = client.models.generate_content(
       model="gemini-2.5-flash",
       contents="Say hello in exactly 3 words"
   )
   print("✅ Setup successful!")
   print(f"Response: {response.text}")
except Exception as e:
   print("❌ Setup failed:")
   print(f"Error: {e}")
Now run your test script to make sure everything works:
uv run python test_setup.pyIf everything is set up correctly, you should see a success message and a short response from the model. The output should look something like:
✅ Setup successful!
Response: Hello there everyone.
If you get an error instead, here are the most common fixes:
.env file has GEMINI_API_KEY=your_actual_keyYour free API key comes with these limits:
These limits are perfect for this tutorial and small projects. You can always check how much you’ve used by going back to Google AI Studio and looking at your usage dashboard.
With your environment set up and tested, you’re ready to start generating images. The next section will walk you through creating your first image with Gemini 2.5 Flash Image.
Now that your environment is ready, let’s create your first image with Gemini 2..5 Flash Image. We’ll start simple and build up your understanding step by step.
First, let’s load the libraries we need and set up our connection to Gemini:
import os
from dotenv import load_dotenv
from google import genai
from PIL import Image
from io import BytesIO

# Load your API key from the .env file
load_dotenv()

# Create a client to talk to Gemini
client = genai.Client(apikey=os.getenv("GEMINIAPI_KEY"))
Let’s break down what each import does:
os: Helps us work with environment variablesload_dotenv(): Reads your API key from the .env filegenai: The main library for talking to GeminiPIL Image and BytesIO: Help us save the image files that come backThe client object is how we'll send requests to Gemini. Think of it as your connection to Google's servers.
Now let’s create a simple image with a clear, descriptive prompt:
# Write a prompt describing what you want
prompt = "A cozy coffee shop with wooden furniture and warm lighting"

# Ask Gemini to create the image
response = client.models.generate_content(
   model="gemini-2.5-flash-image-preview",
   contents=[prompt]
)
The generate_content() function is the main way to talk to Gemini. Here's what each part means:
model="gemini-2.5-flash-image-preview": This tells Gemini which model to use for image generationcontents=[prompt]: This is where you put your text descriptionWhen Gemini sends back a response, the image comes as raw data that we need to convert into a proper image file. Here’s how to extract and save it:
# Look through the response to find the image
for part in response.candidates[0].content.parts:
   if part.inline_data is not None:
       # Convert the raw data into an image
       image = Image.open(BytesIO(part.inline_data.data))
       # Save it as a PNG file
       image.save("myfirstimage.png")
       print("Image saved!")
This code does a few important things:
response.candidates[0]: Gets the first (and usually only) response from Geminicontent.parts: Gemini can send back multiple pieces - text, images, etc.part.inline_data: This is where the actual image data livesBytesIO(): Converts the raw bytes into something PIL can readimage.save(): Saves the final image to your computerLet’s put it all together and run the complete code. When you execute these commands in sequence, you should see output like this:
✅ Image saved as https://cdn-images-1.medium.com/proxy/1*Hhy7vMKOurXDOPVQ6Ps0gQ.png
📏 Image size: (1024, 1024)
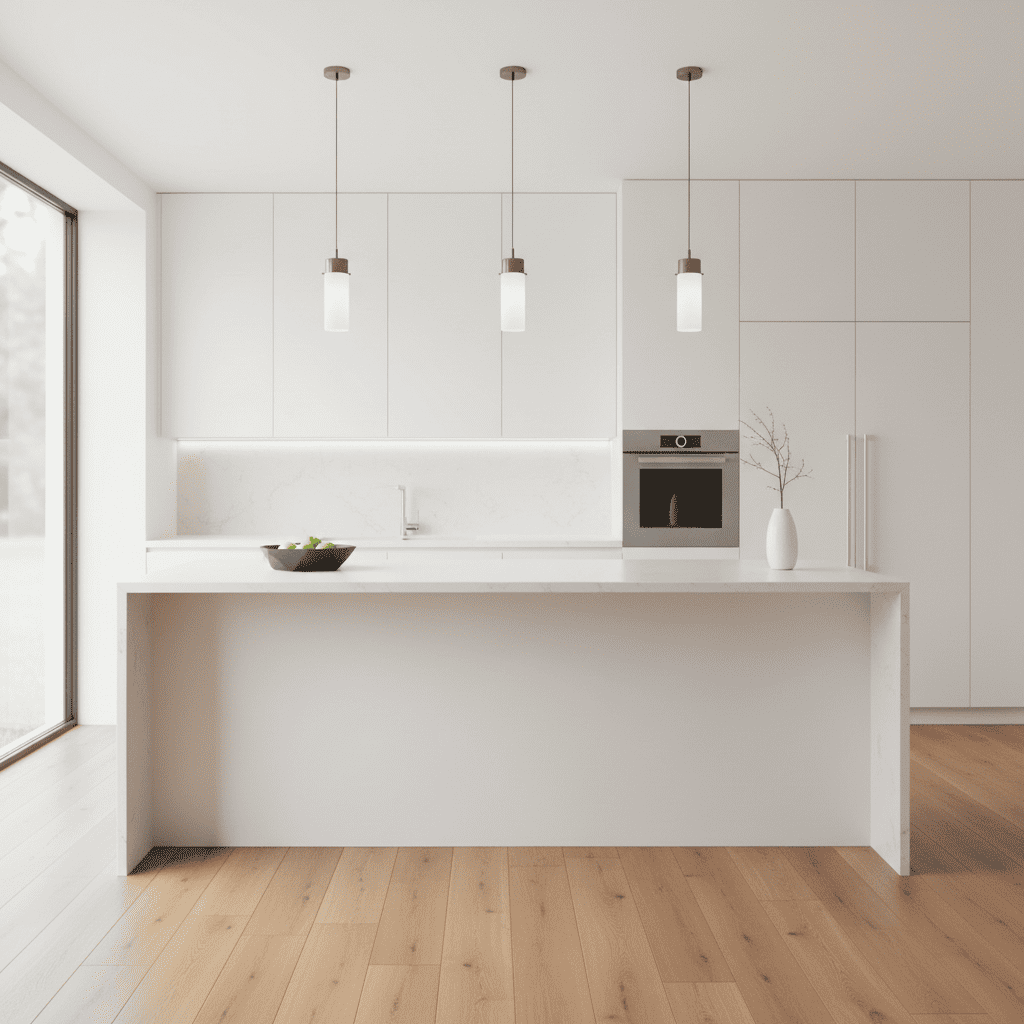
🎨 Image mode: RGBHere’s the actual image that gets generated from our coffee shop prompt:
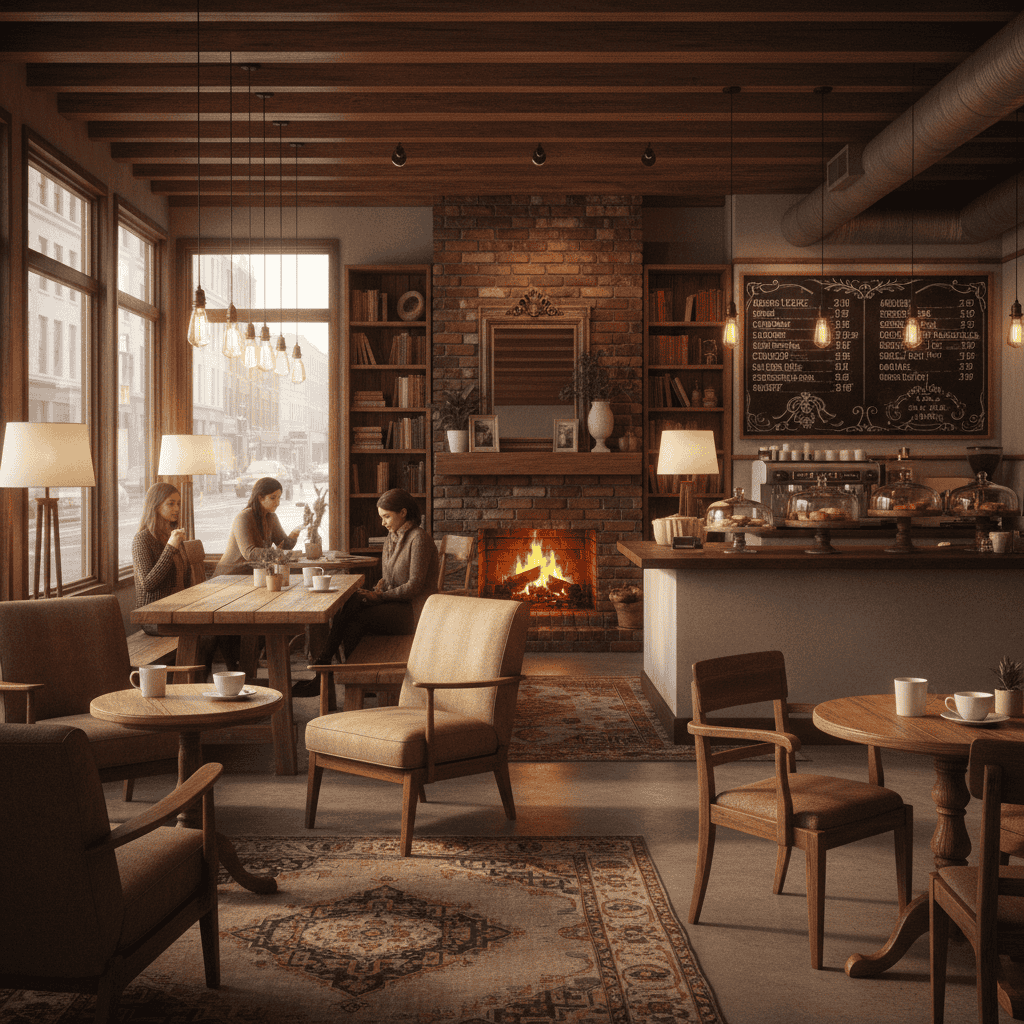
A cozy coffee shop interior featuring wooden beams, warm lighting, comfortable seating, and a welcoming atmosphere exactly as described in the prompt.
Every time you generate an image, Gemini gives you:
The response might also include text if Gemini wants to explain something about the image it created.
Now that you’ve seen the basic workflow, let’s try a few different prompts to see how the model responds to various descriptions:
# Simple object descriptions work great
"A red bicycle in a sunny park"

# You can add details about style and mood
"A modern kitchen with clean white cabinets and natural light"

# Describe the setting and atmosphere
"A peaceful lake surrounded by mountains at sunset"
Let’s see what these prompts actually generate when you run them:
Red bicycle in a sunny park:

A red bicycle perfectly positioned in a beautiful park with golden sunlight, lush greenery, and a peaceful bench setting. Notice the shadows — like a real image, the shadows are distorted when the surface changes from ground to grass.
Modern kitchen with clean white cabinets:
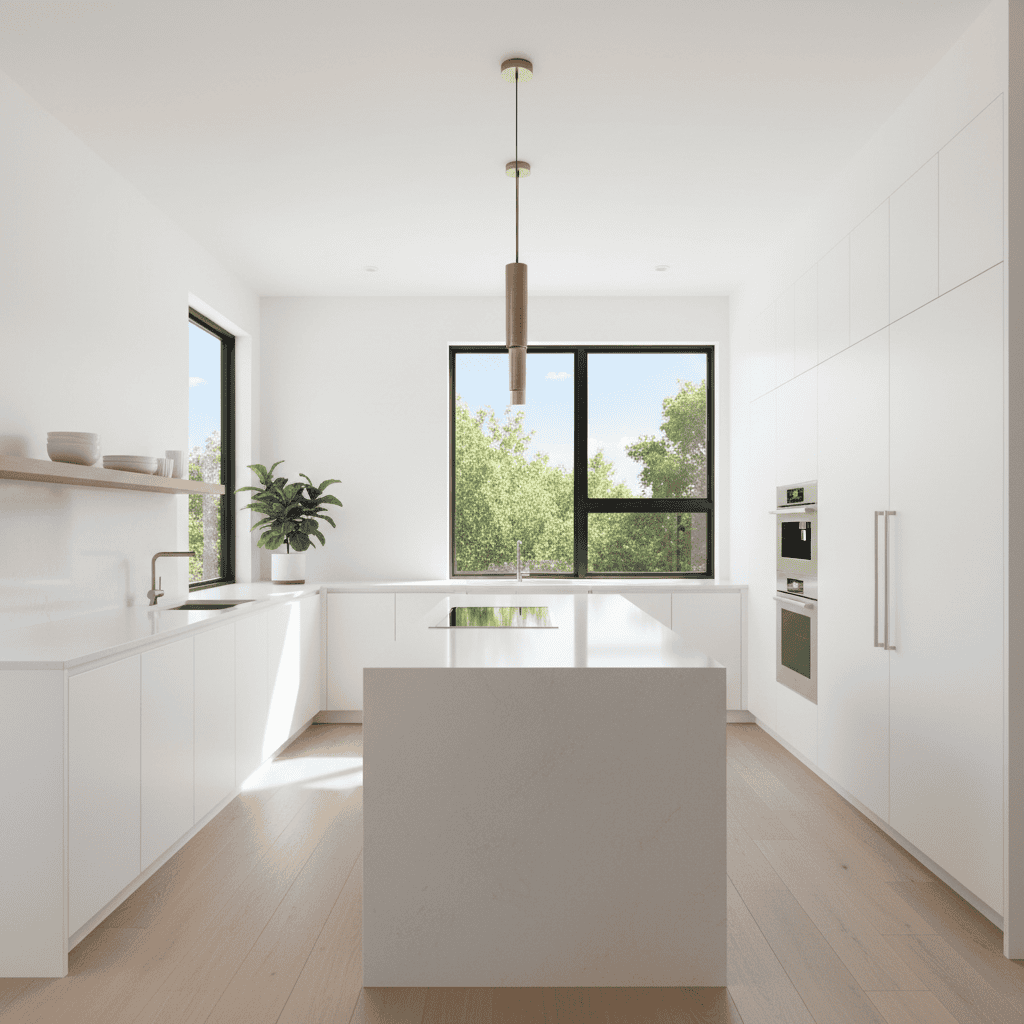
A sleek, contemporary kitchen design with pristine white cabinets, modern fixtures, and natural light streaming through large windows. Notice the reflections of the window on the clear surface of the table in the center.
Peaceful lake surrounded by mountains:
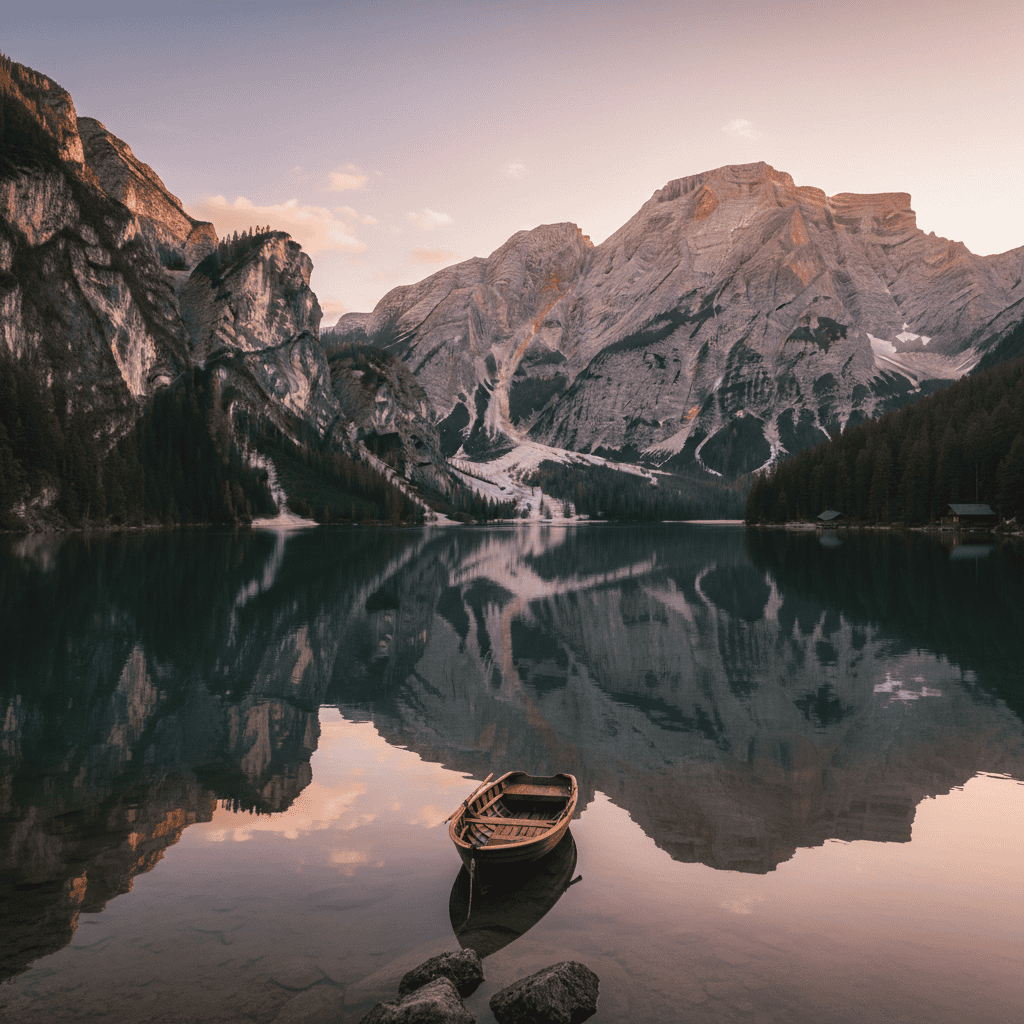
A tranquil mountain lake at sunset with perfect reflections, surrounded by dramatic peaks and featuring a charming wooden boat in the foreground. Again, exceptional detail in the reflections on the water’s surface.
Start with clear, simple descriptions. You can always make them more detailed as you get comfortable with how the model works.
These examples show the typical workflow, but you might encounter some issues along the way. Here’s how to handle the most common problems:
The next section will teach you how to write better prompts that give you more control over your results.
Now that you can generate basic images, let’s learn how to write prompts that give you more control over your results. The key is being specific about what you want while understanding how different techniques affect the final image.
For a deeper dive into the fundamentals of prompt engineering across all AI models, our comprehensive guide to prompt engineering for 2025 covers the latest techniques and strategies that apply to both text and visual AI.
The manual process we used in the previous section works fine for learning, but repeating all that code for each image gets tedious. Before diving into techniques, let’s create a helper function that streamlines the process:
def generateandsave_image(prompt, filename):
   """
   Generate an image and save it to the images folder

   Args:
       prompt (str): Description of what you want to create
       filename (str): Name for the saved image file

   Returns:
       bool: True if successful, False otherwise
   """
   try:
       response = client.models.generate_content(
           model="gemini-2.5-flash-image-preview",
           contents=[prompt]
       )

       # Find and save the image
       for part in response.candidates[0].content.parts:
           if part.inline_data is not None:
               image = Image.open(BytesIO(part.inline_data.data))
               image.save(f"images/{filename}")
               print(f"✅ Image saved as images/{filename}")
               return True

   except Exception as e:
       print(f"❌ Error: {e}")
       return False

   return False
This function handles the image generation and saving process for us. Now we can focus on writing better prompts instead of repeating the same code.
Here’s how to use it:
# Simple function call
generateandsave_image("A cozy reading nook", "readingnook.png")
Much cleaner than writing the full code every time!
The biggest improvement you can make to your prompts is adding specific details. Let’s see the difference between generic and detailed prompts.
Here’s a generic prompt:
generateandsave_image("A kitchen", "generickitchen.png")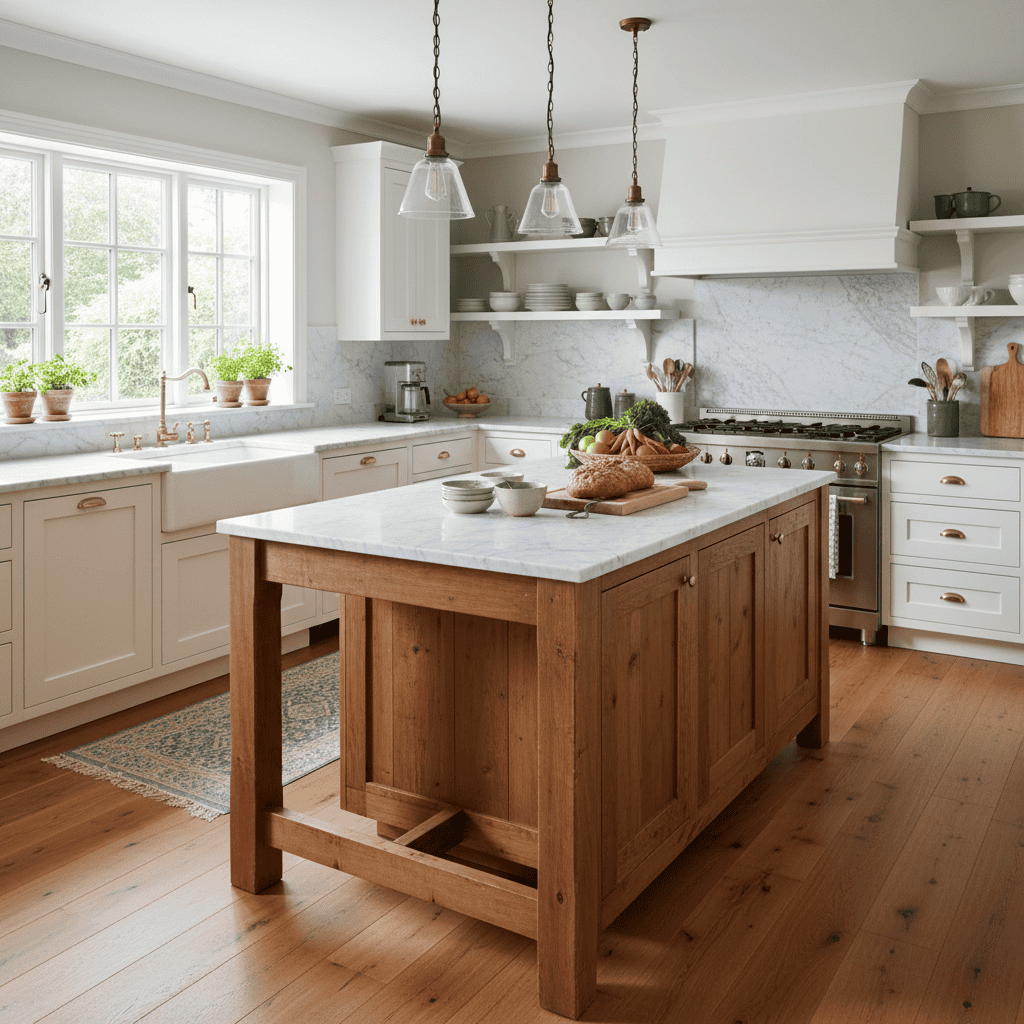
Generic prompt result: A basic kitchen that could be anywhere, with standard features but no distinctive character.
Now let’s try the same concept with specific details:
generateandsave_image(
   "Modern minimalist kitchen, white quartz countertops, stainless steel appliances, pendant lights, natural oak floors",
   "specific_kitchen.png"
)
Specific prompt result: A precisely designed kitchen with exactly the elements we requested, creating a cohesive modern aesthetic.
The difference is dramatic. The specific prompt gives you a professional-looking kitchen that matches exactly what you described. The generic one is fine, but much more unpredictable.
If you’re also working with other image generation models, our guide to Stable Diffusion techniques covers complementary prompting strategies that can improve your results across different AI platforms.
You can control how the image is framed using photography terms. This gives you precise control over the composition and perspective.
Wide angle shots capture more of the scene:
generateandsave_image(
   "Wide angle shot of modern living room, leather sofa, glass coffee table, floor to ceiling windows",
   "wideangleroom.png"
)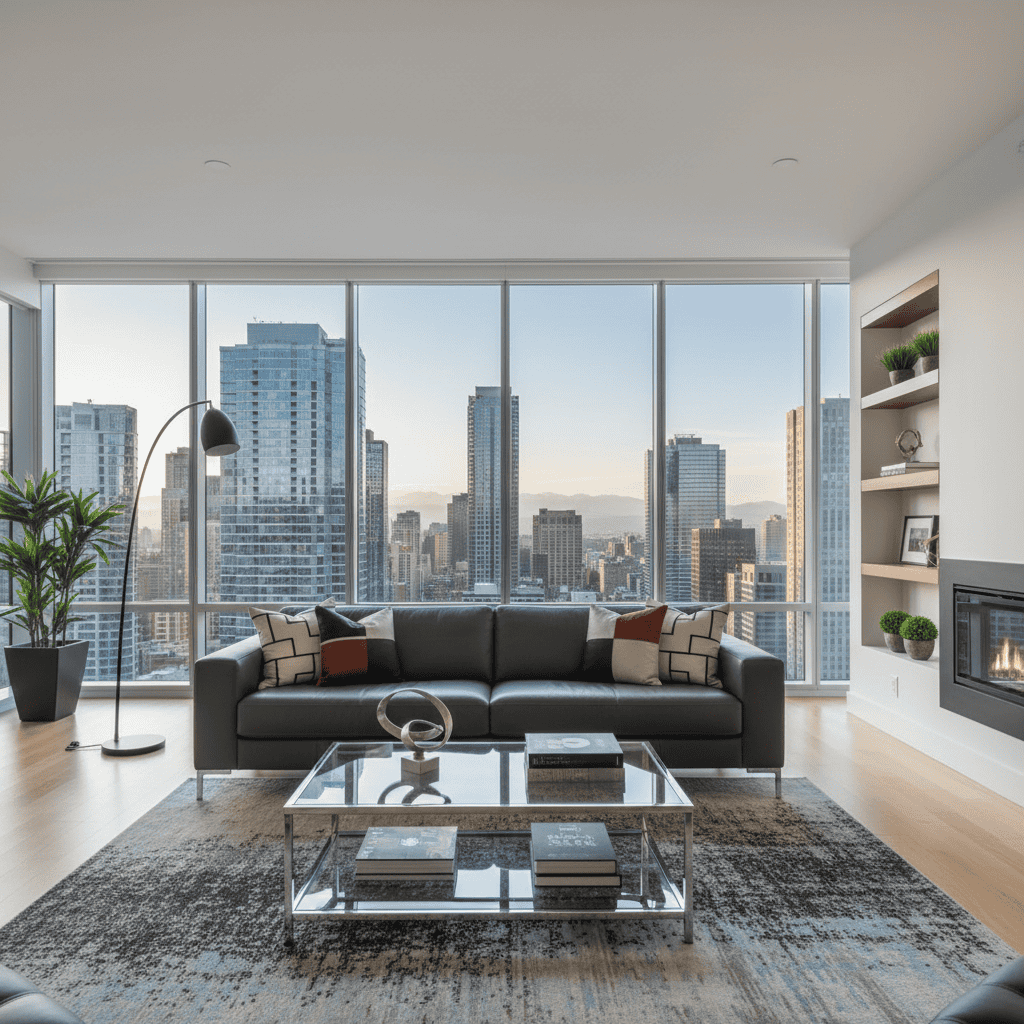
A wide-angle perspective captures the spacious room and impressive city view, making the space feel larger and more dramatic.
Macro shots focus on small details:
generateandsave_image(
   "Macro shot of vintage pocket watch on mahogany desk, brass details, Roman numerals, soft lighting",
   "macro_watch.png"
)
Macro photography reveals intricate details of the watch face, chain, and surrounding vintage books, creating an intimate and detailed composition.
Other useful camera terms:
"Low angle shot" - Looking up at the subject"Bird's eye view" - Looking down from above"85mm portrait lens" - Creates shallow depth of field"Dutch angle" - Tilted perspective for dramaLighting descriptions can completely change the feel of your images. Here’s how to use lighting to create specific moods.
Golden hour lighting creates warmth:
generateandsave_image(
   "Empty park bench at golden hour, warm sunlight, long shadows, autumn leaves scattered, peaceful atmosphere",
   "goldenhourbench.png"
)
Golden hour lighting creates a simple park bench into a warm, inviting scene perfect for contemplation.
Dramatic lighting adds intensity:
generateandsave_image(
   "Dark stormy sky over empty lighthouse, dramatic lighting, waves crashing on rocks, moody atmosphere",
   "dramatic_lighthouse.png"
)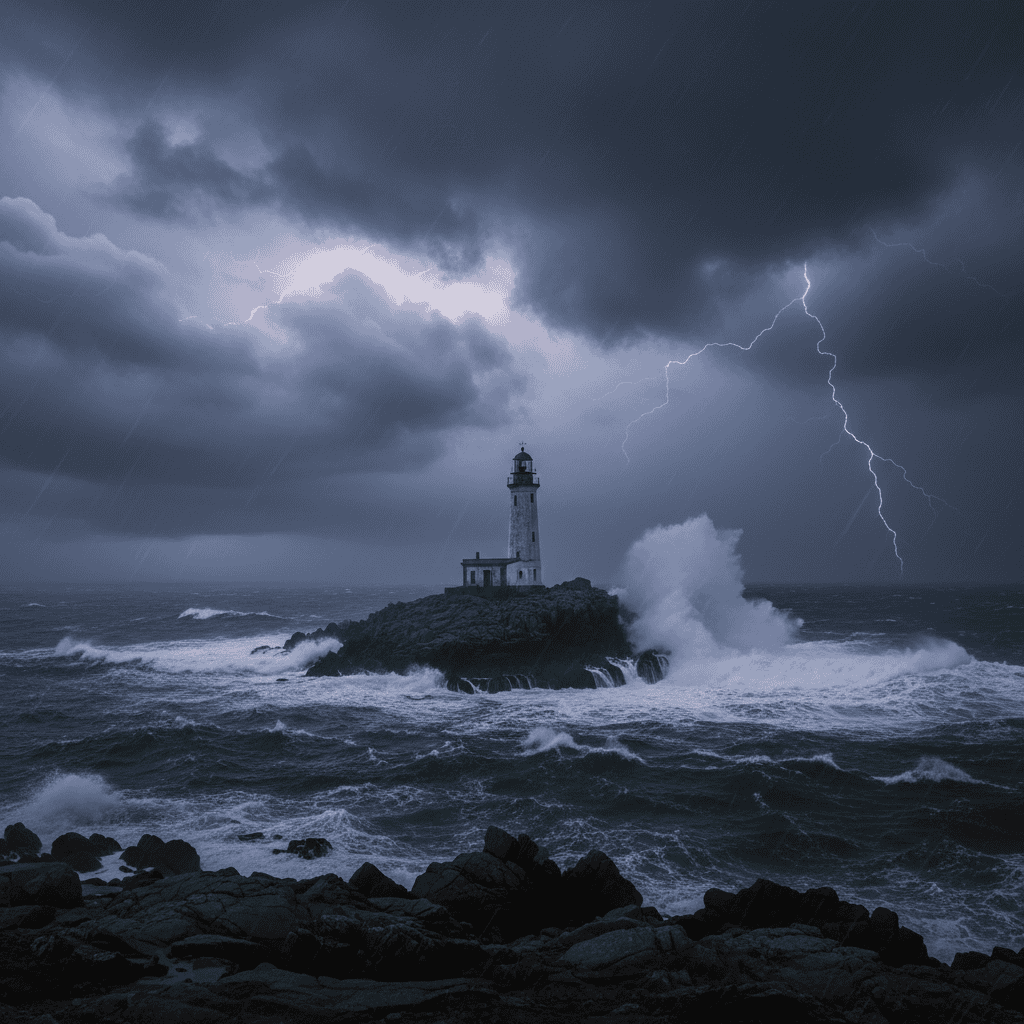
Dramatic lighting and stormy weather create a powerful, moody scene that evokes strength and solitude.
Useful lighting terms:
"Soft natural light" - Gentle, even illumination"Harsh shadows" - Strong contrast and drama"Backlit" - Light coming from behind the subject"Studio lighting" - Clean, professional setupYou can guide the artistic style by including specific aesthetic descriptions in your prompts.
Minimalist style:
generateandsave_image(
   "Minimalist bedroom design, white walls, simple wooden bed frame, single potted plant, clean lines, natural light",
   "minimalist_bedroom.png"
)
Minimalist design principles create a calm, uncluttered space that feels both modern and timeless.
Vintage style:
generateandsave_image(
   "Vintage coffee shop interior, exposed brick walls, antique furniture, Edison bulb lighting, weathered wood tables, nostalgic atmosphere",
   "vintagecoffeeshop.png"
)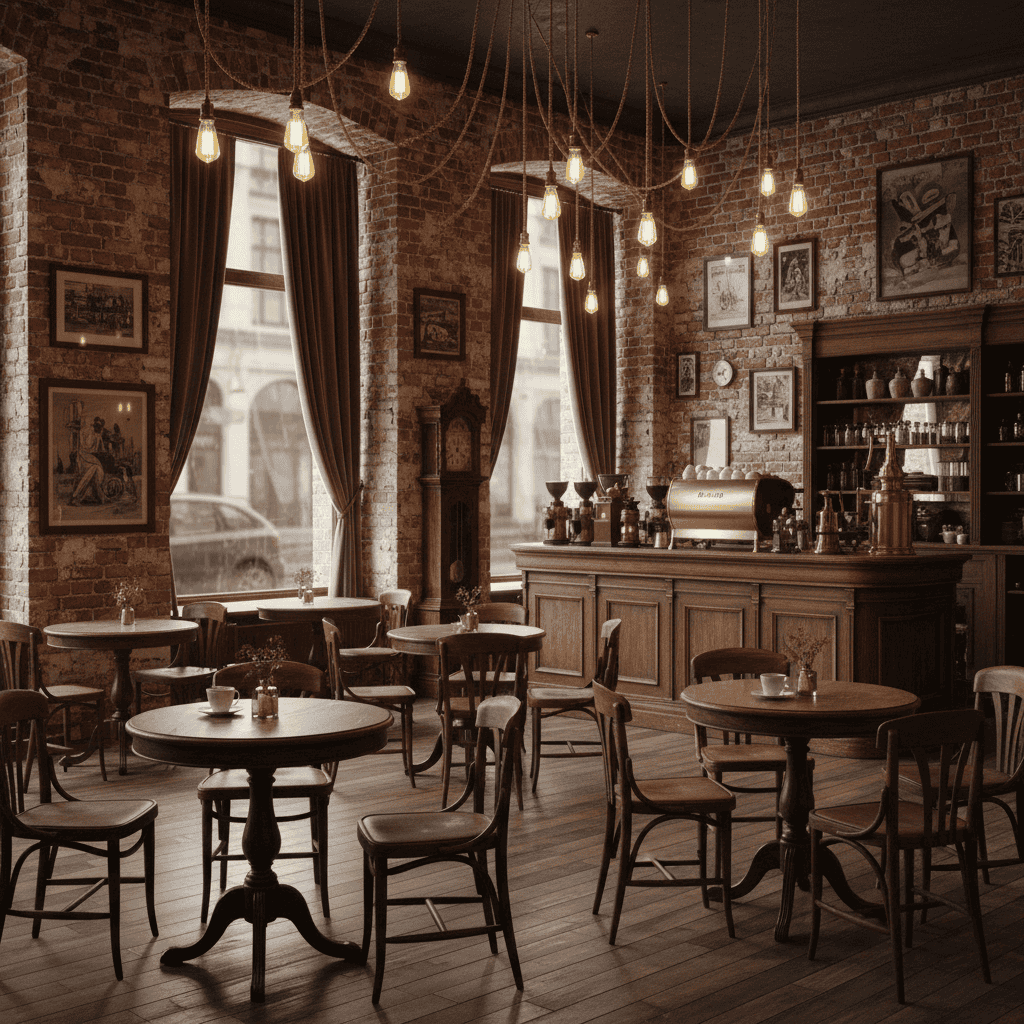
Vintage styling elements combine to create a nostalgic coffee shop that feels lived-in and authentic.
Popular style directions:
"Industrial design" - Raw materials, exposed elements"Scandinavian style" - Light woods, clean lines, cozy textures"Art deco" - Geometric patterns, metallic accents"Rustic charm" - Natural materials, worn texturesGemini 2.5 Flash Image excels at adding readable text directly into images. Keep text short (under 25 characters works best) for clean results.
generateandsave_image(
   "Restaurant menu board with 'DAILY SPECIALS' text, chalk lettering on black board, wooden frame, warm lighting",
   "menuboardtext.png"
)
Perfect text integration with decorative elements and pricing, showing how the model handles both typography and menu layout naturally.
The model automatically added menu items and prices to make the scene more realistic. This shows how Gemini understands context and creates logical, complete compositions.
The most powerful prompts combine multiple techniques. Here’s how to layer different elements:
# Combining camera control + lighting + style + specific details
generateandsave_image(
   "Low angle shot of modern office lobby, dramatic uplighting, marble floors, geometric ceiling, professional atmosphere",
   "professional_lobby.png"
)
Here’s the resulting image that shows all these techniques working together:
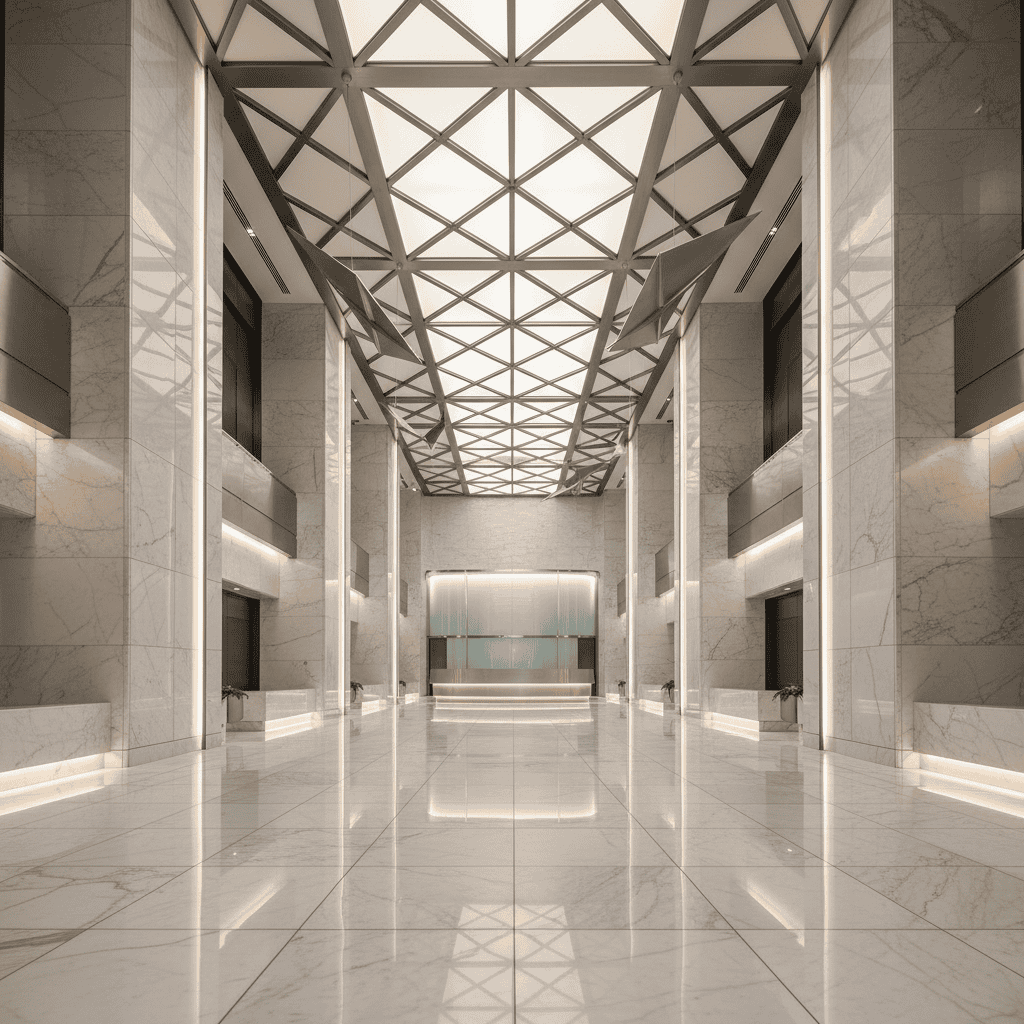
This prompt combines:
Remember that you can always refine your images by describing changes you want to make. Gemini excels at iterative improvements, which brings us to the advanced features that make this model special.
For readers interested in understanding how Gemini 2.5 Flash Image compares to other Google AI tools, our Gemini 2.0 Flash tutorial explores the broader capabilities of Google’s latest multimodal AI system.
The prompt engineering techniques you just learned form the foundation for more advanced operations. Now we can apply these skills to Gemini’s most powerful features that set it apart from other models:
One of the most powerful features is combining multiple images to create something new. This works differently from simple image blending — Gemini understands the objects and contexts in each image and can intelligently merge them.
For this example, we’ll assume you’ve already generated the base components using the techniques from the previous sections. Here’s how to combine them:
# Load the base images for composition
gemstone_img = Image.open("https://cdn-images-1.medium.com/proxy/1*zy36GlKisNwsmJ0PwwHODw.png")
setting_img = Image.open("https://cdn-images-1.medium.com/proxy/1*fpNU31VkSznr1NTHbUx-mA.png")

# Compose them with specific instructions
response = client.models.generate_content(
   model="gemini-2.5-flash-image-preview",
   contents=[
       "Mount the rare tanzanite gemstone perfectly into the platinum Art Nouveau setting, creating an exquisite luxury engagement ring, professional jewelry photography with dramatic lighting",
       gemstone_img,
       setting_img
   ]
)
Base images used for composition:
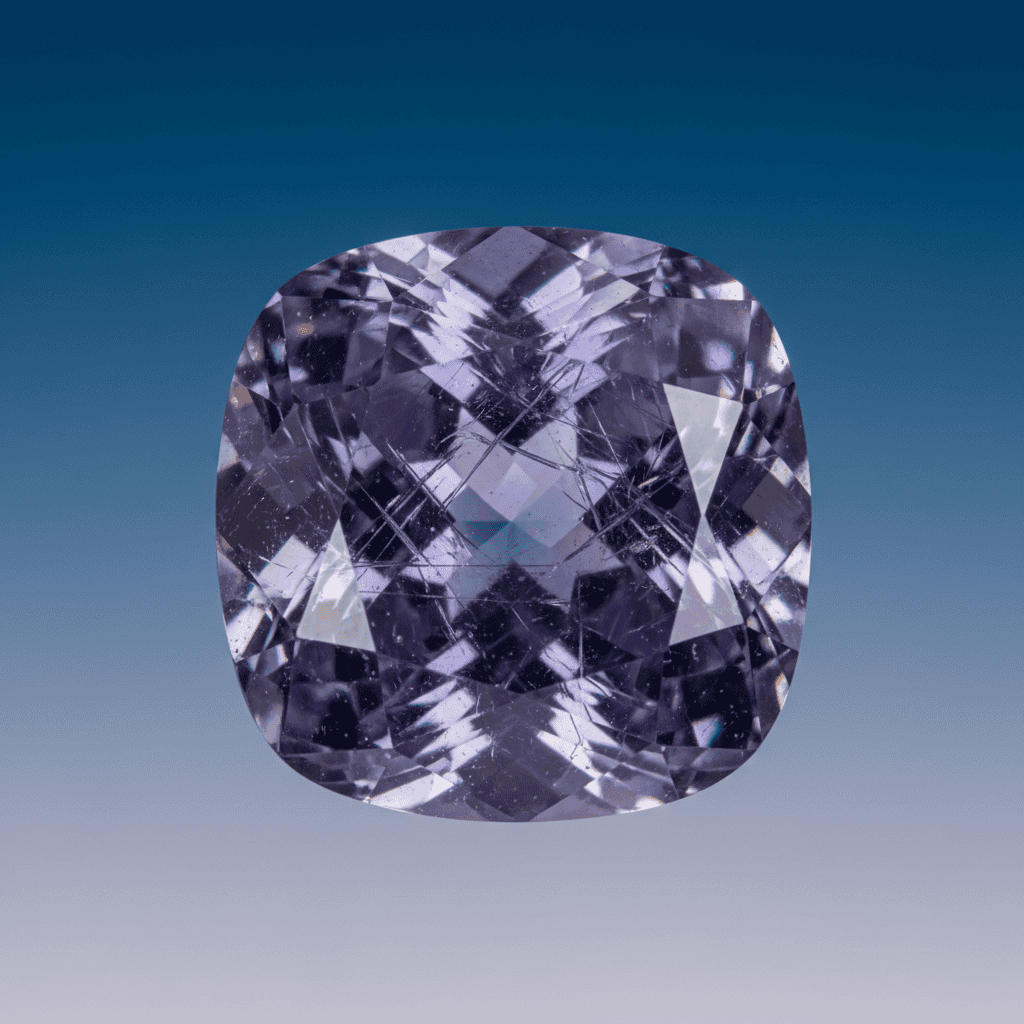
Base component 1: Rare tanzanite gemstone with exceptional clarity and prismatic internal structures.

Base component 2: Platinum Art Nouveau setting with masterful filigree craftsmanship.
The composed result:
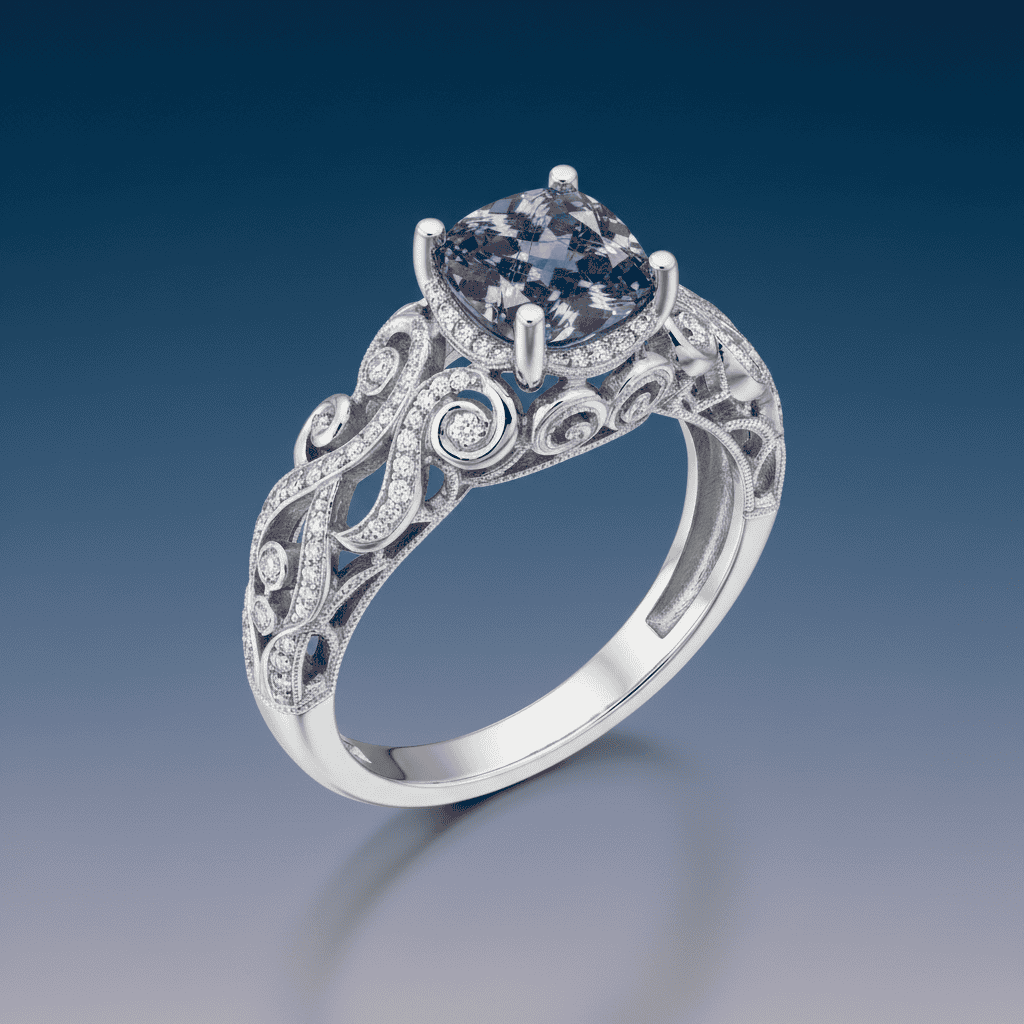
Final composition: The gemstone and setting are seamlessly combined into a luxury piece with perfect lighting that highlights both elements.
The secret to professional composition is being specific about:
This technique works well for:
Unlike most image models that require starting over for changes, Gemini 2.5 Flash Image lets you make progressive improvements through conversation. This makes it perfect for professional design workflows where you need to develop concepts.
Let’s work through premium audio equipment development:
# Step 1: Start with concept design
concept_img = Image.open("https://cdn-images-1.medium.com/proxy/1*2qw1o9vPjUMHCwYnvHiYbA.png")

# Step 2: First refinement - luxury materials
response1 = client.models.generate_content(
   model="gemini-2.5-flash-image-preview",
   contents=[
       "Refine this speaker with premium ebony wood veneer finish, hand-polished surfaces, subtle gold accent lines, maintaining same proportions",
       concept_img
   ]
)

# Step 3: Second refinement - high-tech features
luxuryimg = Image.open("https://cdn-images-1.medium.com/proxy/1*kytHi4QRCmbor1e35Nyyw.png")

response2 = client.models.generate_content(
   model="gemini-2.5-flash-image-preview",
   contents=[
       "Add sophisticated LED indicators, premium fabric grille, wireless connectivity features, maintaining all luxury finishes",
       luxury_img
   ]
)
Step 1: Concept design

Starting concept: Clean geometric design showing sophisticated engineering and premium material foundations.
Step 2: Luxury materials refinement
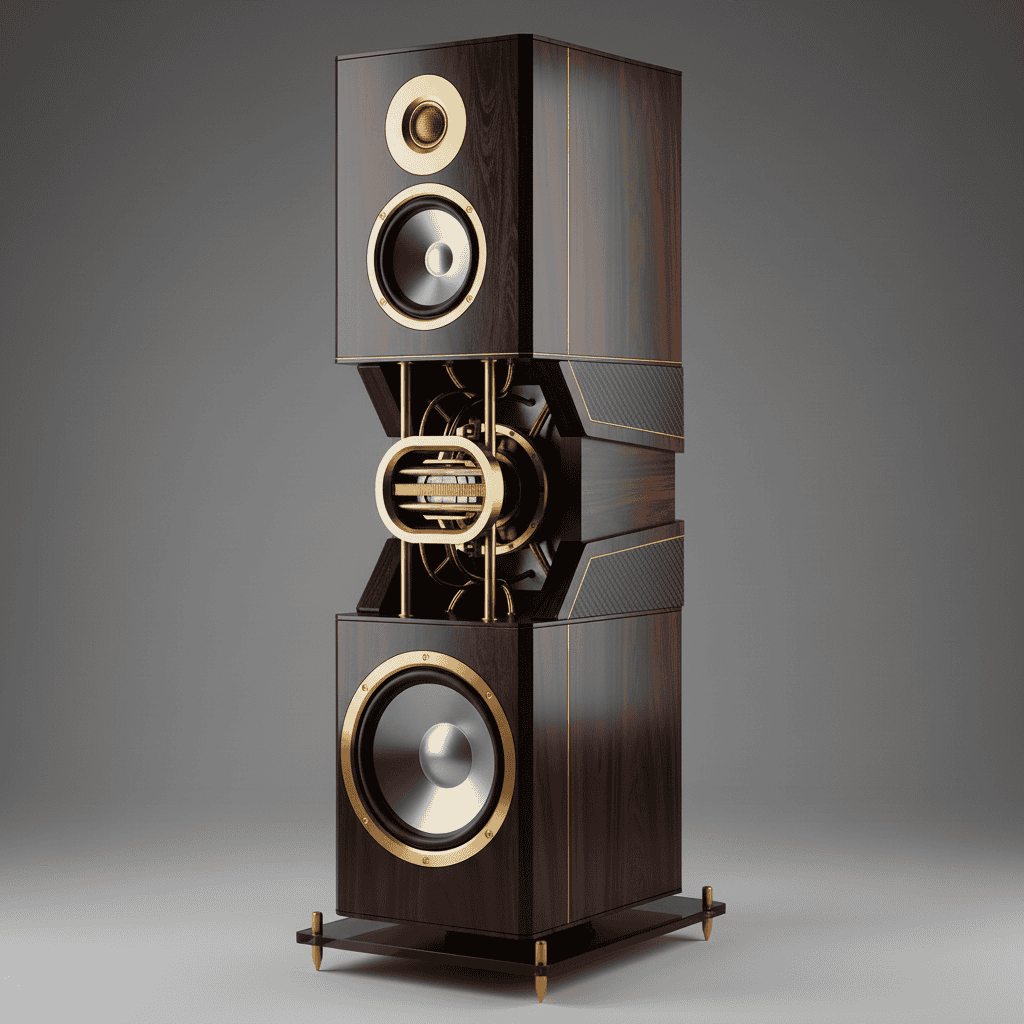
First iteration: Added luxury ebony wood veneer and hand-polished gold accents while preserving the original proportions.
Step 3: High-tech integration
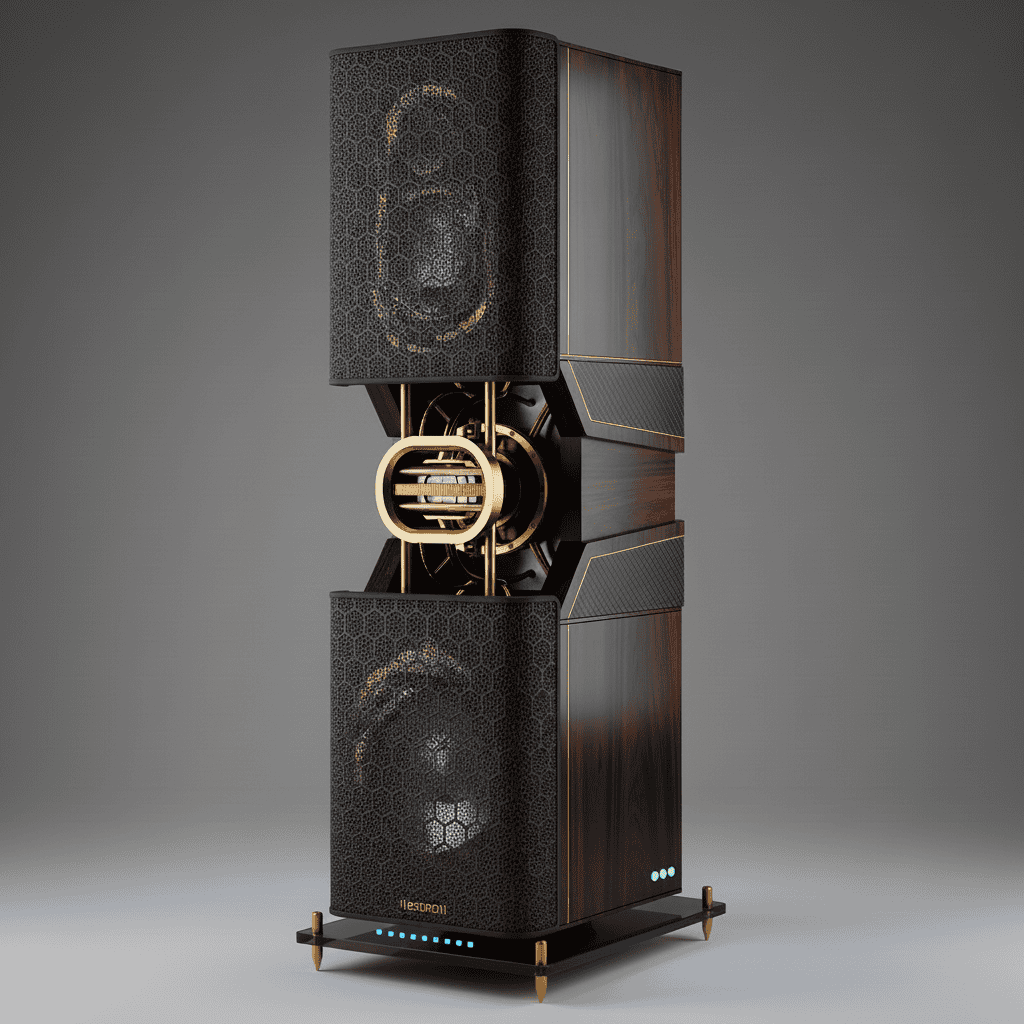
Final iteration: Integrated sophisticated LED indicators and premium fabric grille while maintaining all luxury finishes.
Best practices for professional iterative refinement:
Maintaining consistent characters across multiple contexts is important for luxury brand development and sophisticated marketing campaigns. Gemini handles this by understanding the visual DNA of characters and preserving it across different professional applications.
Here’s how to develop a sophisticated brand mascot:
# After creating your base character
basemascot = Image.open("https://cdn-images-1.medium.com/proxy/1*Szx9SZ9UPl7zsa5NKUDVg.png")

# Generate consistent applications
response1 = client.models.generate_content(
   model="gemini-2.5-flash-image-preview",
   contents=[
       "Show this exact crystal mascot in an upscale jewelry boutique, maintaining identical facets and rose-gold glow",
       base_mascot
   ]
)

response2 = client.models.generate_content(
   model="gemini-2.5-flash-image-preview",
   contents=[
       "Show this exact crystal mascot on luxury packaging design, maintaining identical geometric form and internal glow",
       base_mascot
   ]
)
Step 1: Establish the brand character
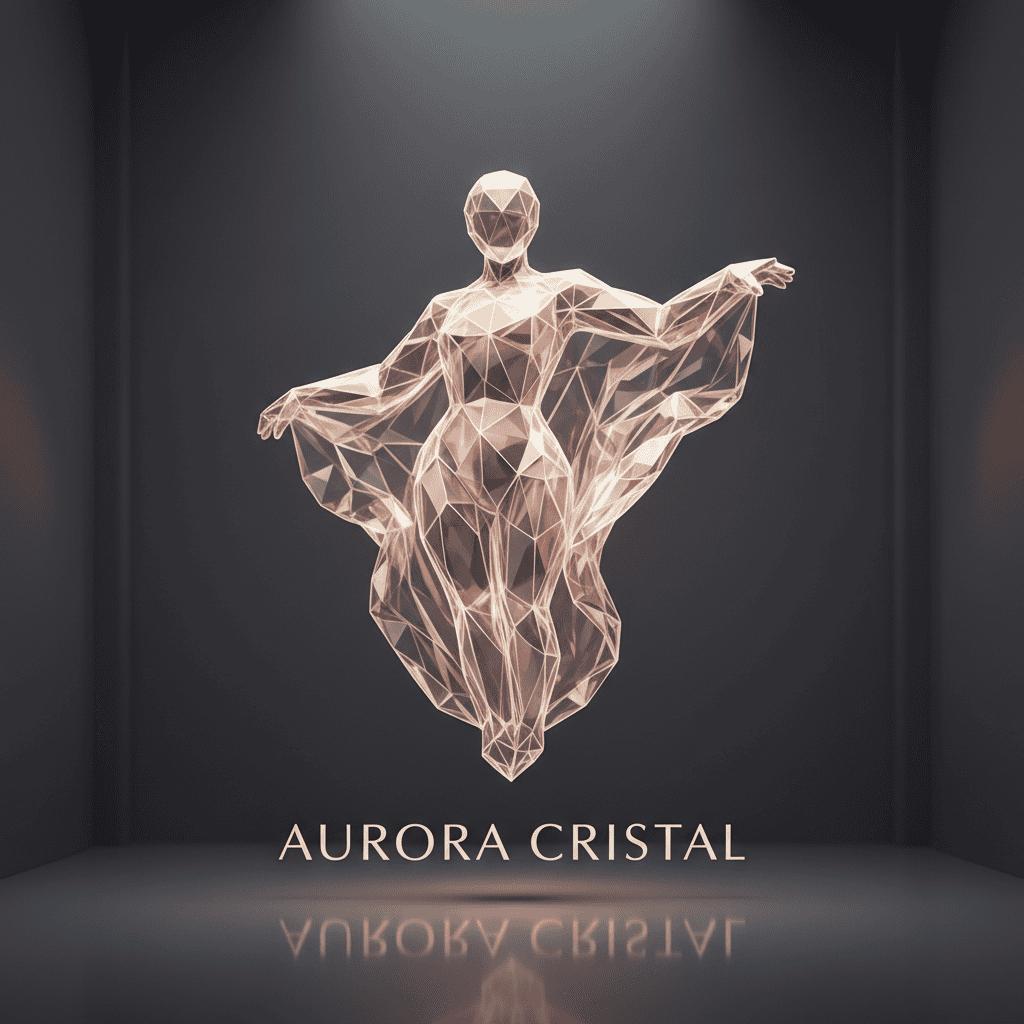
Brand character foundation: Sophisticated crystal being with distinctive geometric facets and rose-gold internal luminescence.
Step 2: Retail environment application
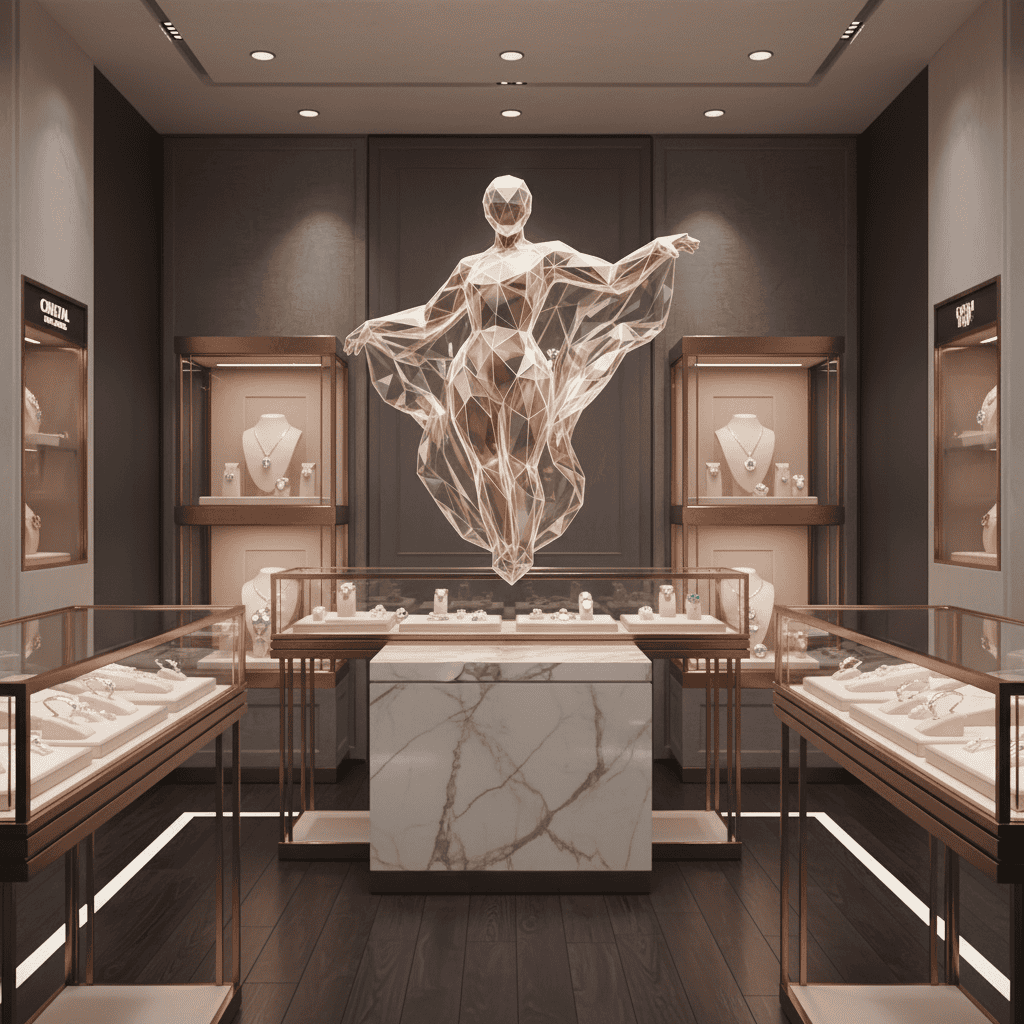
Boutique application: Character maintains exact geometric facets and glow while adapting to luxury retail context.
Step 3: Packaging design integration

Packaging integration: Identical character adapted to premium packaging aesthetic with consistent visual identity.
Step 4: Digital interface presence

Digital application: Character consistency maintained across digital platforms with identical geometric properties.
The phrase for professional consistency is “this exact [character]” combined with specific feature callouts: “maintaining identical facets”, “same geometric form”, “identical rose-gold glow”.
Professional character consistency works best when you:
This feature is valuable for:
Beyond editing content, you can change the entire aesthetic style of objects while maintaining their core structure. This is powerful for testing different design directions quickly.
Base object for style testing:

Starting point: A sophisticated sculptural chair design that we’ll change into completely different styles.
Cyberpunk transformation:
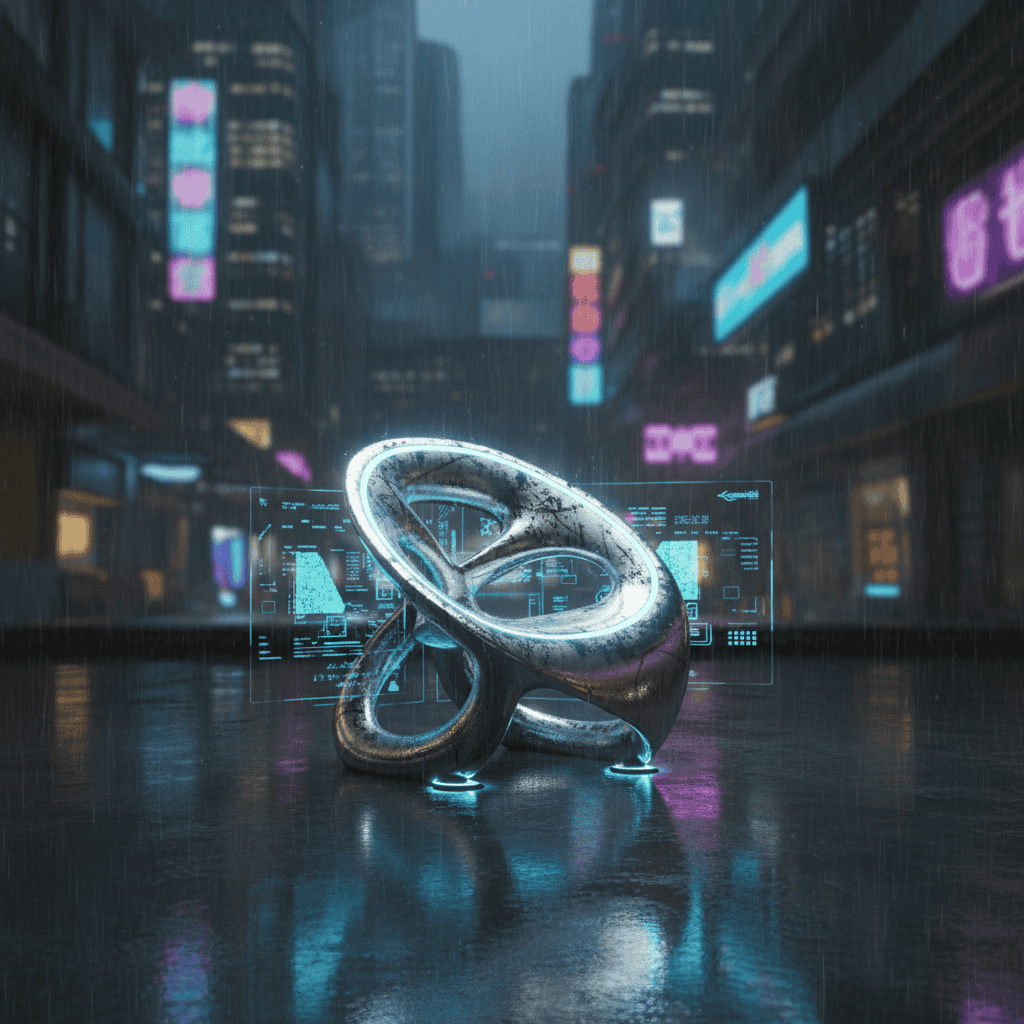
Cyberpunk version: Futuristic high-tech aesthetic with neon accents and metallic finishes, while preserving the chair’s basic form.
Victorian Baroque transformation:
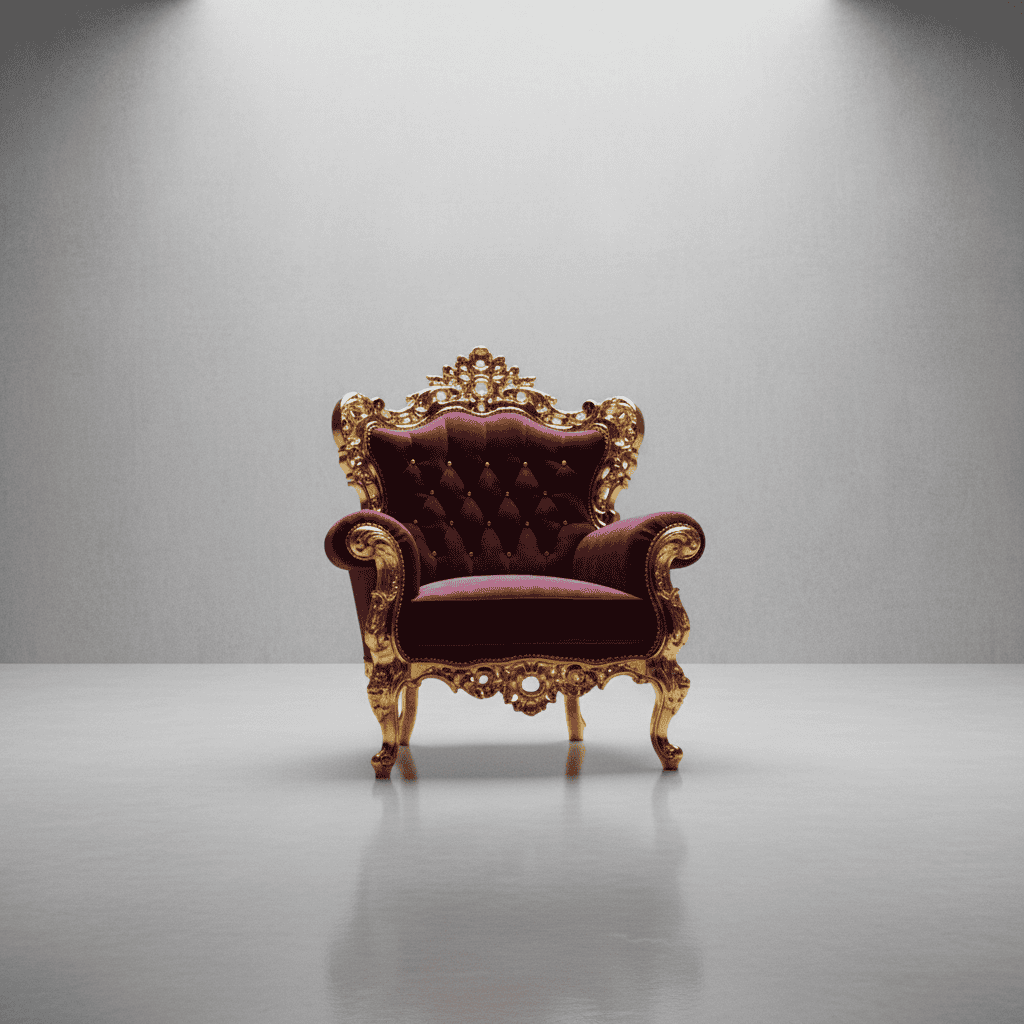
Baroque style: Rich, ornate classical design with luxurious materials and intricate details, maintaining the same underlying structure.
The pattern for style transfer:
# Load your base object
base_object = Image.open("https://cdn-images-1.medium.com/proxy/1*TWO2meqMNnS1-6XSO6yv7Q.png")

# Apply style transformations
response = client.models.generate_content(
   model="gemini-2.5-flash-image-preview",
   contents=[
       "Change this chair into cyberpunk style with neon LED strips, chrome frame, futuristic aesthetic",
       base_object
   ]
)
Style transfer applications:
These advanced features , multi-image composition, iterative refinement, character consistency, and style transfer, represent the core advantages that make Gemini 2.5 Flash Image particularly powerful for professional workflows.
Gemini 2.5 Flash Image takes a different approach to image generation. You can edit images through conversation rather than starting over each time you need changes. The character consistency feature keeps visual elements looking the same across different scenes, and multi-image composition lets you combine elements in ways that feel natural rather than forced.
The token-based pricing structure gives you predictable costs for project planning. When you’re ready to go beyond these basics, the official documentation covers additional features and stays current with new releases. The techniques in this tutorial should give you a solid foundation for incorporating conversational image generation into your workflow.
For those interested in expanding their AI toolkit beyond Gemini, our practical guide to image editing with Gemini explores additional editing capabilities, while our DALL-E 3 tutorial covers OpenAI’s alternative approach to AI image generation.
Top DataCamp Courses
Track
Course
Course
blog
Alex Olteanu
8 min
Tutorial
Bex Tuychiev
Tutorial
François Aubry
Tutorial
François Aubry
Tutorial
François Aubry
Tutorial
Abid Ali Awan