Course
Efficient AI Model Training with PyTorch
4 hr
1.5K
Google recently released Gemma 3 270M, an ultra-compact 270-million parameter model that represents a new paradigm in efficient AI deployment. Unlike massive general-purpose models, Gemma 3 270M is designed for task-specific fine-tuning while maintaining instruction-following capabilities right out of the box.
In this tutorial, I'll show you how to get started with Gemma 3 270M and demonstrate why it's a great choice for developers who need:
We keep our readers updated on the latest in AI by sending out The Median, our free Friday newsletter that breaks down the week’s key stories. Subscribe and stay sharp in just a few minutes a week:
Gemma 3 270M is a compact foundation model, designed to deliver strong instruction-following and structured text generation, all with just 270 million parameters. It’s the smallest member of the Gemma 3 family, yet it inherits the same architecture and training recipes as larger variants like Gemma 3 1B and 4B.
Unlike general-purpose large models, Gemma 3 270M is focused on efficiency and specialization. Here are a few key pointers about this model:
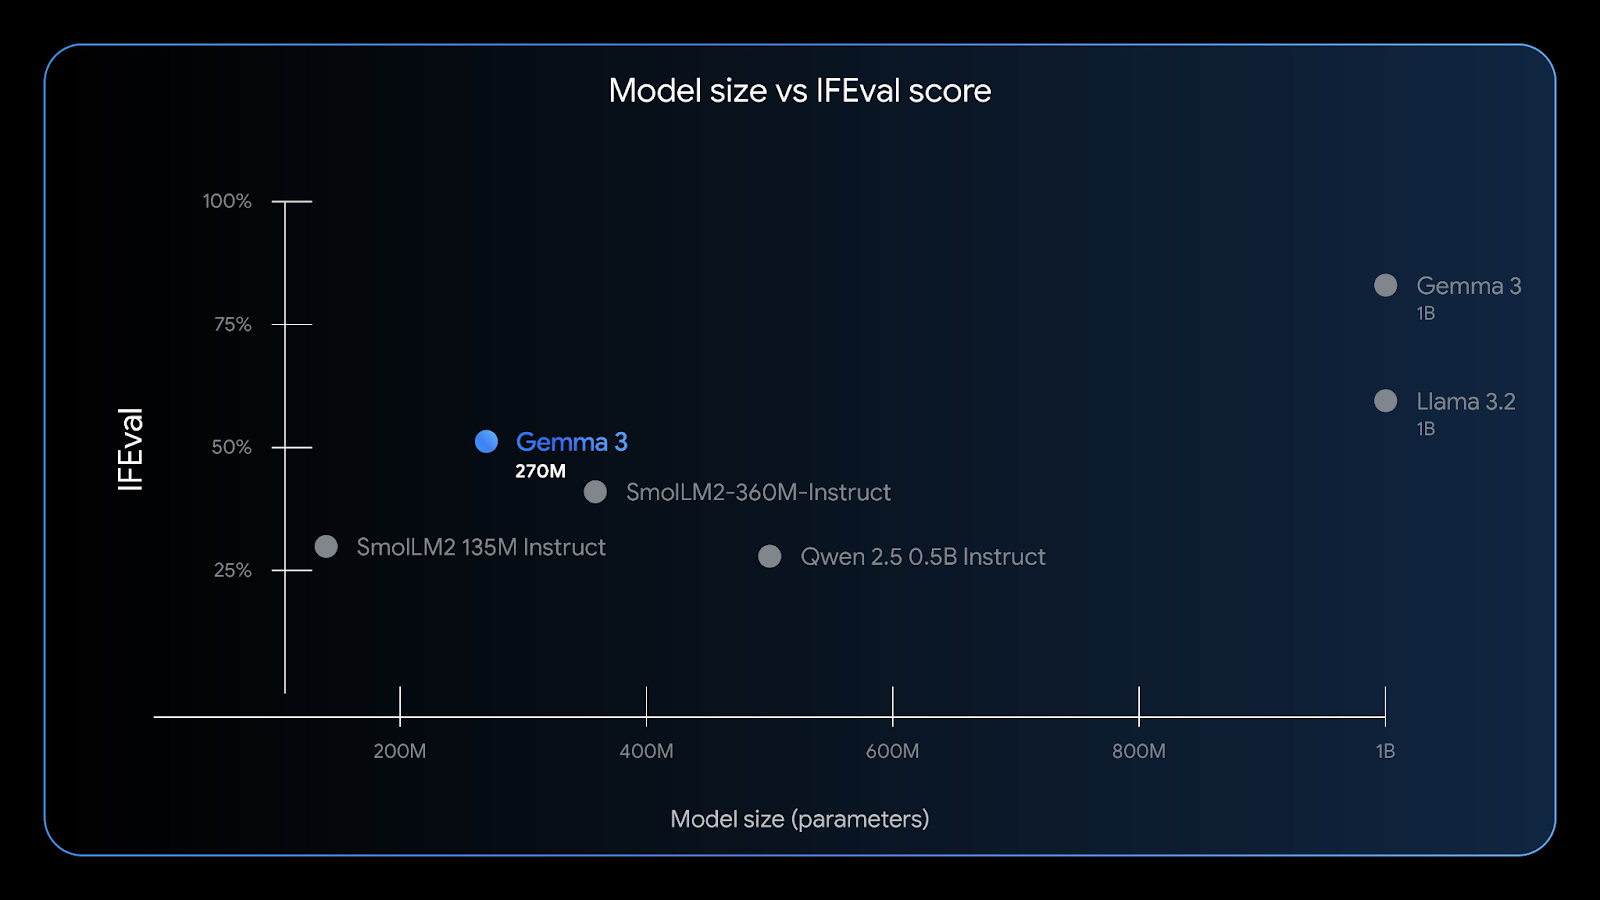
Gemma 3 270M has good instruction-following capabilities—the IFEval benchmark tests a model’s ability to follow verifiable information. Source: Google
With a 32K context window, low memory usage, and robust accuracy on tasks like entity extraction, classification, and lightweight compliance checks, Gemma 3 270M is perfect for edge AI developers seeking privacy, speed, and cost-efficiency.
There are several easy ways to get started with Gemma 3 270M, depending on your preferred platform:
You can deploy Gemma 3 on Google Cloud Run using a prebuilt GPU-accelerated container for scalable inference. For Gemma 3 270M, you need to build your container from the Gemma-on-CloudRun GitHub repo, as only larger variants (1B+) are prebuilt. Follow the instructions in the Google Cloud Run official guide to enable fast, secure, and cost-effective inference for web or backend applications.
The best user experience is on-device, using a quantized version of Gemma 3 270M (gemma3-270m-it-q8) and the official Gemma Gallery App from Google. This approach delivers extremely fast offline inference, strong privacy, and minimal battery usage.
You can also run Gemma 3 270M on your laptop using tools like:
.gguf or .litertlm extension in your LM Studio environment and run it right away within its chat interface or host it locally.ollama run gemma3:270m command to run this model locally on your machine.Gemma 3 270M is also available in Hugging Face Transformers, JAX, or Unsloth to fine-tune on your domain-specific data. The model’s small size makes it ideal for fast, low-cost experiments, and QAT checkpoints enable direct INT4 deployment post-finetuning.
Next, I’ll walk you through building a working Android app that uses the Gemma 3 270M model to process text prompts. We’ll use Google’s official Gallery repository as the base and customize it.
Let’s start by setting up a new project and cloning the original repository from Google.
On your laptop, start by opening the project as a new project in Android Studio and select an Empty Activity.
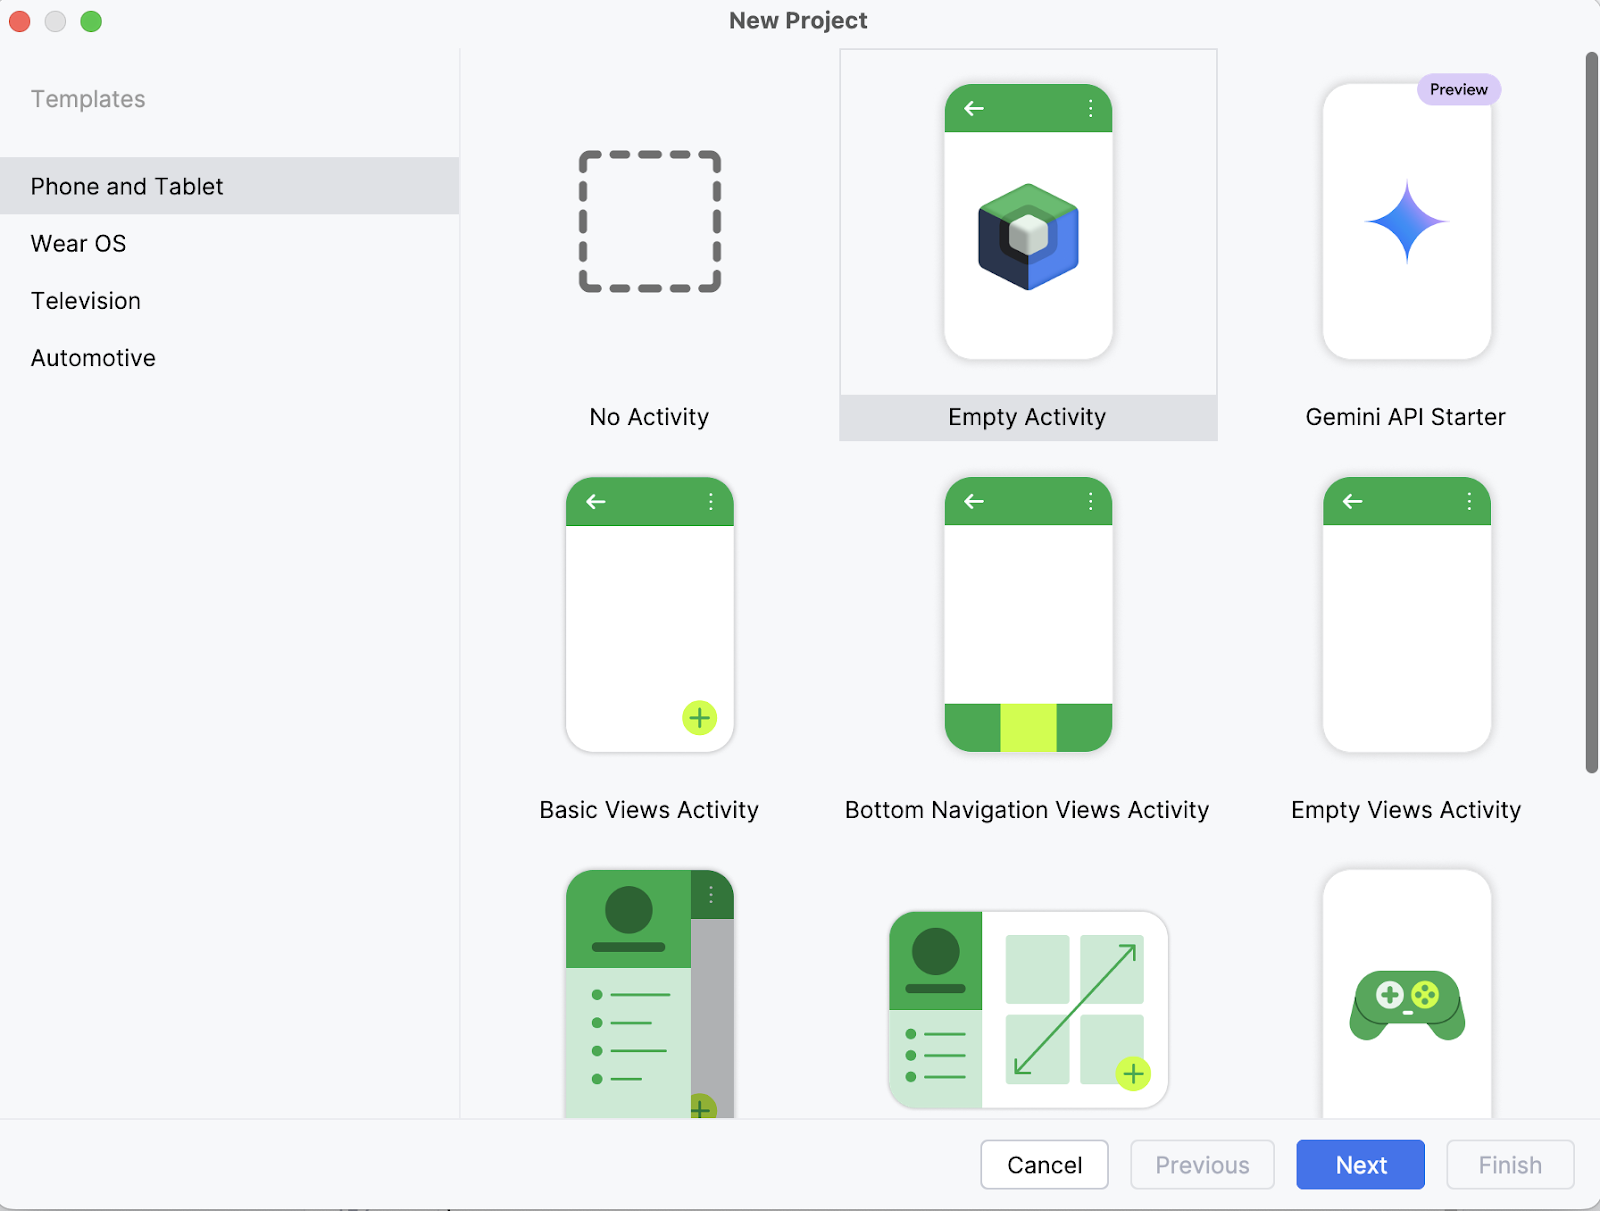
Next, fill in the name of your activity (for instance, “Gemma 3 270M”) and keep the rest as it is. Then, click Finish.
Now, open the terminal within Android Studio (bottom left corner) and execute the following bash commands:
git clone https://github.com/google-ai-edge/gallery
cd gallery/android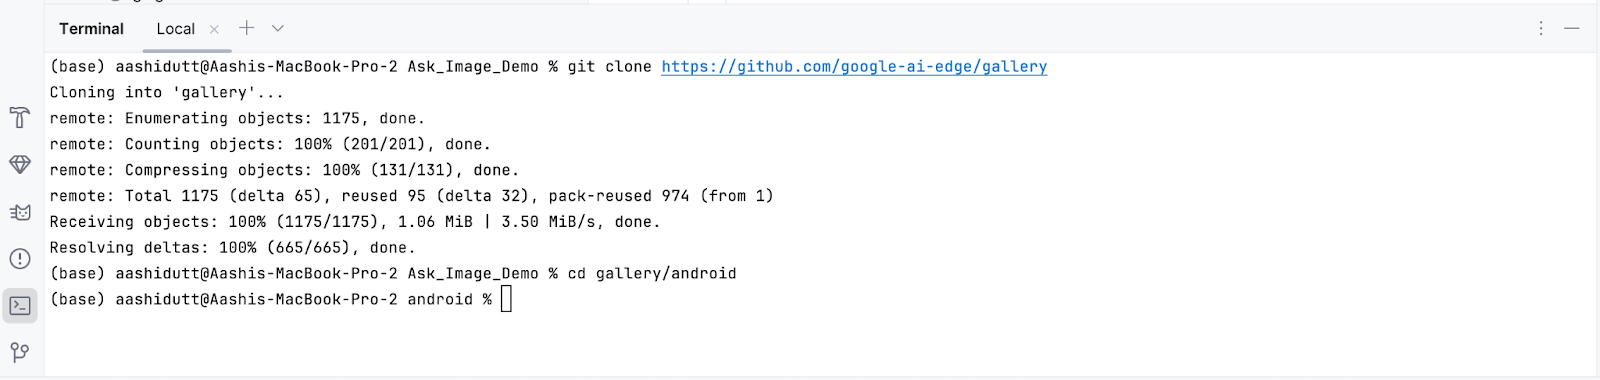
This will open your project. You can view all project files on the left side of the tab.
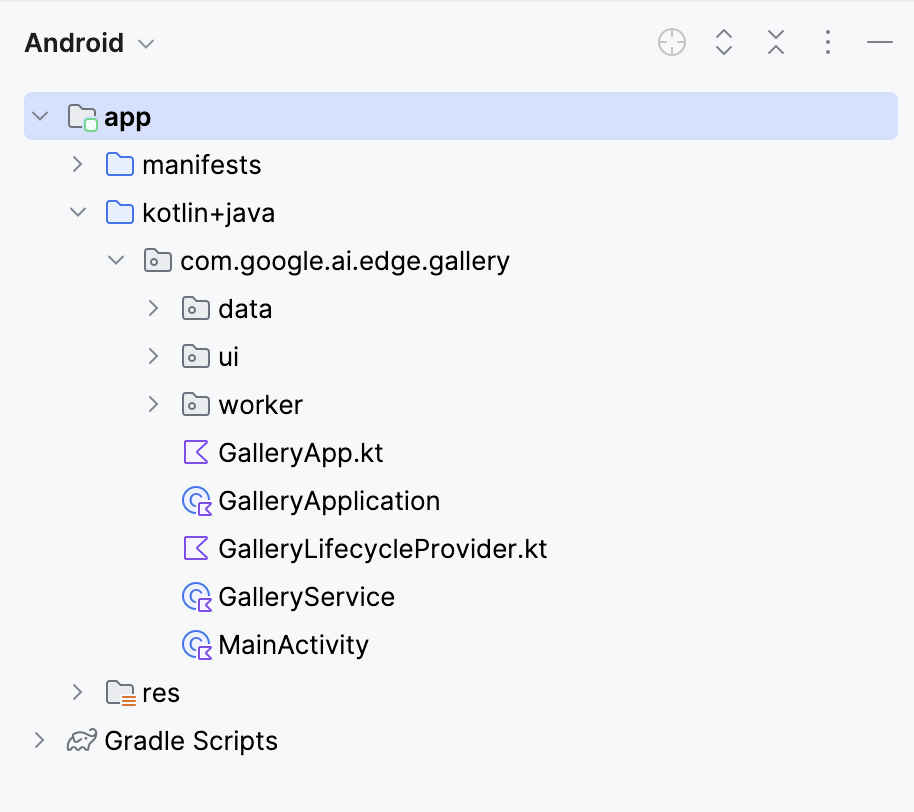
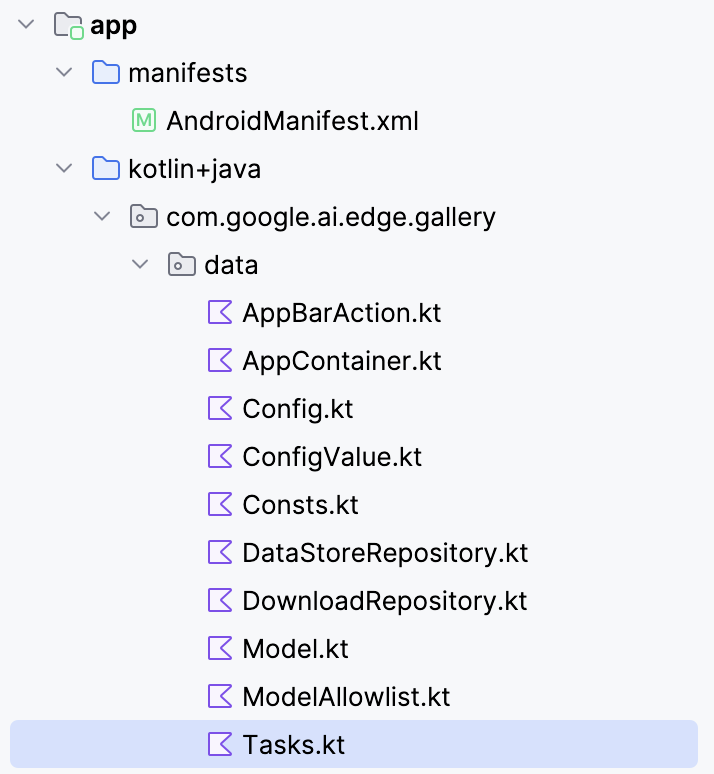
To connect the Gemma 3 270M model with your Android app, you’ll need to register it as a new task inside the app’s Tasks.kt file.
Navigate to the data/ folder and open the Tasks.kt file. There, you'll define a new task entry specifically for the Q8 quantized variant of the model gemma3-270m-it-q8, which is optimized for low-memory and on-device inference. This format is suited for mobile devices with limited RAM.
Note: For this tutorial, I’ll be using a Q8 model configuration, which requires less memory. You can access this model here: https://huggingface.co/litert-community/gemma-3-270m-it
val TASK_GEMMA_3_270M = Task(
  type = TaskType.LLM_PROMPT_LAB,
  icon = Icons.Outlined.Widgets,
  models = mutableListOf(
    Model(
      name = "gemma3-270m-it-q8",
      downloadFileName = "gemma3-270m-it-q8.task",
      url = "https://huggingface.co/litert-community/gemma-3-270m-it/resolve/main/gemma3-270m-it-q8.task",
      sizeInBytes = 318_767_104L
    )
  ),
  description = "Gemma 3 270M (Q8): On-device instruction-following LLM",
  docUrl = "https://ai.google.dev/gemma",
  sourceCodeUrl = "https://github.com/google-ai-edge/gallery",
  textInputPlaceHolderRes = R.string.chat_textinput_placeholder
)
Then, register this new task in the app by including it in the main task list:
/** All tasks */
val TASKS: List<Task> = listOf(
  TASK_LLM_ASK_IMAGE,
  TASK_LLM_CHAT,
  TASK_LLM_PROMPT_LAB,
  TASK_IMAGE_CLASSIFICATION,
  TASK_TEXT_CLASSIFICATION,
  TASK_IMAGE_GENERATION,
  TASK_GEMMA_3_270M
)
Here’s a breakdown of what the new LiteRT task definition does in the code:
TASK_GEMMA_3_270M variable registers Gemma 3 270M as a selectable option inside the app’s Tasks.kt file so that it shows up in the task list..task file: The above code points to the gemma3-270m-it-q8.task bundle hosted on Hugging Face, which gets downloaded within the app and used at runtime..task file contains the quantized model weights, tokenizer, metadata, and configs which are required for LiteRT to run the model efficiently.TASK_GEMMA_3_270M.By default, the Gallery app populates its model lists from a remote allowlist JSON. If your custom Gemma 3 270M entry isn’t included there, it won’t appear in the UI, even if you added TASK_GEMMA_3_270M in code. This step grafts your 270M model into the LLM Prompt Lab task after the allowlist loads, ensuring it’s selectable every time.
Open modelmanager/ModelManagerViewModel.kt, find loadModelAllowlist() function, and (after the loop that converts allowlisted models) append:
Log.d(TAG, "Adding TASK_GEMMA_3_270M models to LLM_PROMPT_LAB")
            for (gemmaModel in TASK_GEMMA_3_270M.models) {
              if (!TASK_LLM_PROMPT_LAB.models.any { it.name == gemmaModel.name }) {
                Log.d(TAG, "Adding model ${gemmaModel.name} to LLM_PROMPT_LAB")
                TASK_LLM_PROMPT_LAB.models.add(gemmaModel)
              }
Here is why this code is required:
TASK_LLM_PROMPT_LAB.models from the server allowlist at startup. Your local model would be wiped unless you re-inject it.any { it.name == gemmaModel.name } guard prevents duplicates when loadModelAllowlist() function runs again.Here is the complete function:
fun loadModelAllowlist() {
    _uiState.update {
      uiState.value.copy(
        loadingModelAllowlist = true, loadingModelAllowlistError = ""
      )
    }
    viewModelScope.launch(Dispatchers.IO) {
      try {
        withTimeoutOrNull(30000L) { // 30 second timeout
          // Load model allowlist json.
          Log.d(TAG, "Loading model allowlist from internet...")
          val data = getJsonResponse<ModelAllowlist>(url = MODEL_ALLOWLIST_URL)
          var modelAllowlist: ModelAllowlist? = data?.jsonObj
          if (modelAllowlist == null) {
            Log.d(TAG, "Failed to load model allowlist from internet. Trying to load it from disk")
            modelAllowlist = readModelAllowlistFromDisk()
          } else {
            Log.d(TAG, "Done: loading model allowlist from internet")
            saveModelAllowlistToDisk(modelAllowlistContent = data?.textContent ?: "{}")
          }
          if (modelAllowlist == null) {
            Log.e(TAG, "Failed to load model allowlist from both internet and disk")
            _uiState.update {
              uiState.value.copy(
                loadingModelAllowlist = false,
                loadingModelAllowlistError = "Failed to load model list"
              )
            }
            return@withTimeoutOrNull
          }
          Log.d(TAG, "Allowlist: $modelAllowlist")
          // Convert models in the allowlist.
          TASK_LLM_CHAT.models.clear()
          TASK_LLM_PROMPT_LAB.models.clear()
          TASK_LLM_ASK_IMAGE.models.clear()
          try {
            for (allowedModel in modelAllowlist.models) {
              if (allowedModel.disabled == true) {
                continue
              }
              val model = allowedModel.toModel()
              if (allowedModel.taskTypes.contains(TASK_LLM_CHAT.type.id)) {
                TASK_LLM_CHAT.models.add(model)
              }
              if (allowedModel.taskTypes.contains(TASK_LLM_PROMPT_LAB.type.id)) {
                TASK_LLM_PROMPT_LAB.models.add(model)
              }
              if (allowedModel.taskTypes.contains(TASK_LLM_ASK_IMAGE.type.id)) {
                TASK_LLM_ASK_IMAGE.models.add(model)
              }
            }
            // Add models from TASK_GEMMA_3_270M to LLM_PROMPT_LAB
            Log.d(TAG, "Adding TASK_GEMMA_3_270M models to LLM_PROMPT_LAB")
            for (gemmaModel in TASK_GEMMA_3_270M.models) {
              if (!TASK_LLM_PROMPT_LAB.models.any { it.name == gemmaModel.name }) {
                Log.d(TAG, "Adding model ${gemmaModel.name} to LLM_PROMPT_LAB")
                TASK_LLM_PROMPT_LAB.models.add(gemmaModel)
              }
            }
          } catch (e: Exception) {
            Log.e(TAG, "Error processing model allowlist", e)
          }
          // Pre-process all tasks.
          try {
            processTasks()
          } catch (e: Exception) {
            Log.e(TAG, "Error processing tasks", e)
          }
          // Update UI state.
          val newUiState = createUiState()
          _uiState.update {
            newUiState.copy(
              loadingModelAllowlist = false,
            )
          }
          // Process pending downloads.
          try {
            processPendingDownloads()
          } catch (e: Exception) {
            Log.e(TAG, "Error processing pending downloads", e)
          }
        } ?: run {
          // Timeout occurred
          Log.e(TAG, "Model allowlist loading timed out")
          _uiState.update {
            uiState.value.copy(
              loadingModelAllowlist = false,
              loadingModelAllowlistError = "Model list loading timed out"
            )
          }
        }
      } catch (e: Exception) {
        Log.e(TAG, "Error in loadModelAllowlist", e)
        _uiState.update {
          uiState.value.copy(
            loadingModelAllowlist = false,
            loadingModelAllowlistError = "Failed to load model list: ${e.message}"
          )
        }
      }
    }
}By default, the app assumes the currently picked task matches the clicked model. Once you inject Gemma 3 270M into the Prompt Lab task (Step 3), that assumption can break. This step makes the navigation model-aware, so taps, deep links, and restored state always land on the correct screen.
Open navigation/GalleryNavGraph.kt and update the model navigation control logic as follows:
Before:
onModelClicked = { model ->
  navigateToTaskScreen(
    navController = navController, taskType = curPickedTask.type, model = model
  )
}
After:
onModelClicked = { model ->
  Log.d("GalleryNavGraph", "Model clicked: ${model.name}, current task: ${curPickedTask.type}")
  val actualTask = when {
    TASK_LLM_CHAT.models.any { it.name == model.name } -> TASK_LLM_CHAT
    TASK_LLM_PROMPT_LAB.models.any { it.name == model.name } -> TASK_LLM_PROMPT_LAB
    TASK_LLM_ASK_IMAGE.models.any { it.name == model.name } -> TASK_LLM_ASK_IMAGE
    TASK_TEXT_CLASSIFICATION.models.any { it.name == model.name } -> TASK_TEXT_CLASSIFICATION
    TASK_IMAGE_CLASSIFICATION.models.any { it.name == model.name } -> TASK_IMAGE_CLASSIFICATION
    TASK_IMAGE_GENERATION.models.any { it.name == model.name } -> TASK_IMAGE_GENERATION
    else -> curPickedTask
  }
  Log.d("GalleryNavGraph", "Navigating to task: ${actualTask.type} for model: ${model.name}")
  navigateToTaskScreen(
    navController = navController, taskType = actualTask.type, model = model
  )
}
If a model appears in (or was injected into) a different task than the one currently selected, this code guarantees that the screen matches the model’s capabilities.
When dealing with deep links or restored state, the app may try to open a model that’s no longer available. Without proper handling, this would result in a blank screen. To avoid this, we add a safety check that if the model is missing, we log a warning and redirect the user. Here is how we do that:
// Added error handling for model not found:
if (model != null) {
  Log.d("GalleryNavGraph", "Model found for LlmChat: ${model.name}")
  modelManagerViewModel.selectModel(model)
  LlmChatScreen(/* ... */)
} else {
  Log.w("GalleryNavGraph", "Model not found for LlmChat, modelName: ${it.arguments?.getString("modelName")}")
  // Handle case where model is not found
  androidx.compose.runtime.LaunchedEffect(Unit) {
    navController.navigateUp()
  }
}
This code ensures the app stays functional. Instead of freezing or showing an empty screen, it safely navigates back using navController. This way, even if a model is missing, the user flow continues smoothly without breaking the overall experience.
Running a large language model on a mobile device differs from running one on a desktop computer. Storage can be unreliable, memory budgets are tighter, and initialization failures need to be handled to avoid app crashes. To make Gemma 3 270M (Q8, ~304MB) stable on Android, I introduced additional safety checks and failover strategies.
Before loading the model, the app performs sanity checks on the .task file. This ensures the model file exists, is readable, and is close to its expected size (within ±10%). This tolerance accounts for slight differences due to compression or packaging, while still catching corrupted or partial downloads.
// File validation and logging
Log.d(TAG, "Checking model file: $modelPath")
Log.d(TAG, "Model file exists: ${modelFile.exists()}")
Log.d(TAG, "Model file can read: ${modelFile.canRead()}")
Log.d(TAG, "Model file size: ${modelFile.length()} bytes")
Log.d(TAG, "Model file absolute path: ${modelFile.absolutePath}")
// Size validation with tolerance (10%)
val expectedSize = model.sizeInBytes
val fileSize = modelFile.length()
val sizeDifference = kotlin.math.abs(fileSize - expectedSize)
val sizeTolerance = (expectedSize * 0.1).toLong()
if (!modelFile.exists() || !modelFile.canRead() || sizeDifference > sizeTolerance) {
  onDone("Model file invalid (missing/unreadable/wrong size).")
  return
}
This snippet validates a model file before loading it. It logs basic details like path, readability, and size, then checks whether the file exists, is readable, and matches the expected size. If any of these checks fail, the function stops early via onDone() method instead of attempting inference and risking a crash.
Large models can give Out-Of-Memory (OOM) errors if you start aggressively (long outputs, GPU allocation spikes). To mitigate this, I added logic to dynamically choose the safest backend (CPU vs GPU/NPU) based on file size and device configuration, while also trimming max tokens for oversized binaries.
val preferredBackend = when {
  fileSize > 200_000_000L -> {
    Log.d(TAG, "Model is large (${fileSize / 1024 / 1024}MB), using CPU backend for safety")
    LlmInference.Backend.CPU
  }
  accelerator == Accelerator.CPU.label -> LlmInference.Backend.CPU
  accelerator == Accelerator.GPU.label -> LlmInference.Backend.GPU
  else -> LlmInference.Backend.CPU
}
val baseMaxTokens = 1024 // your default; tune to taste
val maxTokens = if (fileSize > 200_000_000L) {
  kotlin.math.min(baseMaxTokens, 512)
} else {
  baseMaxTokens
}
This ensures that large models default to CPU (safer but slower). The code checks the .task file’s byte size (fileSize) and compares it to a threshold (maxTokens). If it exceeds 200 MB, it switches inference to CPU and halves the token budget. This safeguards from memory spikes (from simultaneous GPU allocation) and oversized generation requests.
When initializing LiteRT, it’s important to distinguish between runtime creation and session creation. If session creation fails but you leave the runtime open, you can leak resources and lock memory, causing cascading failures. To fix this, I wrapped the code in try/catch blocks with explicit cleanup.
val llmInference = try {
  LlmInference.createFromOptions(context, options)
} catch (e: Exception) {
  Log.e(TAG, "Failed to create LlmInference instance", e)
  onDone("Failed to create model instance: ${e.message}")
  return
}
val session = try {
  LlmInferenceSession.createFromOptions(/* ... */)
} catch (e: Exception) {
  Log.e(TAG, "Failed to create LlmInferenceSession", e)
  try {
    llmInference.close()
  } catch (closeException: Exception) {
    Log.e(TAG, "Failed to close LlmInference after session creation failure", closeException)
  }
  onDone("Failed to create model session: ${e.message}")
  return
}
This try/catch guarantees clean rollback i.e. if runtime creation fails, nothing else proceeds, but if session creation fails, the runtime is explicitly closed. It ensures the heap-allocated llmInference object is disposed via .close(), releasing memory and file handles. Without this, you risk JNI references that crash on the next model load.
Even if a model loads successfully, inference can fail due to race conditions, null references, or uninitialized instances. To harden this step, I added null checks and catch exceptions around the full inference block.
try {
  Log.d(TAG, "Starting inference for model '${model.name}' with input: '${input.take(50)}...'")
  val instance = model.instance as LlmModelInstance? ?: run {
    Log.e(TAG, "Model instance is null for '${model.name}'")
    resultListener("Error: Model not initialized", true)
    return
  }
} catch (e: Exception) {
  Log.e(TAG, "Error during inference for model '${model.name}'", e)
  resultListener("Error during inference: ${e.message}", true)
}
The above code guarantees inference only proceeds with a valid model instance and catches runtime errors cleanly. The as LlmModelInstance? cast checks if the model instance is correctly typed and the Elvis-like fallback short-circuits execution if null. Wrapping the block in try/catch ensures that any exceptions are caught and routed back as user-visible error messages.
Once you have made all the necessary changes, we will run the app. To run your app on your local Android device, pair your Android device with Android Studio using wireless debugging with the following steps.
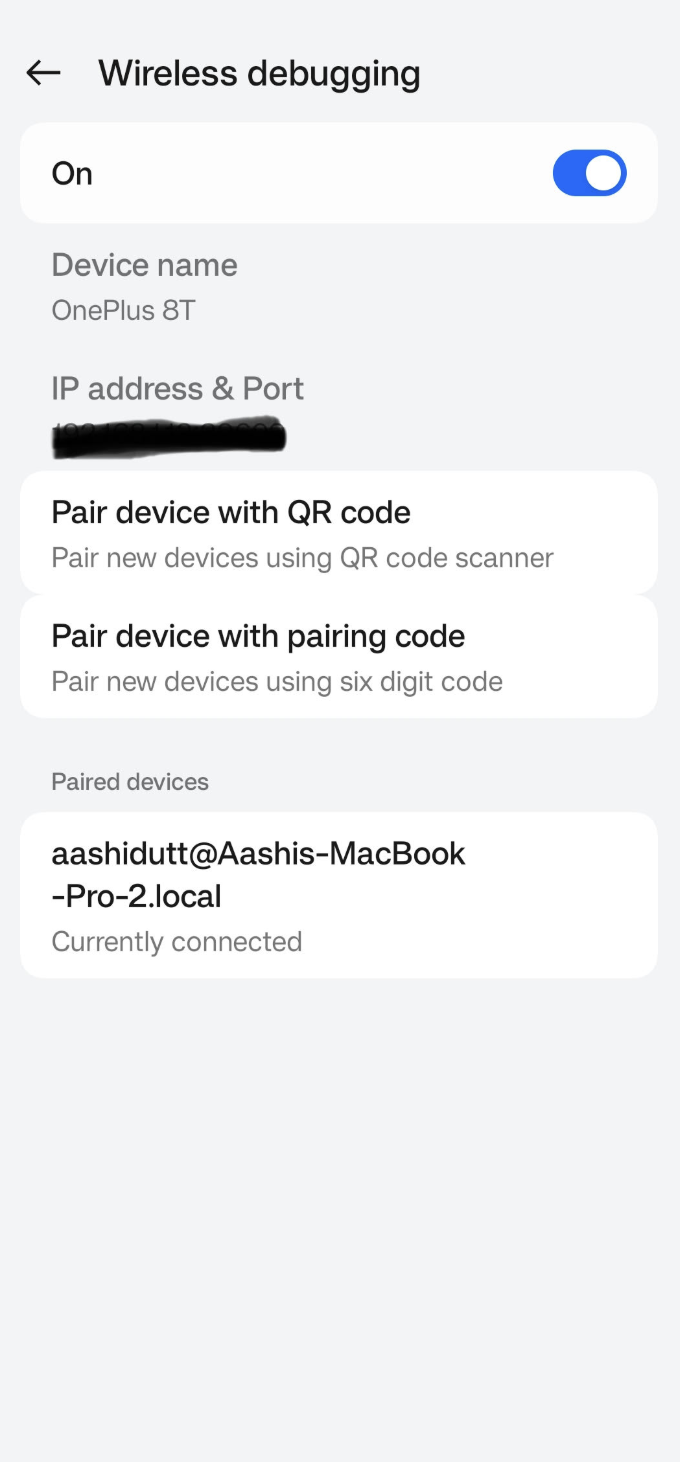
Go to the Settings app on your Android device and enable Developer options. Then turn on Wireless debugging. You should see a screen with two pairing options.
In Android Studio, open Device Manager (the icon resembles a phone with an Android logo) and click Pair using QR code.
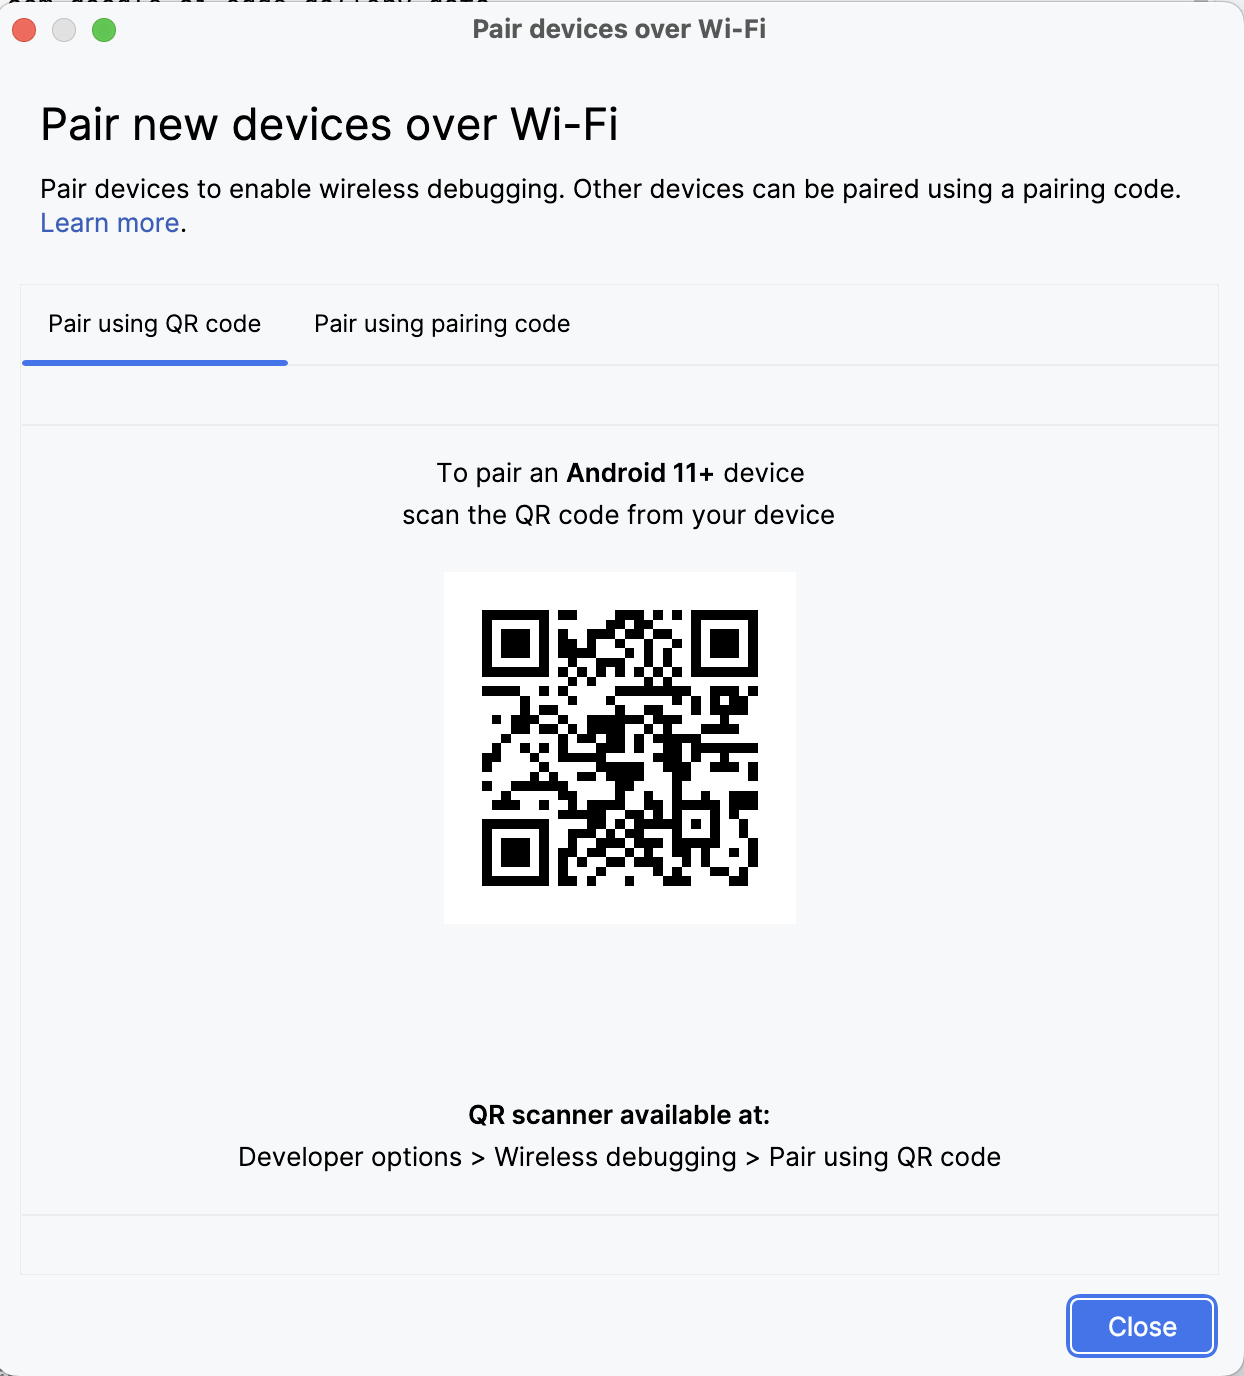
Scan the QR code using your device and complete the pairing setup. Once your device is connected, you will see your device name under Device Manager. Make sure your system and Android device are both connected to the same WiFi network.
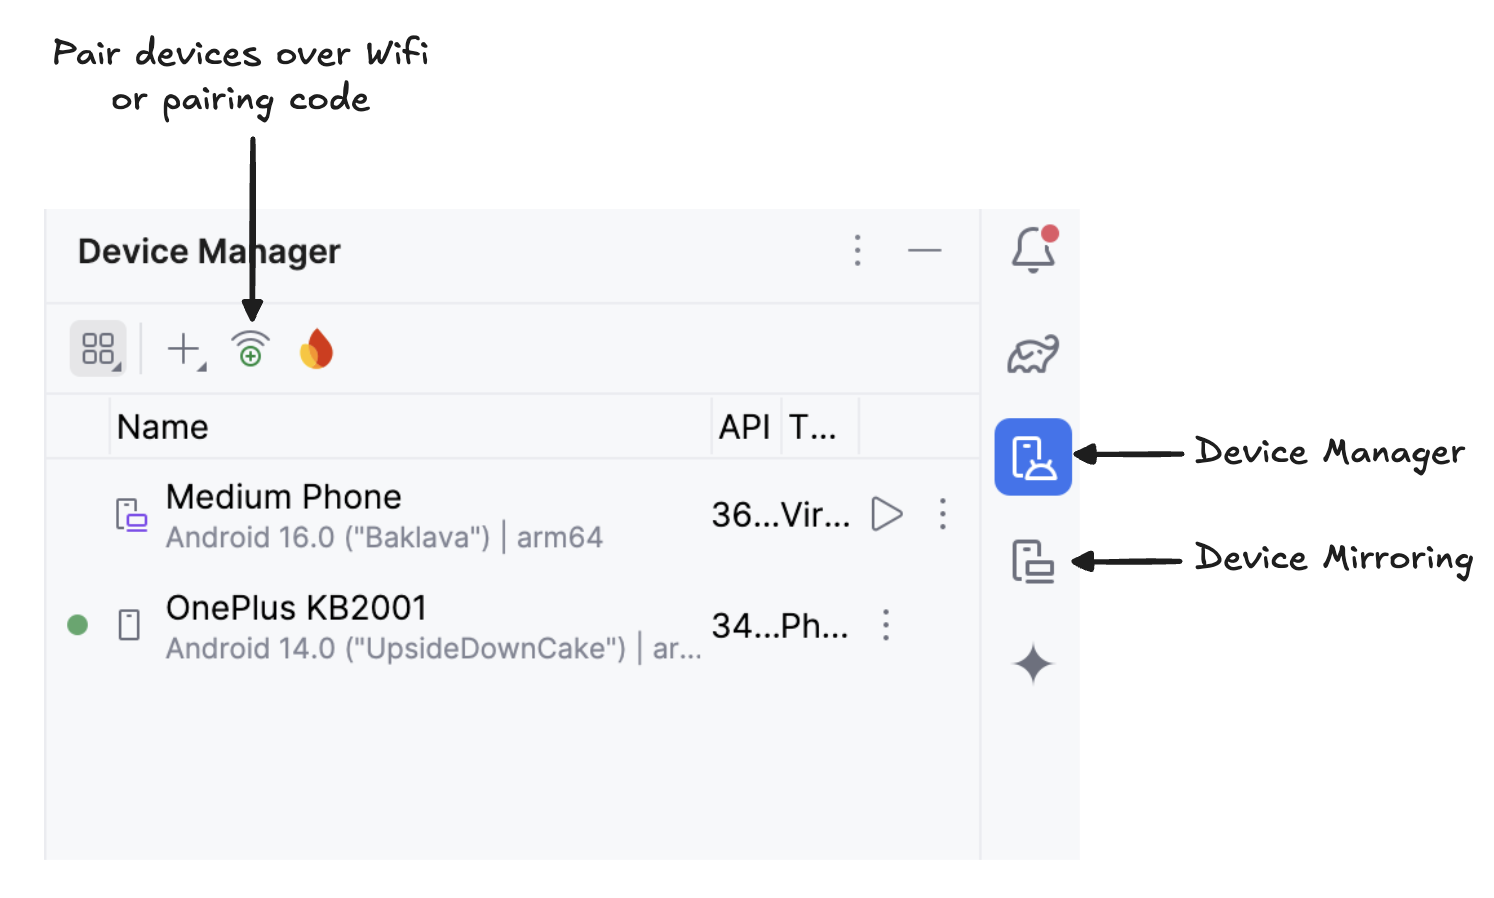
Start mirroring your Android device by clicking the Device Mirroring icon (which depicts a desktop screen and a phone screen). Once you see your device screen mirrored, click the green Run icon to deploy the app on your device.
The app will launch, and a browser window will open, prompting you to log in to Hugging Face using a write token to securely download the model file.
Once you log in to HuggingFace, click start download on the model of choice, and your model will start downloading. For this example, I'm using the gemma3-270m-it-q8 model by default. Now you can begin experimenting with this model.
For the sake of this tutorial, I ran four experiments:
In this experiment, I prompted the model to write a free-form story, and here are the results:
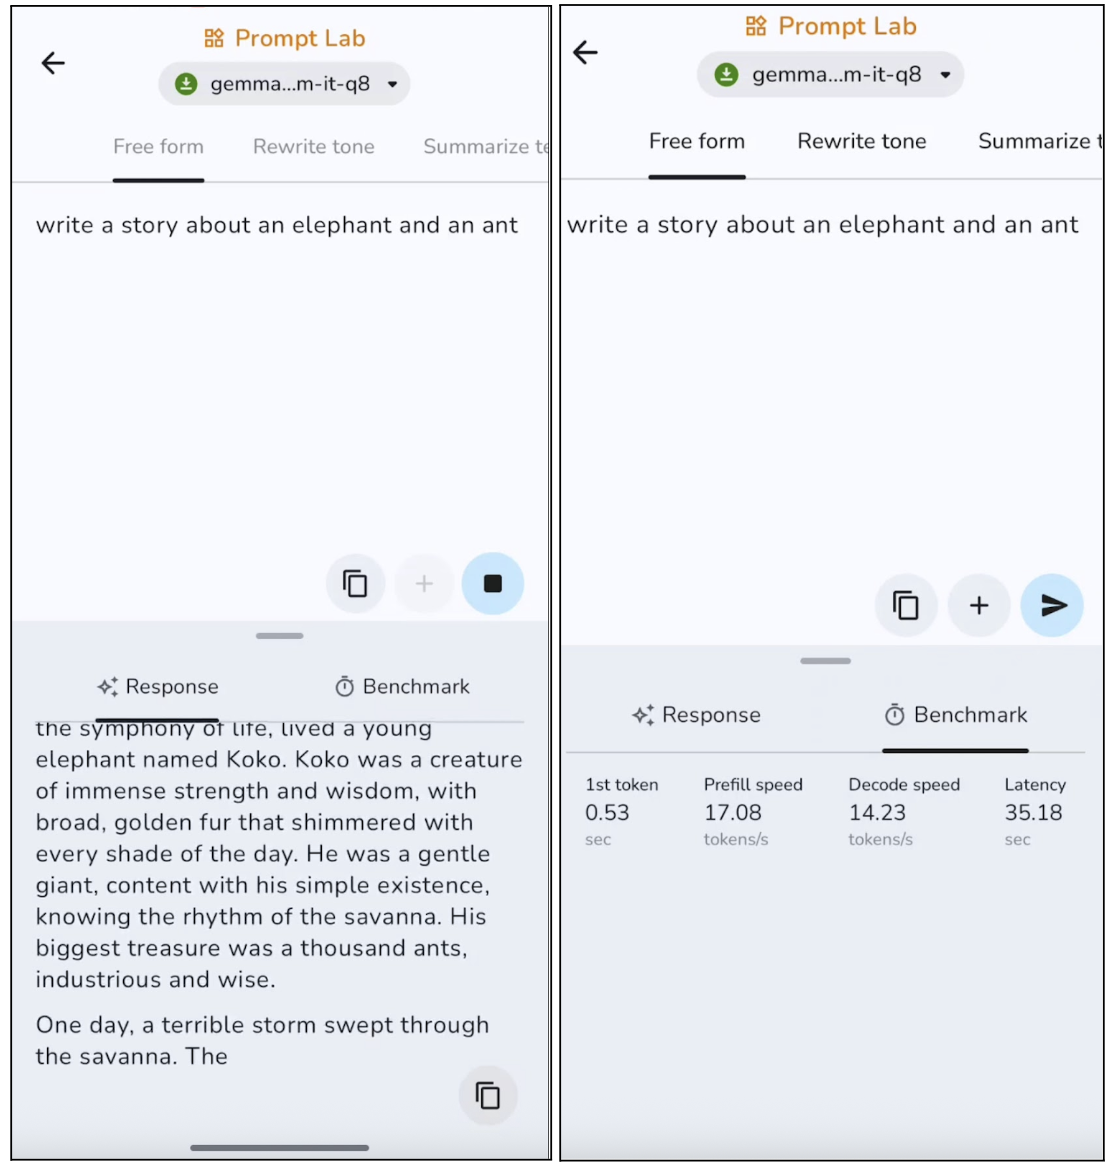
The model produces on-topic text with a clear structure, though it tends to play it safe and sound somewhat generic. On longer outputs, the model usually repeats certain sentences. This makes it best suited for short posts, descriptions, and outlines. However, first-token generation is quite fast at around 0.53 seconds, and decode speed is also good for on-device inference.
Next, I used a pre-written paragraph and asked Gemma 3 270M to rewrite the given paragraph in a friendly tone.
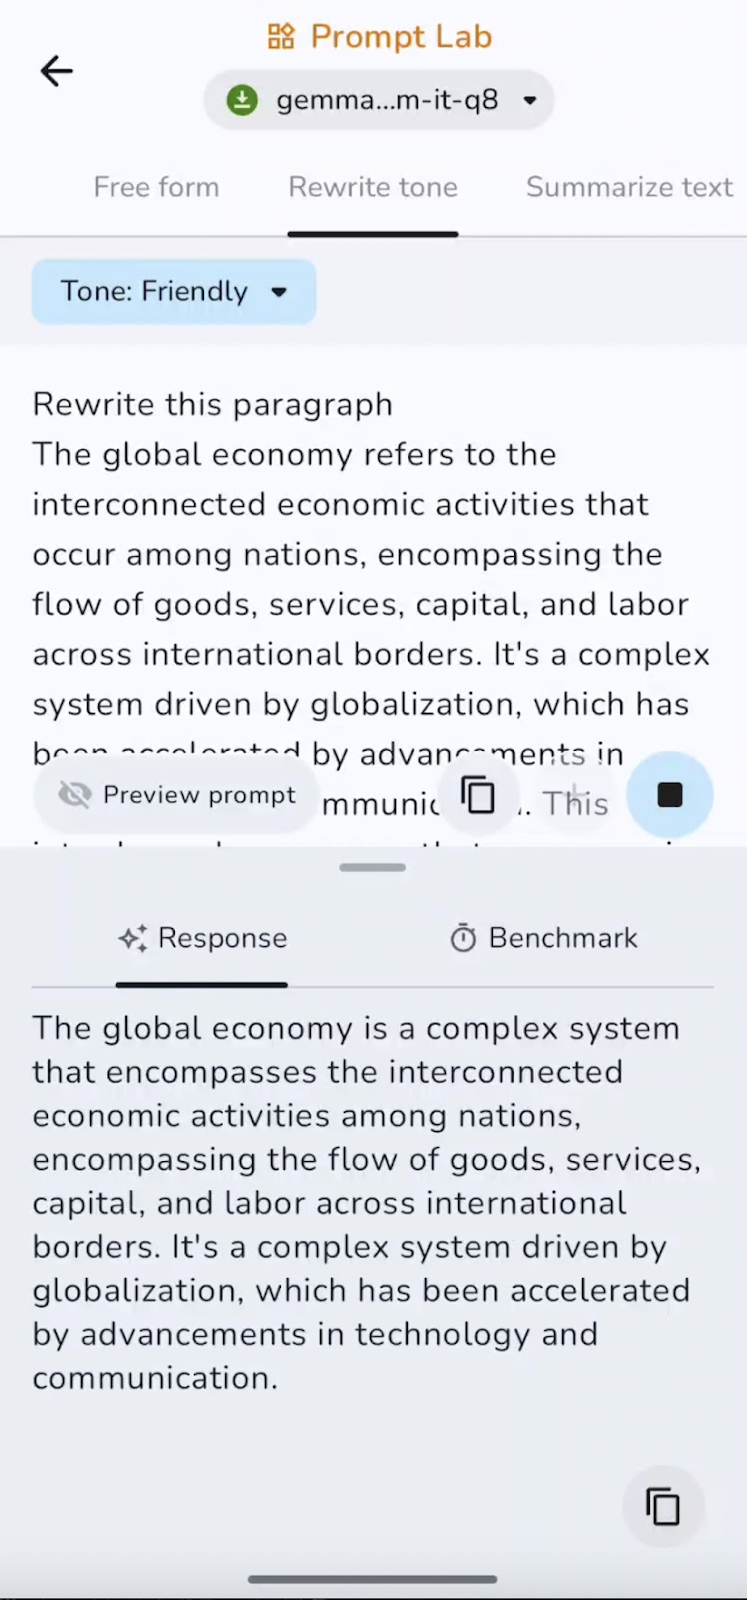
Instruction-following is strong, with clear shifts between formal, casual, and friendly tones while retaining meaning. The speed is near-instant for short passages, making it well-suited for polishing emails or converting text between styles.
I also summarized the pre-written text into bullet points. You can experiment with summaries, points, takeaways, and more.
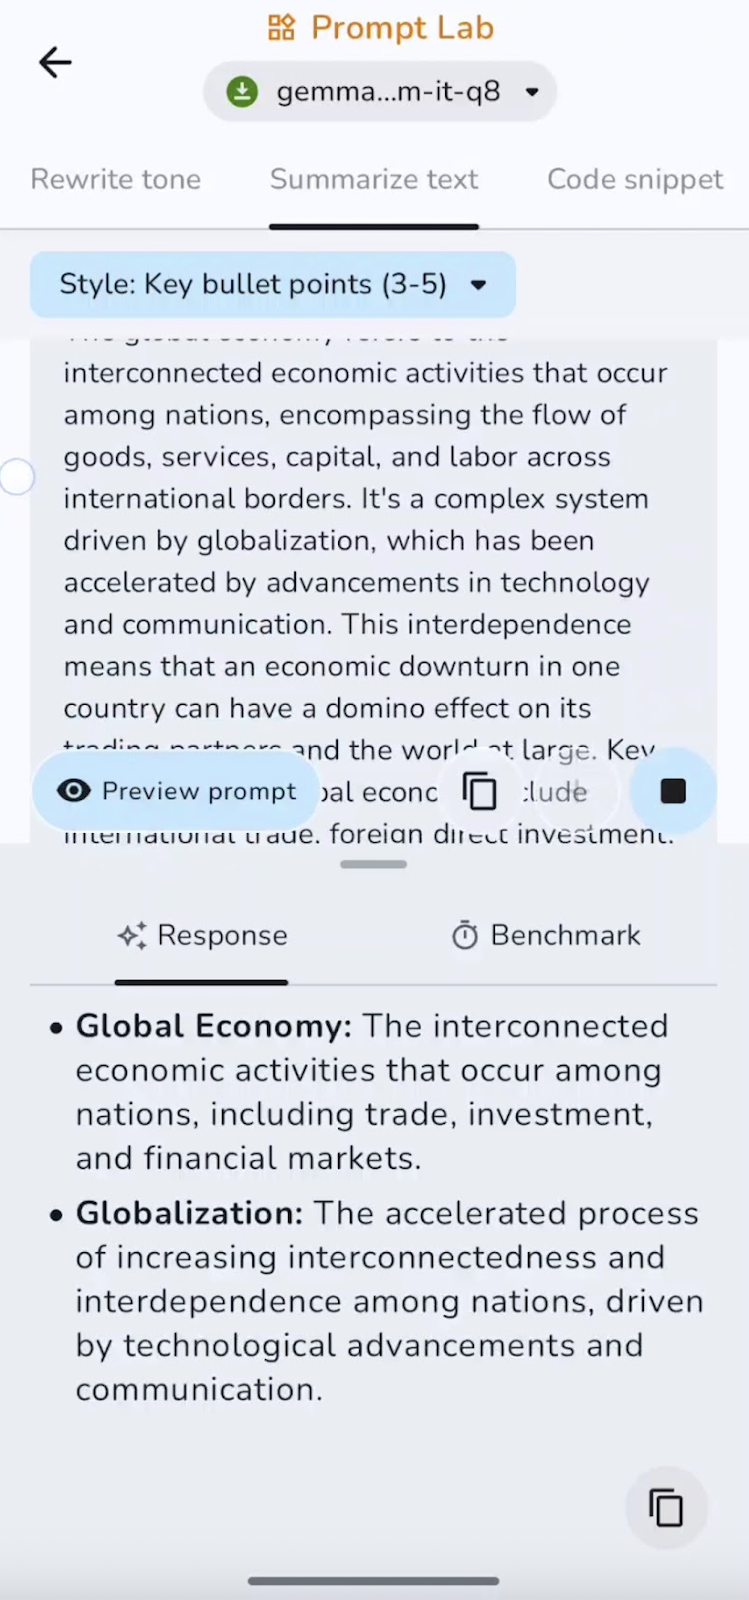
In this experiment, the model summarizes and captures key points. Speed is excellent for short and medium-length documents. Some of the use cases can be executive summaries, bullet highlights, or TL;DRs.
Finally, I asked the model to write a small code snippet. Here’s what I found:
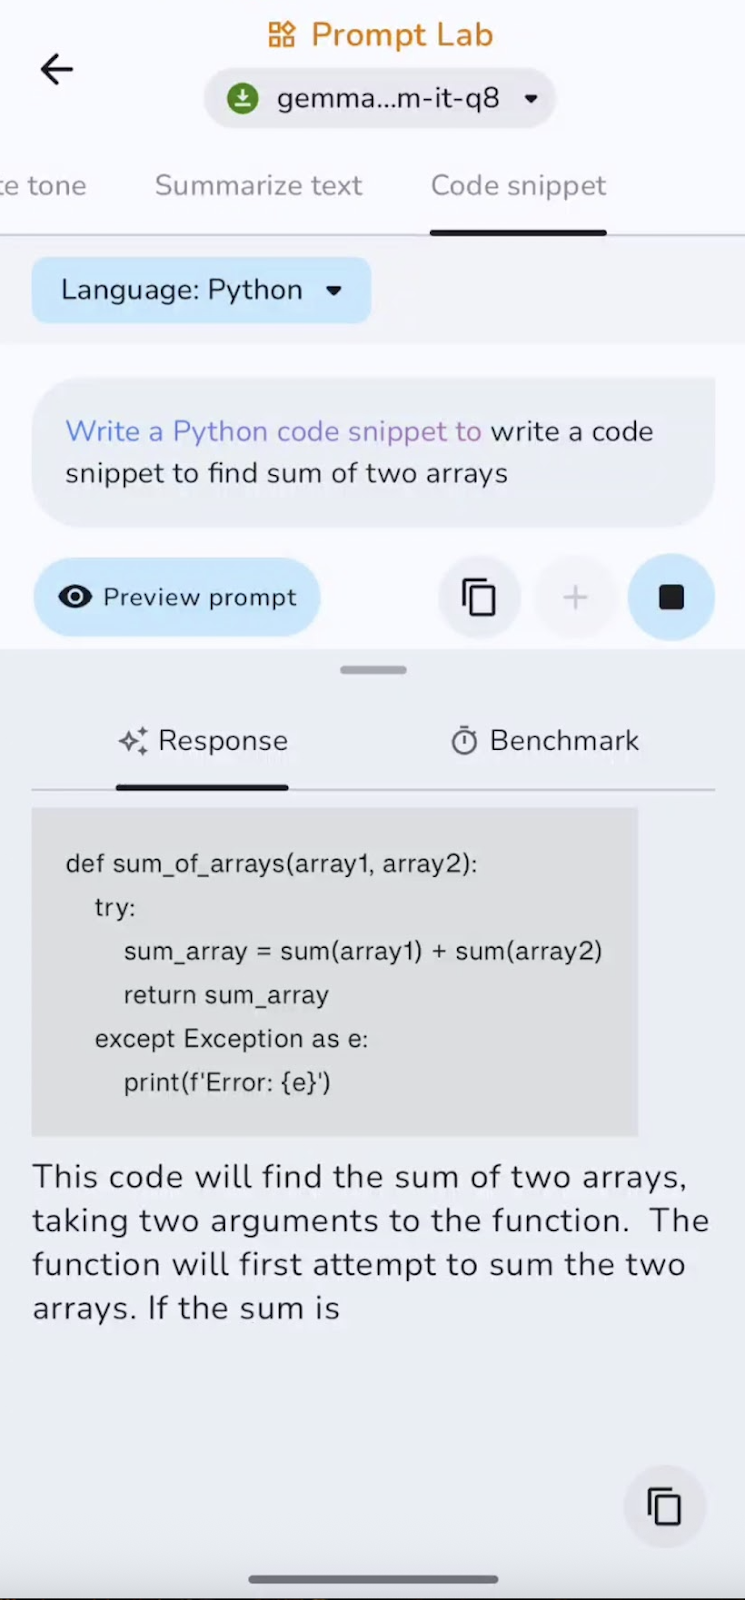
The model is effective at generating boilerplate and small utilities, though it can miss imports, edge cases, or complex logic without guidance. Short snippets generate quickly, while longer completions slow slightly as context grows. It works best for helper functions and configs.
I’ve set up this GitHub repository if you want to explore the full project code.
In this guide, we walked step-by-step through running the Gemma 3 270M model, from downloading and wiring the model into a custom Android app, to handling navigation, reliability, and inference-time safety.
Gemma 3 offers fast inference with low computational overhead, uses very little power, supports INT4 quantization with minimal impact on performance, and runs fully on-device to maintain privacy.
Learn AI with these courses!
Course
Course
Course
Tutorial
Aashi Dutt
Tutorial
Abid Ali Awan
Tutorial
François Aubry
Tutorial
Abid Ali Awan
Tutorial
Aashi Dutt
Tutorial
Abid Ali Awan