Track
OpenAI Fundamentals
15 hr
The newly introduced OpenAI AgentKit is a new toolkit that lets developers design, connect, and deploy AI agents through a visual workflow interface. It combines the Agent Builder, ChatKit, and built-in tool integrations (like web search, GitHub, and MCP servers) so you can go from idea to working agent quickly and efficiently.
In this guide, I’ll walk you through building a hands-on demo that automatically scans repositories, classifies open issues, detects duplicates, and summarizes everything into a concise report. Step by step, you’ll see how to:
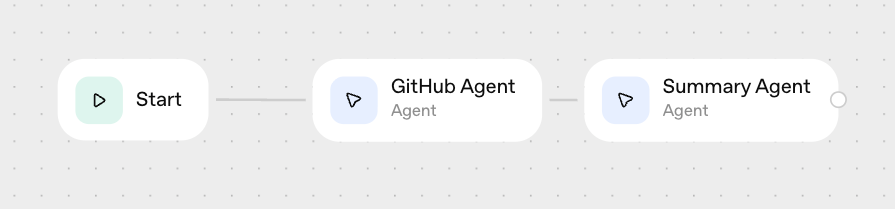
At the end, your AgentKit workflow will look like this:
If you’re still getting familiar with OpenAI, I recommend checking out our OpenAI Fundamentals skill track.
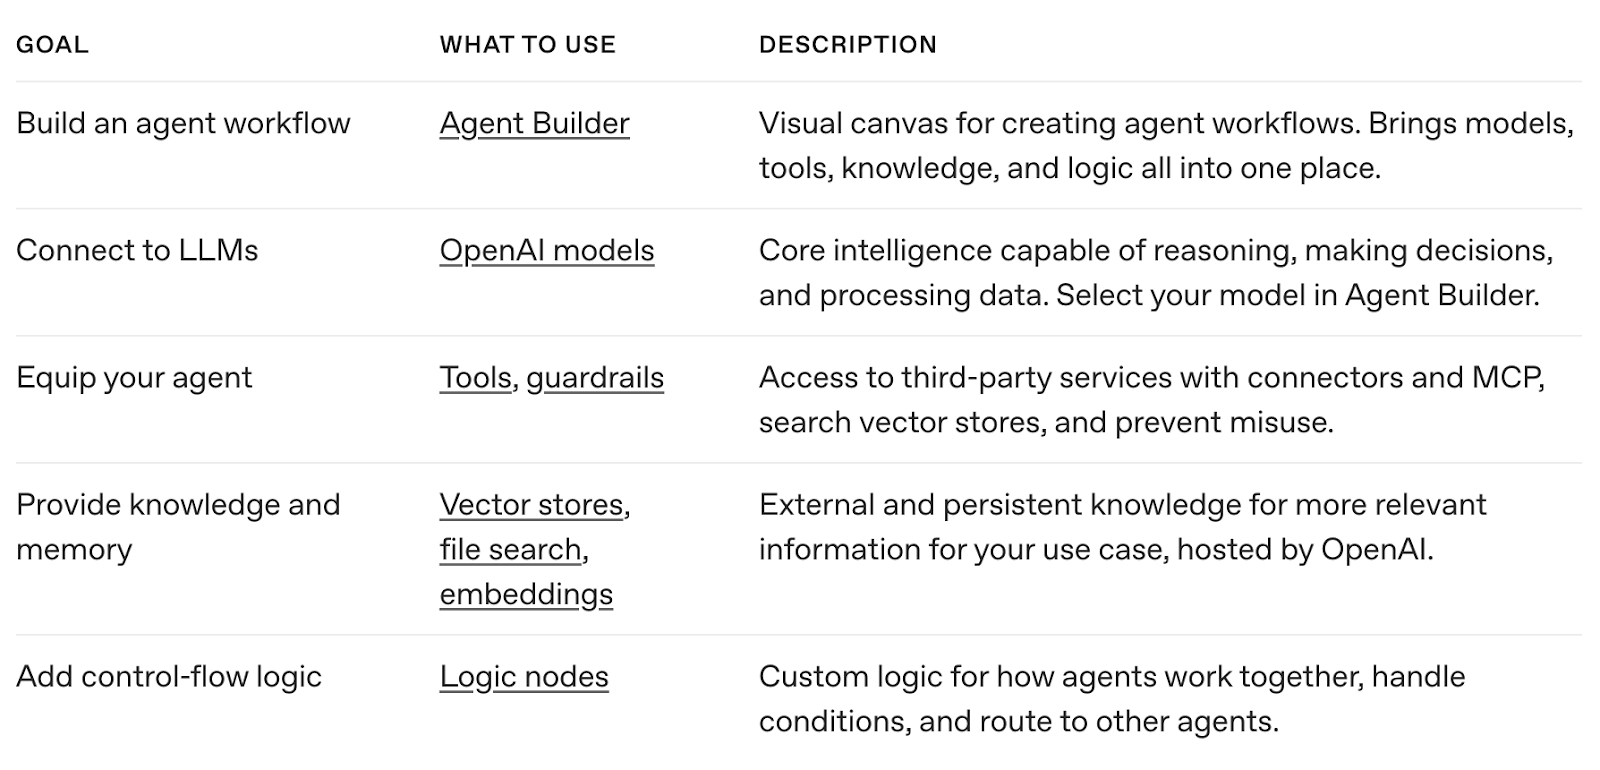
AgentKit is OpenAI’s latest framework for building, deploying, and optimizing AI agents. It is designed to take you from prototype to production without requiring a complex backend setup.
At its core, AgentKit revolves around two key components: Agent Builder and ChatKit.
Agent Builder is a drag-and-drop visual interface that lets you design complete AI workflows without writing code. You can combine multiple Agent nodes (powered by a GPT model) and connect them in logical order.
Each agent can have its own instructions, tools (such as Web Search, Code Interpreter, or API calls), and structured output schemas, which you can chain together to form multi-step automations. Agent Builder automatically handles context passing, model calls, and data formatting between nodes, making it easy to prototype even complex pipelines.

Source: ChatKit Playground
Once your workflow is ready, ChatKit makes it deployable anywhere. It acts as the integration layer that lets you embed your workflow in a chat interface, expose it via API, or manage user sessions through schema-based configuration.
You can even download the SDK and host it yourself for flexibility and control over how your agents run.
AgentKit also integrates seamlessly with the Connector Registry which is a central hub that lets admins manage how data sources and tools connect across OpenAI products.
This integration means your agents can securely access enterprise resources like GitHub, Notion, or internal APIs, without hard-coding credentials or managing separate integrations.
In this section, we’ll walk through how to build an automated GitHub Issue Review workflow using AgentKit’s Agent Builder. This workflow combines two connected agents, one that analyzes issues from a GitHub repository, and another that summarizes the results into a concise report.
Here’s how it works:
https://github.com/OWNER/REPO).At the end, you’ll have a fully functional, multi-agent workflow that turns raw GitHub issues into actionable insights.
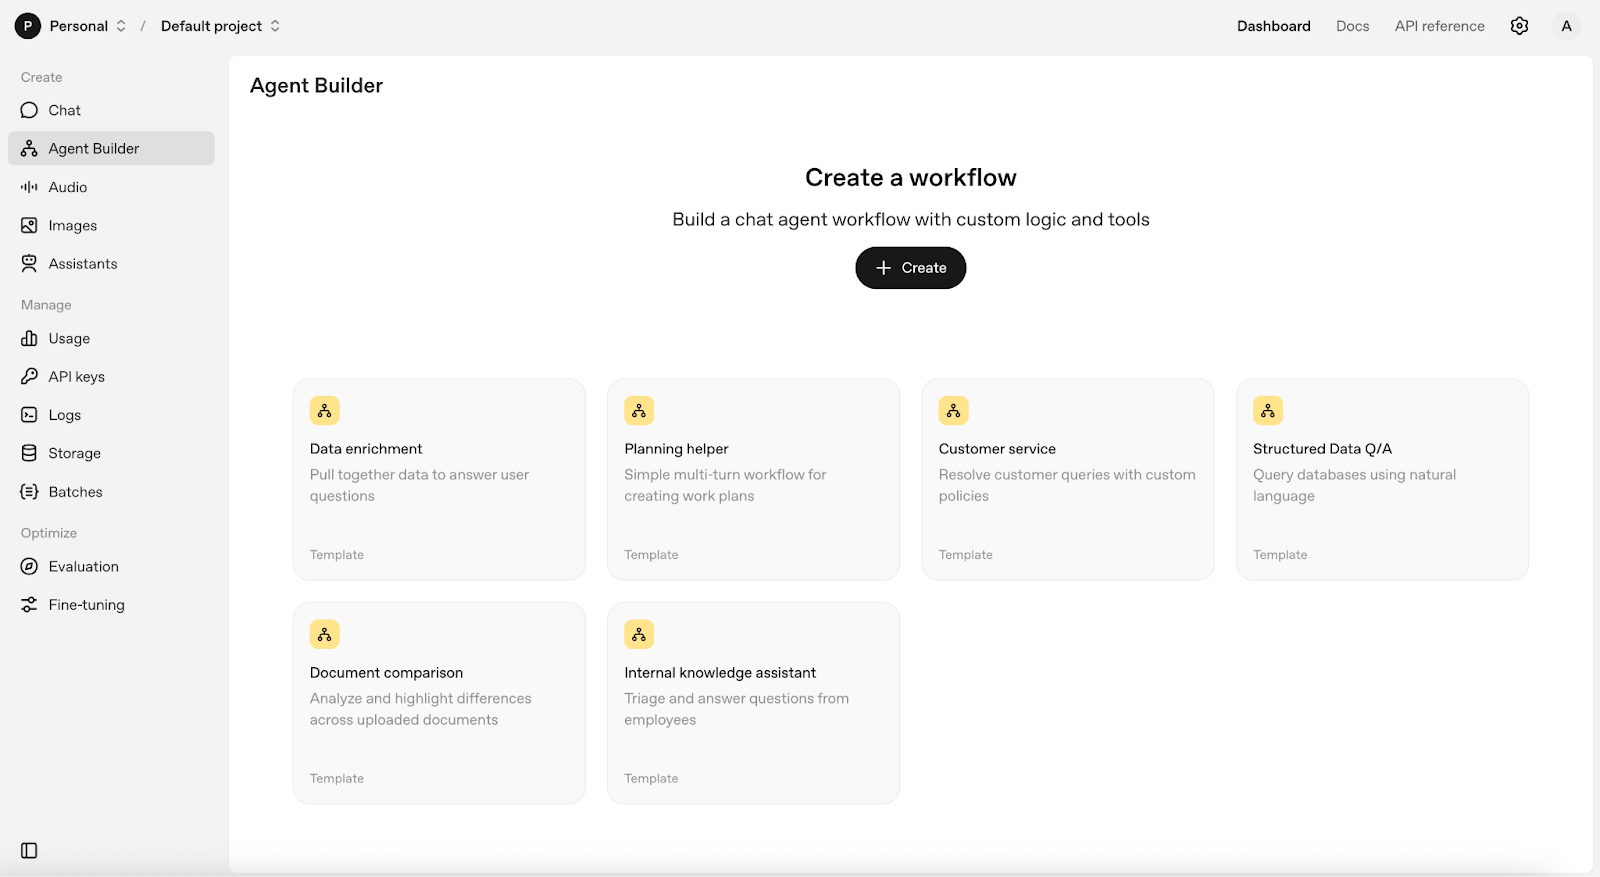
Go to the AgentKit Playground and log in or sign up with your OpenAI account. Once logged in, you’ll land on the visual workflow editor, where you can design, connect, and configure agents in an easy-to-use interface.

Now, let’s create a workflow to get started.
Before building agents, we first need a workflow that defines how agents connect and interact. A workflow acts as the control flow between different nodes, such as input, processing, and output.
Start by clicking + Create to make a new workflow and name it something like GitHub Issue Assistant. Once created, you’ll see a blank canvas with a Start node which acts as the entry point for all actions in your workflow.
Our canvas is ready and now we can start adding and connecting multiple nodes to build out the logic of the workflow.
In this step, we’ll add a GitHub Agent node next to the Start node to help process the repository link input by the user. Here is how you can do it in 6 simple steps:
1. On the sidebar, click on Agent and add an agent node next to the Start node.
2. Double-click the agent node to access its parameters and change the agent name to “GitHub Agent”.
3. Add in the following instructions to the instruction box:
You are a GitHub Issue Triage agent.
Input: a public GitHub repository URL (e.g., https://github.com/OWNER/REPO).
Task:
1) Find the repository and the 10–20 most recent *open* issues.
2) For each issue, produce:
   - `label`: one of ["bug","feature","question","chore","docs"]. Be strict.
   - `summary`: 1–2 sentences in plain English that restates the problem or request.
   - `duplicate_query`: a GitHub search string likely to find duplicates. Use:
       repo:OWNER/REPO is:issue (STATE OR KEYWORDS …)
     Prefer 2–4 high-signal tokens from the issue title/body; include synonyms.
   - `assignee_hints`: array of up to 3 GitHub usernames to consider assigning.
       Heuristics: past commit/file authors, most recent commenters with code
       context, codeowners, or frequent resolvers of similar issues.
   - `evidence`: an array of `{url, title}` for 1–3 canonical links
       (the issue URL itself is allowed; add one extra context link if useful).
   - `confidence`: 0–1 float confidence for your label.
3) If fewer than 3 issues are open, expand to the last 30 days including closed.
Constraints & quality bar:
- Do not invent usernames. Only output handles you can infer from the repo or issues.
- Prefer precise duplicate queries over long ones.
- Keep `summary` ≤ 280 chars.
- Include citations for any non-issue links you add.
4. Under the Tools tab, click + and enable Web Search tool for this agent.

5. Finally, click the toggle button near output format tab and select JSON for a structured output. An Excel-like pop-up will open and fill in the following parameters as shown:

You can click Generate to have GPT auto-fill this schema for you.
6. Click update to save the settings.
Now our GitHub agent is ready to analyze repositories and categorize their issues.
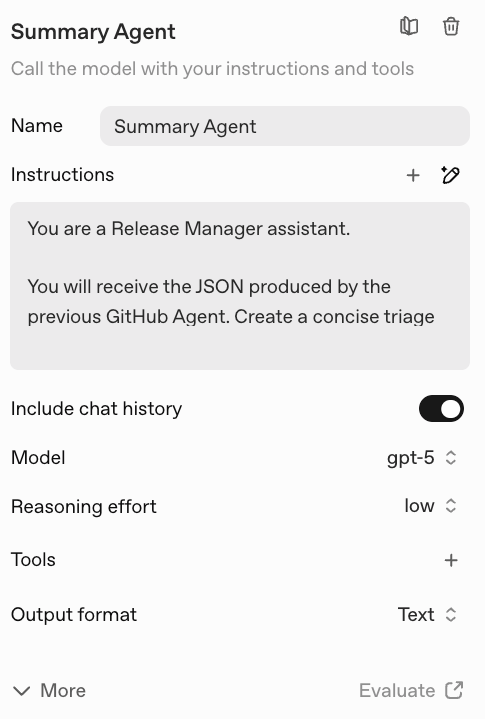
Next, let’s summarize everything your GitHub Agent produces into a report. For this, we set up a summary agent that takes in the JSON output from the previous node and returns a text summary as output.
You are a Release Manager assistant.
You will receive the JSON produced by the previous GitHub Agent. Create a concise triage report that a maintainer can act on immediately.
Report format:
- Repo header with link.
- Triage table (or bullet list) grouped by label in the order: bug, feature, question, chore, docs.
  For each issue: #number, title (link), 1-line summary, confidence (0–1), and a clickable “Duplicates” GitHub search using duplicate_query.
- “Suggested assignees” section: aggregate the top usernames across all issues and list why they were suggested (e.g., “owns file X”, “fixed similar Y”).
- “Notable risks” section: 2–4 bullets calling out breaking risks or customer impact.
- Keep the whole report under 400 words.
Rules:
- Do not invent data not present in the JSON input.
- If error is set or the issues array is empty, output a short diagnostic instead.
4. Select the output format as Text.
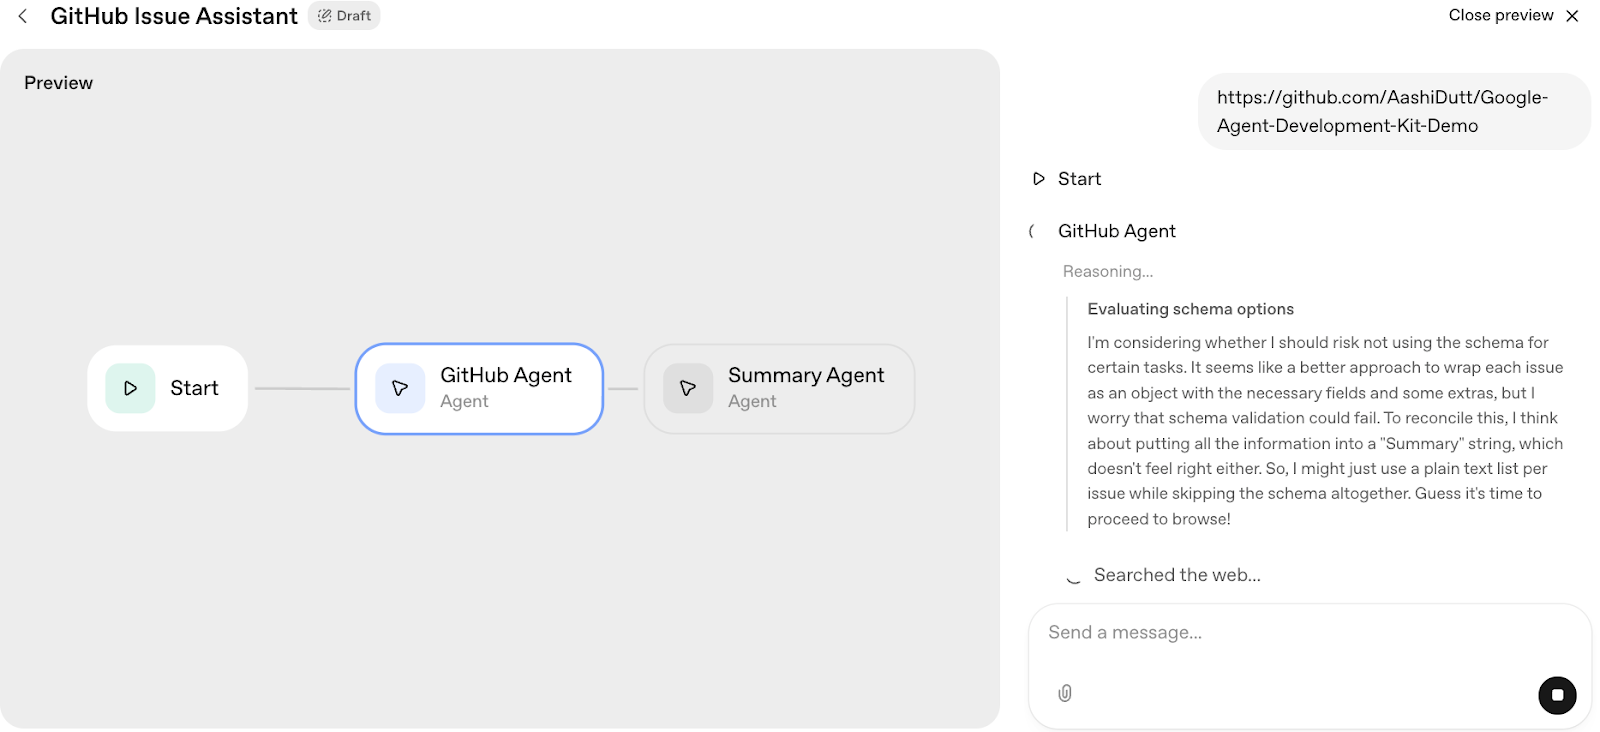
Now, your Summary Agent will generate a developer-ready summary report, and your final workflow will look like this:
To run this workflow, click on Preview and test your workflow interactively.
Once you are happy with your workflow, go ahead and click Publish to publish your workflow to be called in using APIs. Once you deploy your workflow, pass the ID into your ChatKit integration, or download the Agents SDK code to deploy your workflow yourself.
Source: Agent Builder workflow deployment
Note: The agent builder is still in beta, but tools are billed under the standard API usage for models like gpt-4o-mini or gpt-5. You can learn about the pricing of API on the OpenAI website. .
Here is a video from OpenA on the Agent Builder that you might find useful:
Top DataCamp Courses
Track
Course
Course
Tutorial
Bex Tuychiev
Tutorial
François Aubry
Tutorial
Abid Ali Awan
Tutorial
Aashi Dutt
Tutorial
Aashi Dutt
Tutorial
Aashi Dutt