
Course
Introduction to GitHub Concepts
2 hr
35.6K
Git is a powerful distributed version control system that tracks the change history of files allowing developers to collaborate efficiently across teams.
As someone who is working with code and scripts, one of the first commands you’ll encounter in Git is git clone. This command allows you to create a local copy of a repository that your colleagues have worked on, setting the foundation for contributing to shared projects or managing your codebase offline.
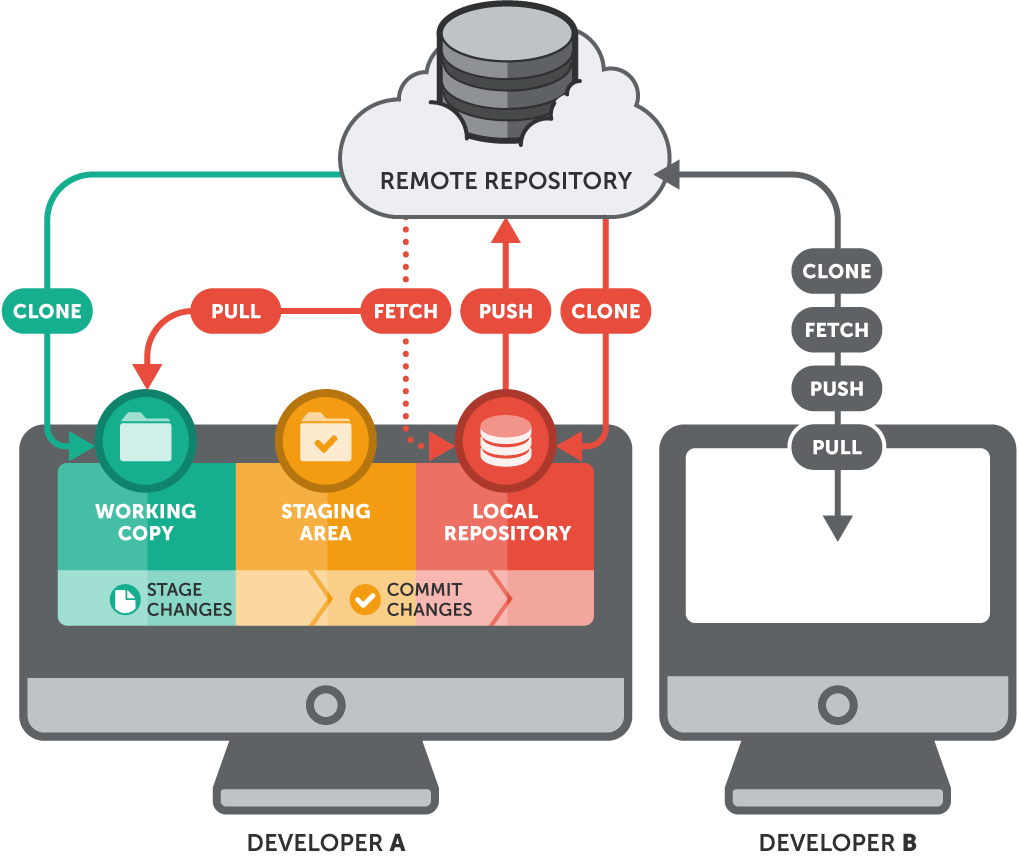 How the git clone command works. Source: Git-Tower
If you want to learn more about Git, I recommend this Introduction to Git course.
In Git’s distributed architecture, every developer has a full copy of the repository, which includes its commit history and branches. This is made possible via the git clone command. It ensures that you’re not just downloading the current state of a project, but also inheriting its entire version history, which may be crucial to understanding how the codebase arrived at its current state.
In this tutorial, I’ll walk through what git clone does, how to use it in various scenarios, and what happens behind the scenes when you run the command. Regardless of whether you’re a beginner just starting with Git or looking to deepen your understanding of repository management, this guide will provide you with practical knowledge and confidence to use git clone effectively.
The git clone command clones or copies a repository into a new directory on your local machine. Although it can clone both local and remote repositories, it is most commonly used to clone a remote repository. git clone copies all files, branches, commit history, and configurations from a source (such as GitHub, GitLab, or Bitbucket) into a new directory on the destination, which can be your local machine or a CI/CD pipeline.
At its core, git clone is a shortcut that sets up everything you need to start working on an existing project. For example, to have a copy of the “aws-cli” repository from GitHub (a remote repository) to your local machine, you can run the git clone command as shown in the following image:
# Initializes a new Git repository in the “aws-cli” folder on your local
# The version of Git used throughout this tutorial is 2.39.5
git clone https://github.com/aws/aws-cli.git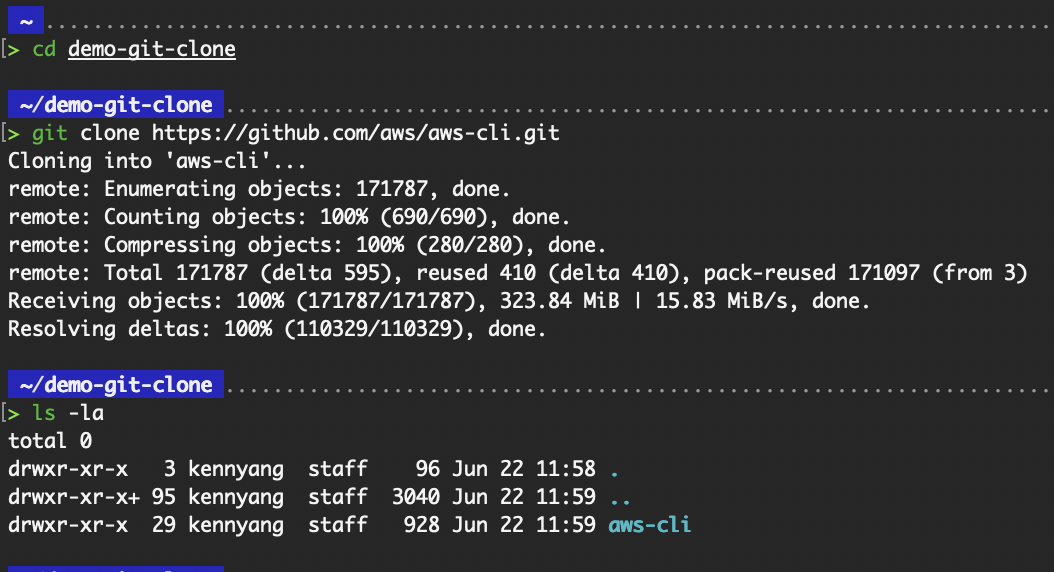
Output of the basic usage of git clone
Compared to other Git commands, git clone is unique because it's typically your first point of contact with a remote repository and is generally a one-time operation. For example:
git init creates a brand-new Git repository locally from scratch, which is also a one-time operation.git fetch, git pull, and git push are used after a repository has already been set up.In contrast, git clone bootstraps your entire Git environment for an existing project in a single step — no extra setup required. If you're joining a project or contributing to an open-source project, git clone is your starting point.
Cloning a Git repository does far more than simply download project files. This section dives into what happens during the cloning process and how Git’s distributed model empowers seamless collaboration through peer-to-peer interactions, unlike traditional centralized systems.
Let’s understand what happens in the background when the git clone command is executed.
.git directory. This directory stores all metadata, configuration, and version history needed to track and manage changes. .git directory
origin, allowing us to fetch and push changes easily.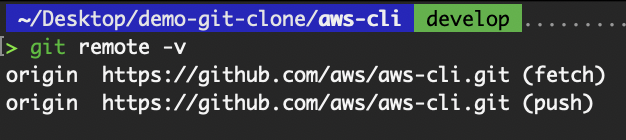 View the remote repository
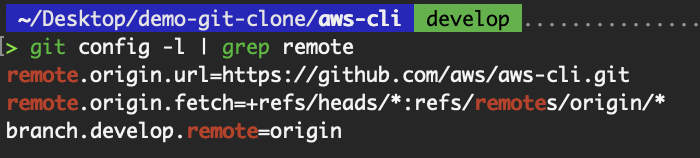
View configuration variables
main or master branch, and this is the branch you'll start working on after cloning. However, for the “aws-cli” repository, the default branch is develop.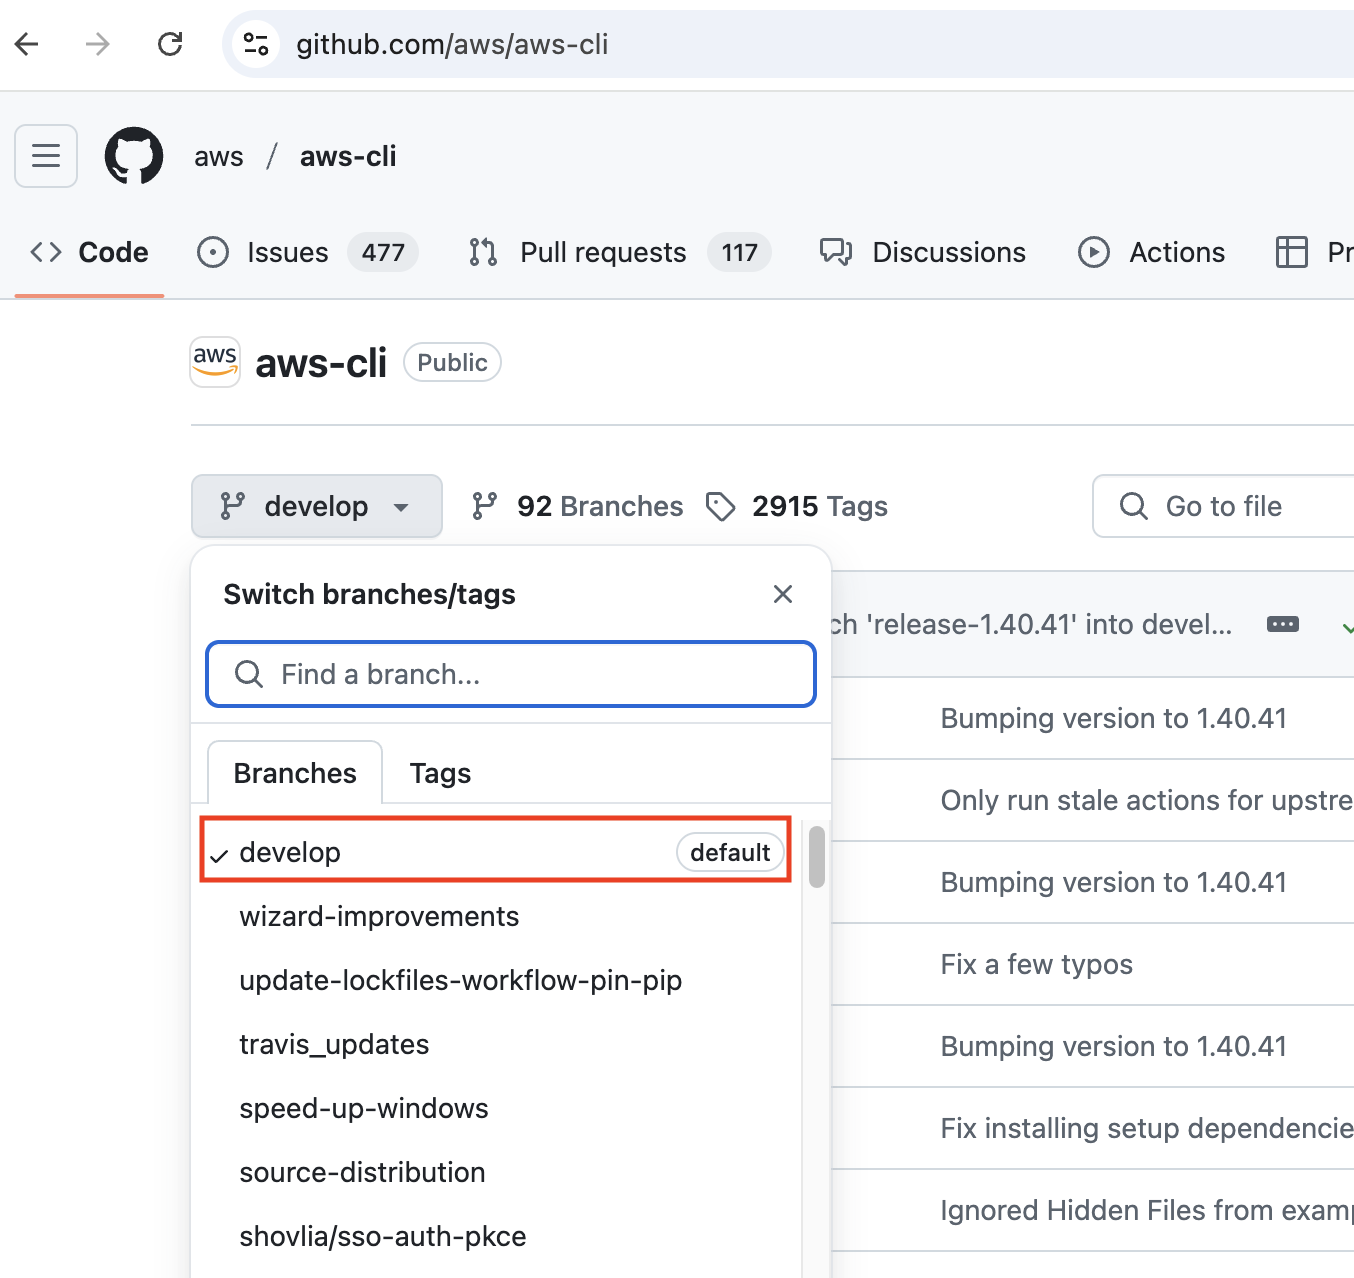 The default branch, as seen on GitHub
Git’s design and function mean that once cloning is complete, your local repository is a fully independent copy with the same capabilities as the remote. It can commit, create branches, and even act as a remote for others.
This model differs significantly from Centralized Version Control Systems (CVCS) like Subversion (SVN), where the server acts as the sole source of truth. In Git, every clone is a peer, not just a client. All repositories are equal in terms of functionality, and changes can be shared in any direction.
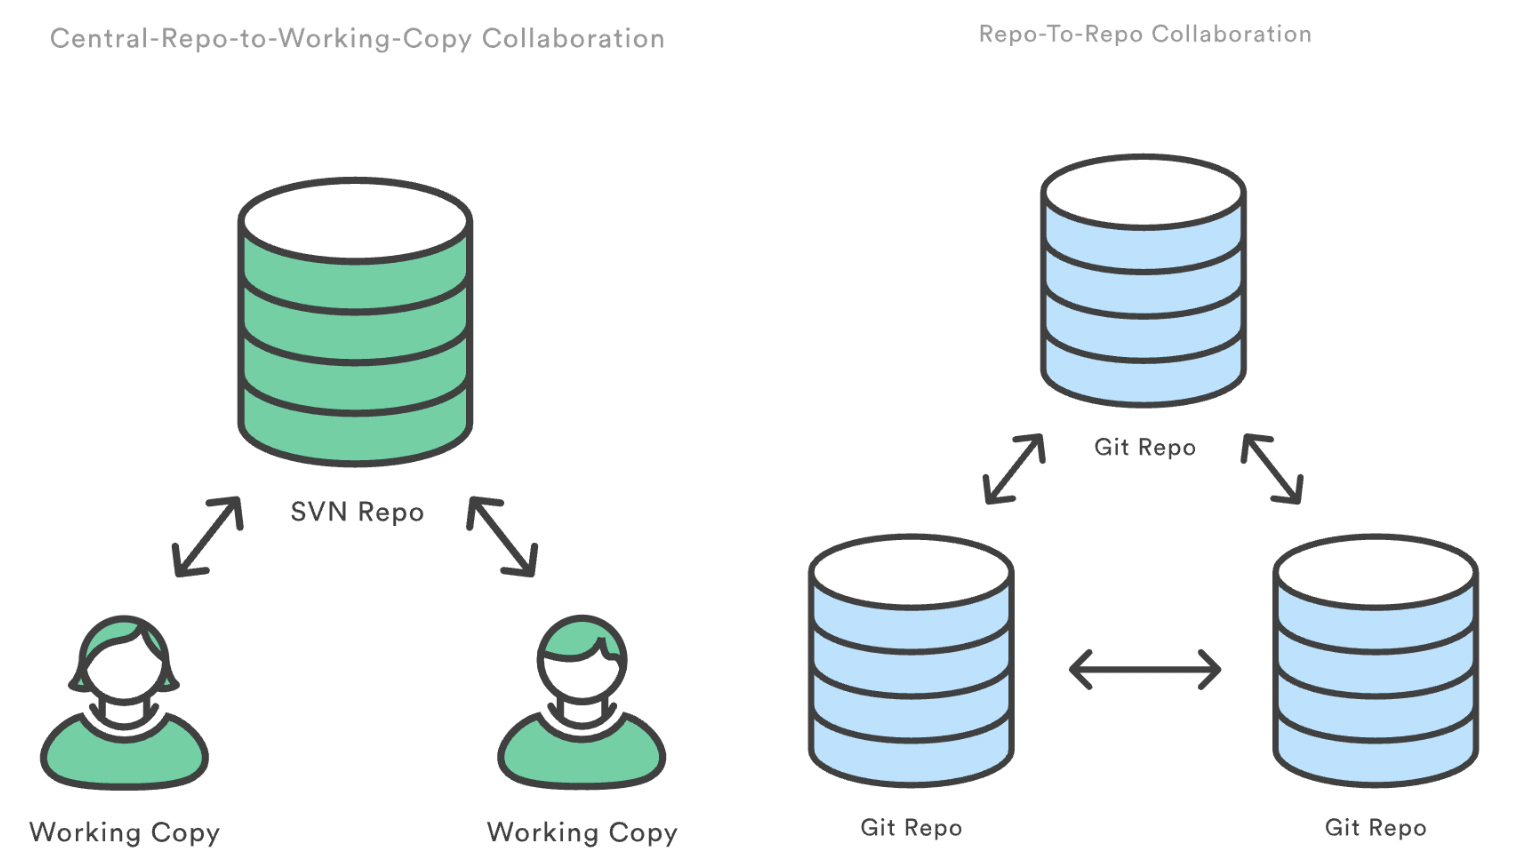
SVN repo vs Git repo. Source: Atlassian
Each time we clone a Git repository, we’re not just making a copy; we’re creating a new, self-sufficient Git repository. Our clone has the full commit history and structure of the original repository.
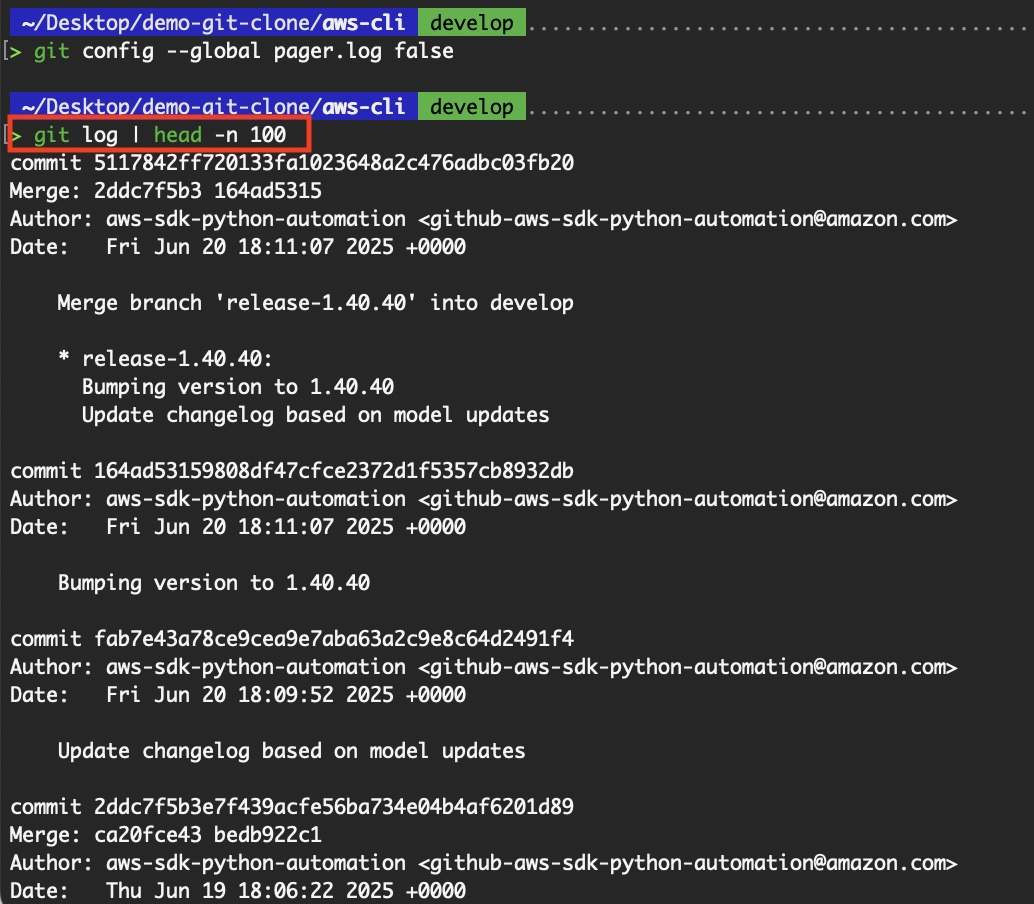
View the entire commit history from the cloned repository
It allows us to work offline, make commits, and create branches independently. Our local repository can also serve as a base for new features or experiments.
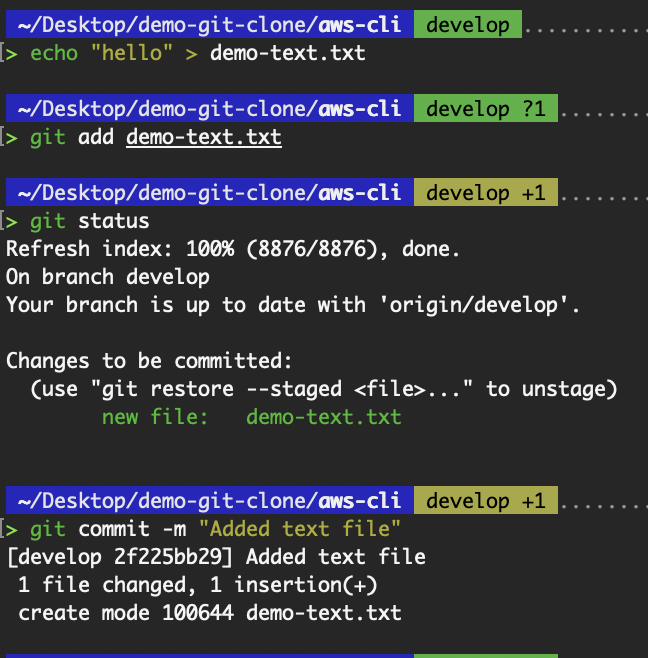
Add a commit to the cloned repository
 Create a local branch in the cloned repository
The cloning process establishes tracking relationships, most notably with the remote repository, which is labeled as the origin. This connection enables the following:
git fetch origingit pullgit push origin <branch>While everyone may have their own repository copy, Git ensures coordination through shared remotes and clear tracking of which branches correspond across repositories. This is why Git is used in all organizations to manage their codebase.
In essence, cloning is the entry point into Git's distributed collaboration model, where each contributor becomes an equal participant in the development lifecycle.
As seen from the above example of cloning the “aws-cli” repository, to clone a repository using git clone, we need to provide the location of the remote repository, which is done through a Git URL.
Git supports multiple protocols to access remote repositories, each with its own structure, security model, and best use cases. Understanding the different types of Git URLs and when to use each can help you work more securely and efficiently, especially when collaborating across teams or automating deployments.
When cloning a repository, the URL you provide tells Git how to connect to the remote server. The most common Git URL types are:
Hyper Text Transfer Protocol Secure (HTTPS). Most commonly used to access webpages via a web browser. This URL type is straightforward to use and doesn’t require any setup when cloning a public repository. Here are some examples:
git clone https://github.com/<username>/<repo>.git
git clone https://github.com/aws/aws-cli.git
git clone https://gitlab.com/gitlab-org/gitlab.git
Structure Breakdown:
https:// – Protocol used for communication (secure and firewall-friendly).github.com – Domain of the Git hosting service.username/repo.git – Path to the repository:username is the owner (user or org)repo.git is the Git repository nameSecure Shell (SSH). An authenticated network protocol that requires you to establish credentials with the hosting server before connecting. Requires generating an SSH key pair and adding the public key to your Git provider (e.g., GitHub, GitLab)
git clone git@github.com:<username>/<repo>.git
git clone git@github.com:aws/aws-cli.git
git clone git@gitlab.com:gitlab-org/gitlab.git
Structure Breakdown:
git@ – Specifies the SSH user account (usually just git).github.com: – Domain of the Git server, followed by a colon : (not a slash).username/repo.git – Path to the repository on the server.As I have not configured any SSH keys on my GitHub account, it shows the following message when I attempt to copy the SSH URL.
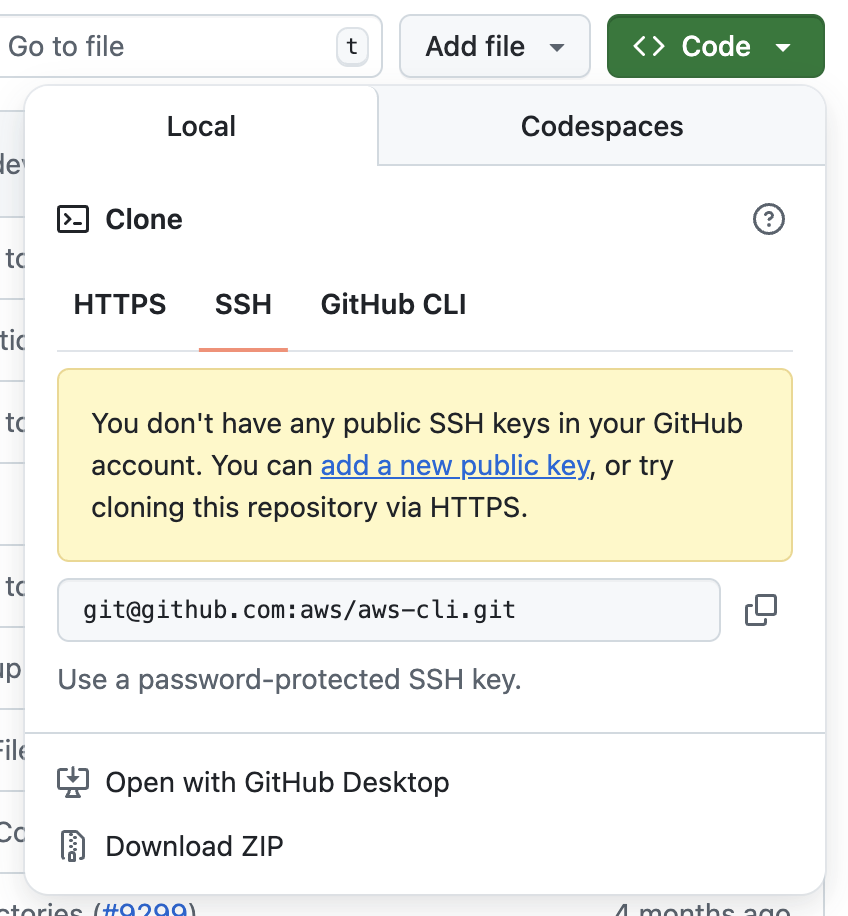
No SSH key set up
I will cover setting up SSH keys in the next section.
A lightweight, unauthenticated protocol for read-only access. It’s a protocol unique to git. It is rarely used nowadays due to security concerns and deprecation by major providers like GitHub and GitLab. You won’t even find the option to clone using the git protocol on GitHub or GitLab.
# Not recommended
git clone git://github.com/<username>/<repo>.git
Structure Breakdown:
git// – Git protocol (read-only, unauthenticated).github.com: – Domain of the Git server.username/repo.git – Path to the repository on the server.Regardless of the cloning protocol used, you can check the URL and protocol used by running the following commands:
git remote -v
git remote show originEach protocol has trade-offs. Using the following table, we compare the pros and cons of choosing the proper protocol for your use case.
|
Protocol |
Use case |
Pros |
Cons |
|
HTTPS |
Ideal for beginners and CI tools |
Easy to use, firewall-friendly |
Requires entering credentials or setting up a personal access token (PAT). It can be mitigated with credential helpers. |
|
SSH |
Best for frequent contributors |
Secure, no repeated logins |
Requires key setup and management |
|
Git |
Archival or public read-only cloning |
Fast, lightweight |
Insecure, mostly deprecated |
Once you've chosen a Git URL protocol, the actual cloning process and authentication workflow differ. While both methods ultimately achieve the same goal (cloning a remote repository to your local machine), they cater to different security preferences, user needs, and setup complexities.
In this section, I’ll cover cloning a repository using both HTTPS and SSH, along with best practices, setup steps, and troubleshooting advice to ensure a secure and smooth cloning process.
Cloning a Git repository over HTTPS is the most straightforward method, making it ideal for beginners and constrained environments (like corporate firewalls or restricted networks).
To clone a repository, navigate to it and copy the HTTPS URL. The following image is taken from GitHub. It will be similar to your Git provider.
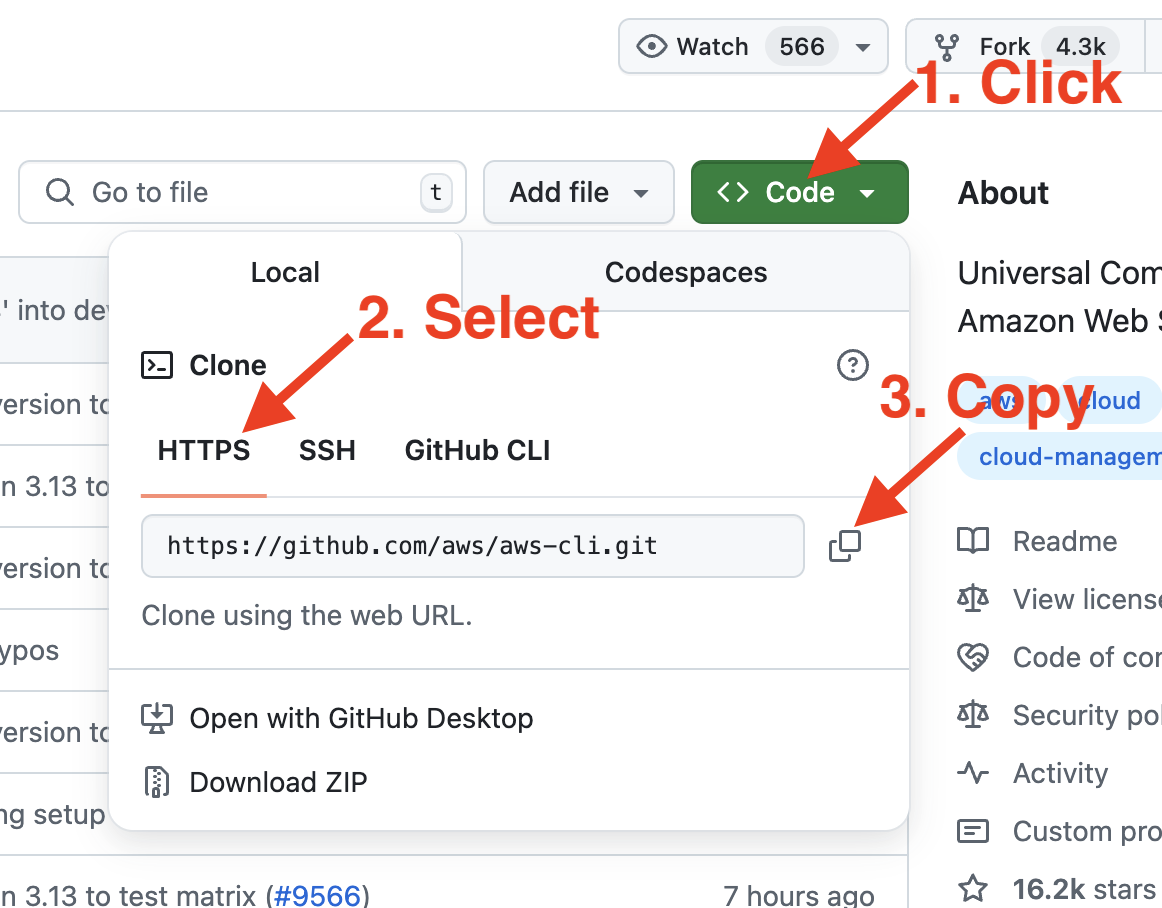
Obtain the HTTPS URL of a repository on GitHub
Thereafter, run the git clone command on the destination (e.g., your laptop or a CI/CD pipeline) where you want the repository to be cloned.
git clone https://github.com/aws/aws-cli.git
Basic git clone command
For cloning a public repository, as we have done for the “aws-cli” repository, no authentication is required since the repository is public. As long as you have git installed on your system, you can clone the public repo immediately without any configuration.
However, if you’re cloning a private repository, authentication is required. You can authenticate via:
To demonstrate authentication via a personal access token, I spun up a server in AWS EC2 and installed Git. Upon execution of the git clone command on a private repository, it prompts for a username and password. Enter your GitHub username as the username and your personal access token as the password.

HTTPS authentication via username/password
Due to increased security policies, GitHub and other providers now require a personal access token instead of a password.
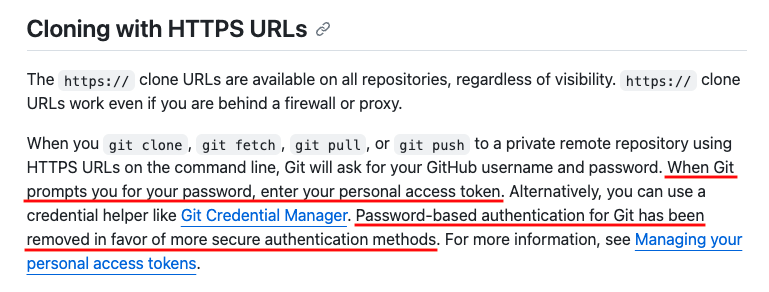
Cloning with HTTPS URLs access token instructions. Source: GitHub
You'll encounter the following error if you do not enter your personal access token:
![]()
Support for password authentication was removed.
To create a personal access token, navigate to Create a GitHub Token and follow the instructions:
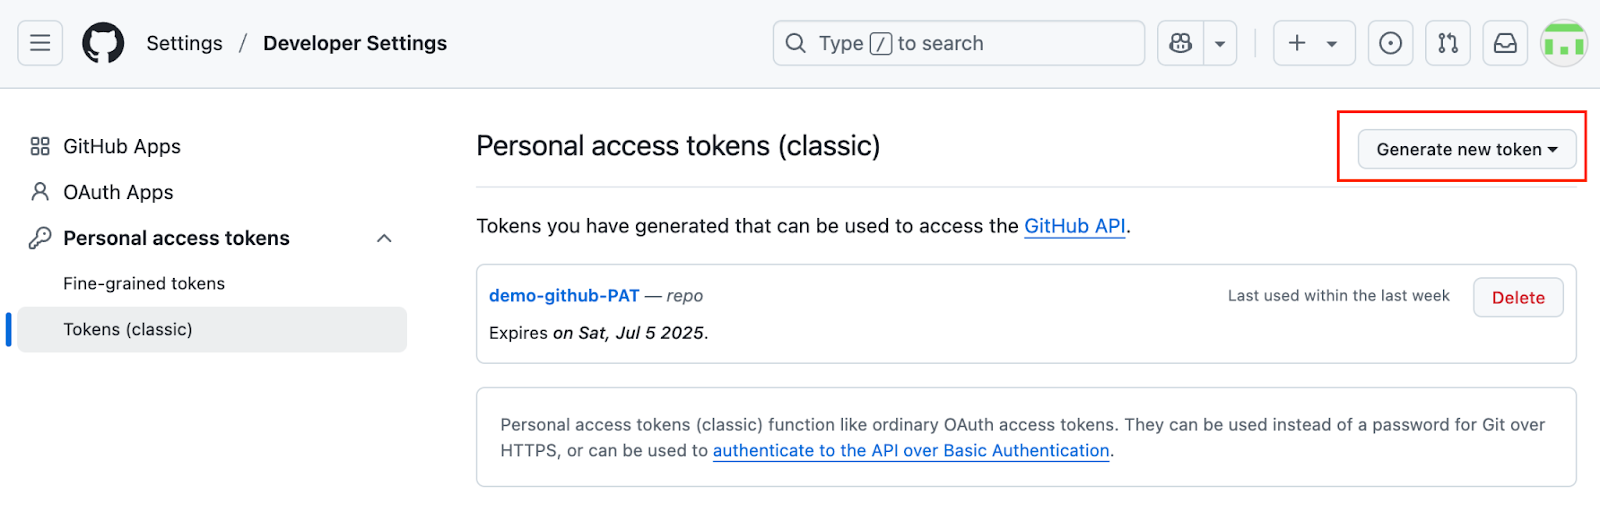
Create a personal access token on GitHub
To avoid entering your personal access token every time Git requires authentication over HTTPS, you can use a credential helper to cache your credentials securely. One popular option is the Git Credential Manager.
On macOS, Git integrates seamlessly with the macOS Keychain, which is what I personally use to store my credentials. In my case, I authenticate using passkeys stored in the Keychain, allowing for a secure and seamless experience.
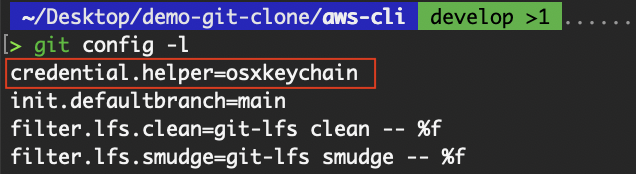
View credential helper

Passkeys on MacOS
To set up a passkey, navigate to GitHub's password and authentication settings and follow the prompts.
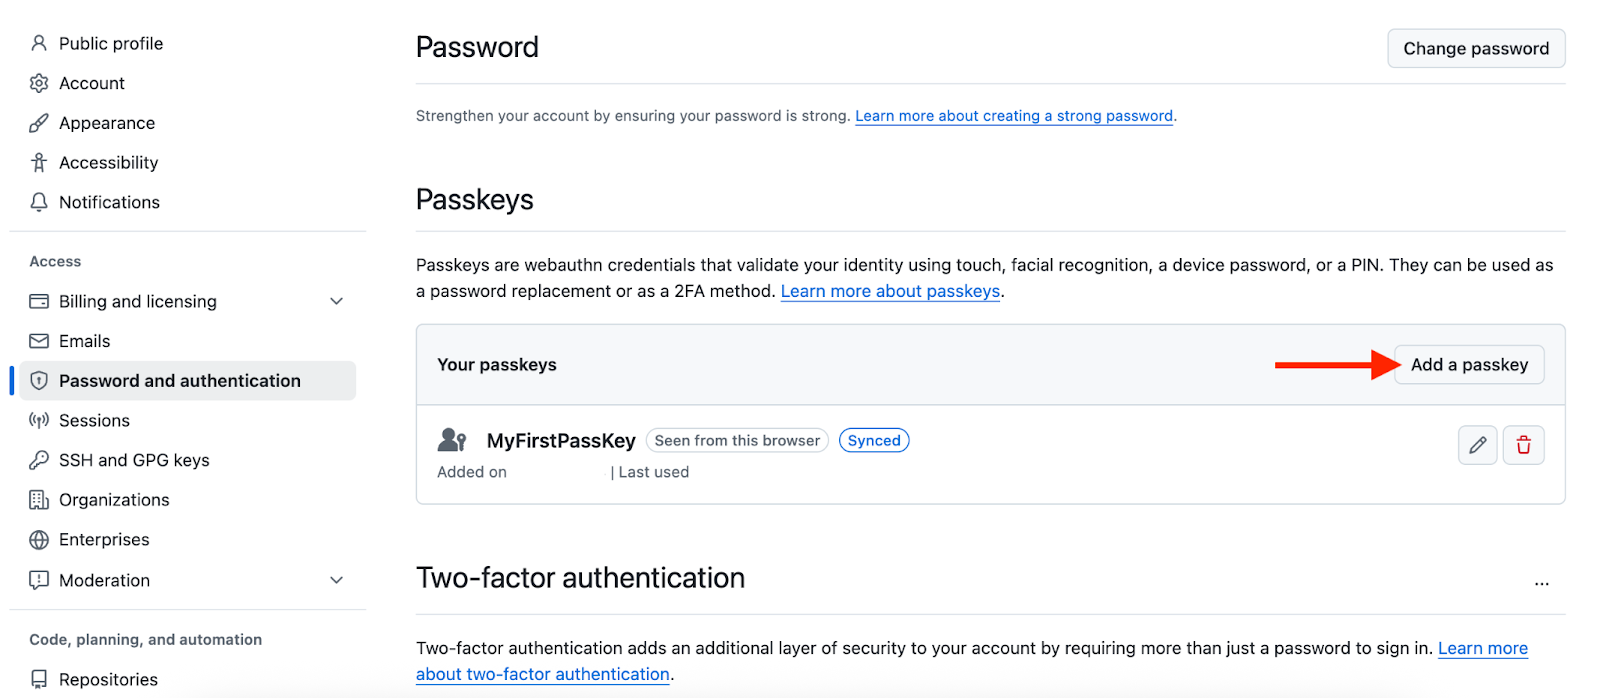
Create a passkey on GitHub
While GitHub allows you to create a non-expiring personal access token, most organizations enforce security policies that require tokens to have expiration dates. This means that if a token is used in automated environments, such as CI/CD pipelines, and it expires, the pipeline will fail due to authentication errors. It’s essential to proactively regenerate the token before it expires and update its usage accordingly.
Without proper controls, developers may inadvertently create and use multiple personal access tokens without clear documentation or tracking. This can quickly lead to confusion about which token is used and where, making maintenance and auditing more difficult. For better hygiene, it’s recommended to keep token usage minimal, documented, and tied to specific use cases.
SSH offers a secure and persistent authentication method, especially suitable for regular contributors and advanced users. Once configured, it provides a seamless way to interact with repositories without repeated credential prompts.
To set up SSH authentication, we must first generate an SSH key pair, which consists of a public and private key.
# ed25519 specifies the key type
ssh-keygen -t ed25519 -C "your_email@google.com"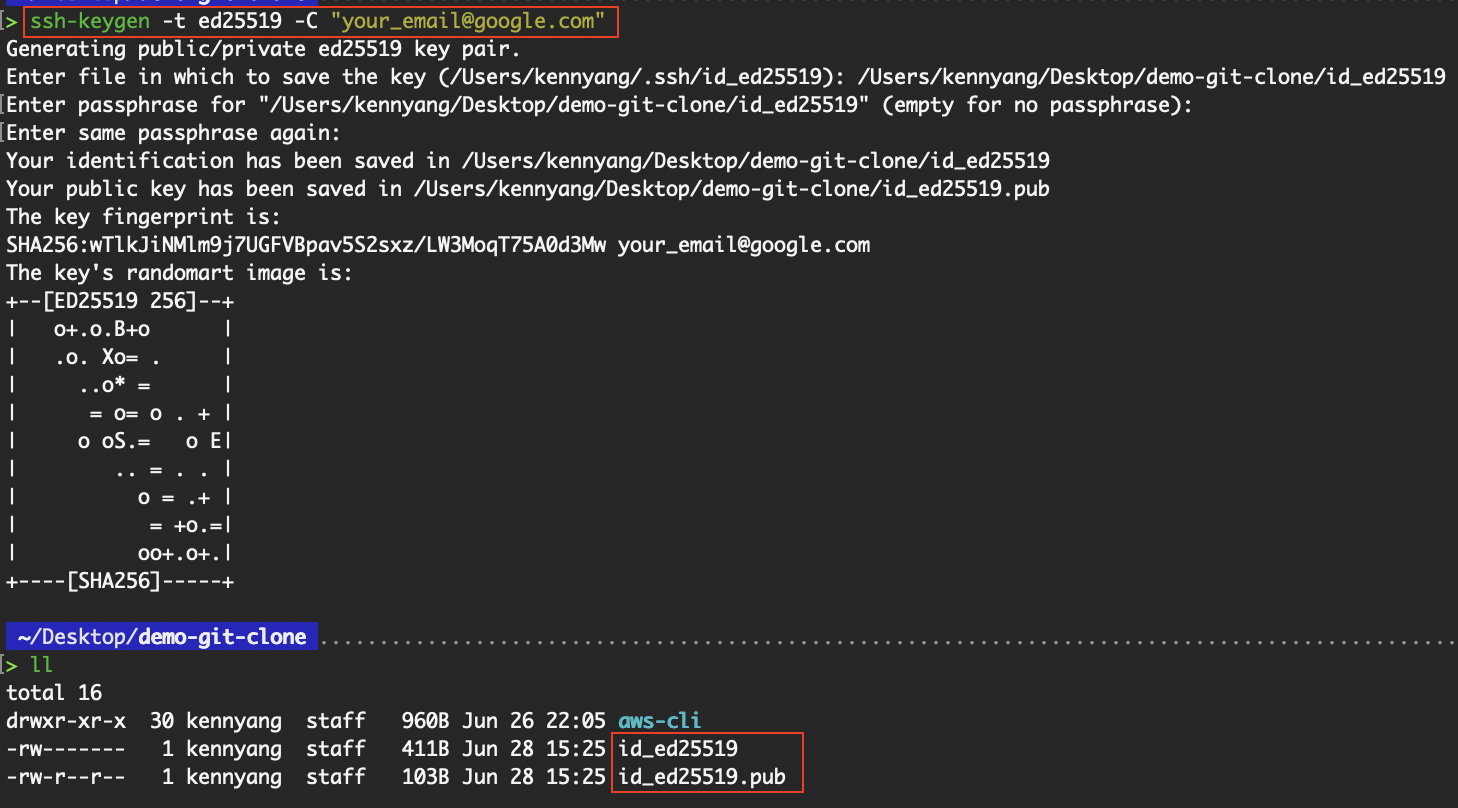
Create an SSH key pair
As I already have an existing SSH key in ~/.ssh/id_ed25519, I overwrote the default directory where the keys will reside. But if you’re creating the SSH key for the first time on your device, accept the default directory.
Navigate to SSH and GPC keys in GitHub to set up your SSH key.
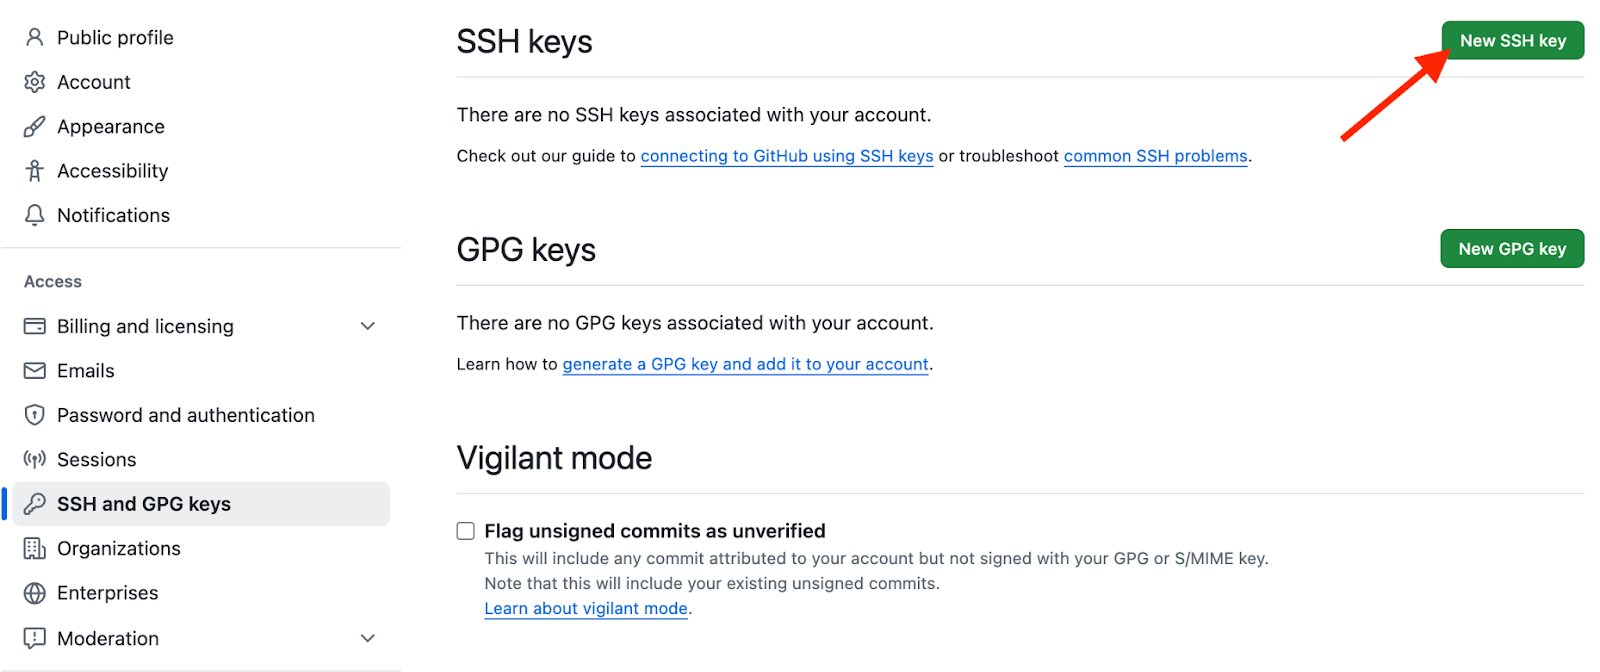
Set up SSH key on GitHub
Copy the contents of the public key in the “Key” section. In my case, it’s the contents of the id_ed25519.pub.
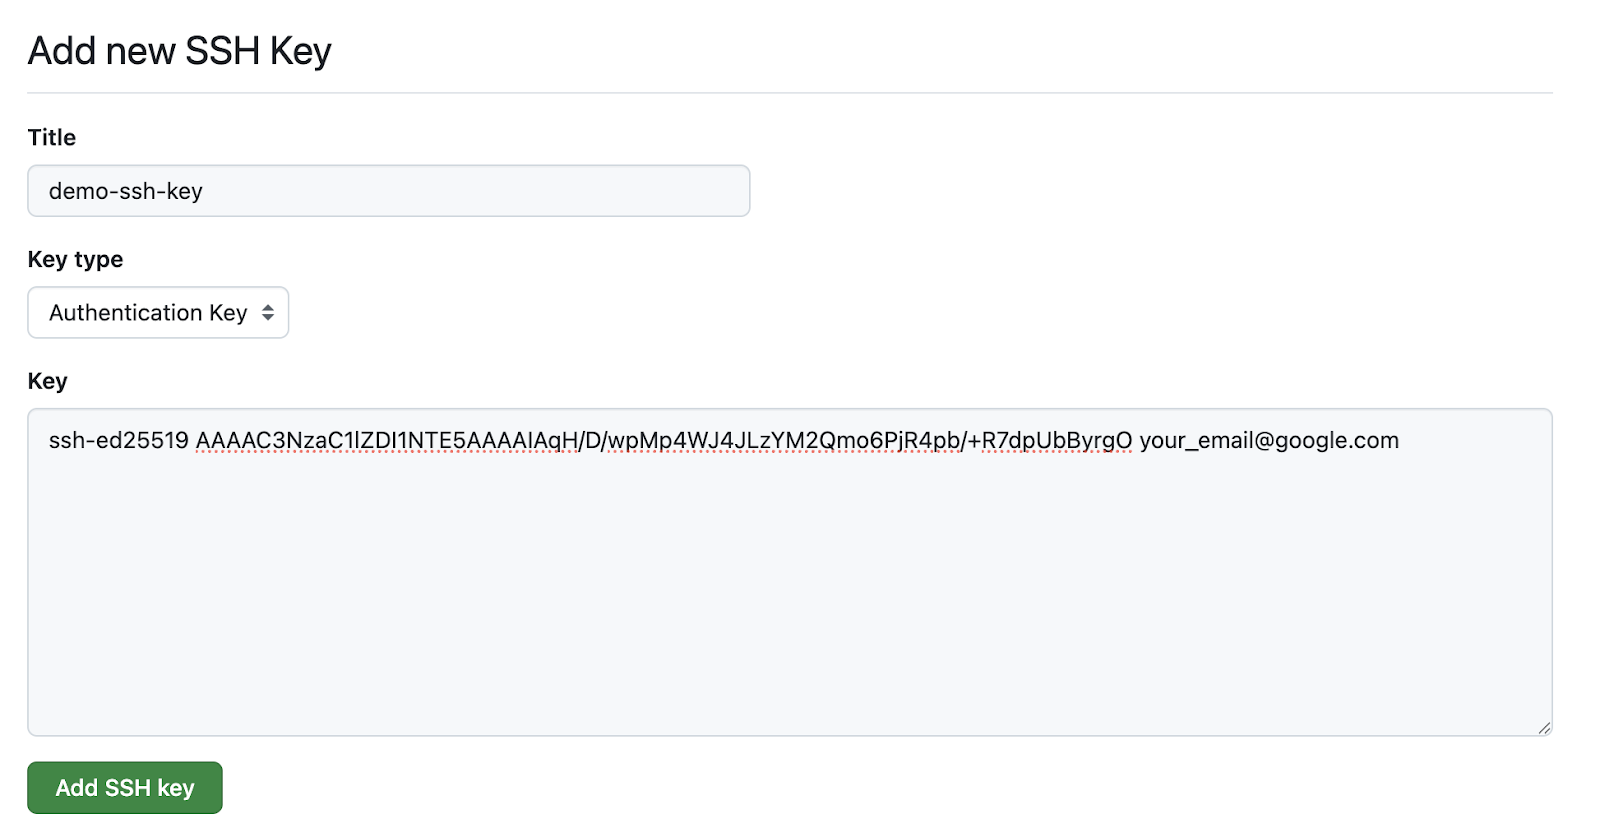
Paste in the contents of id_ed25519.pub
SSH uses public/private key encryption. Keep your private key safe and secure on your machine. With that, you’re ready to clone a repository, be it public or private, via SSH.
After successfully setting up SSH, selecting the SSH URL no longer displays the warning message, as seen in the “Types of Git URLs” section above.
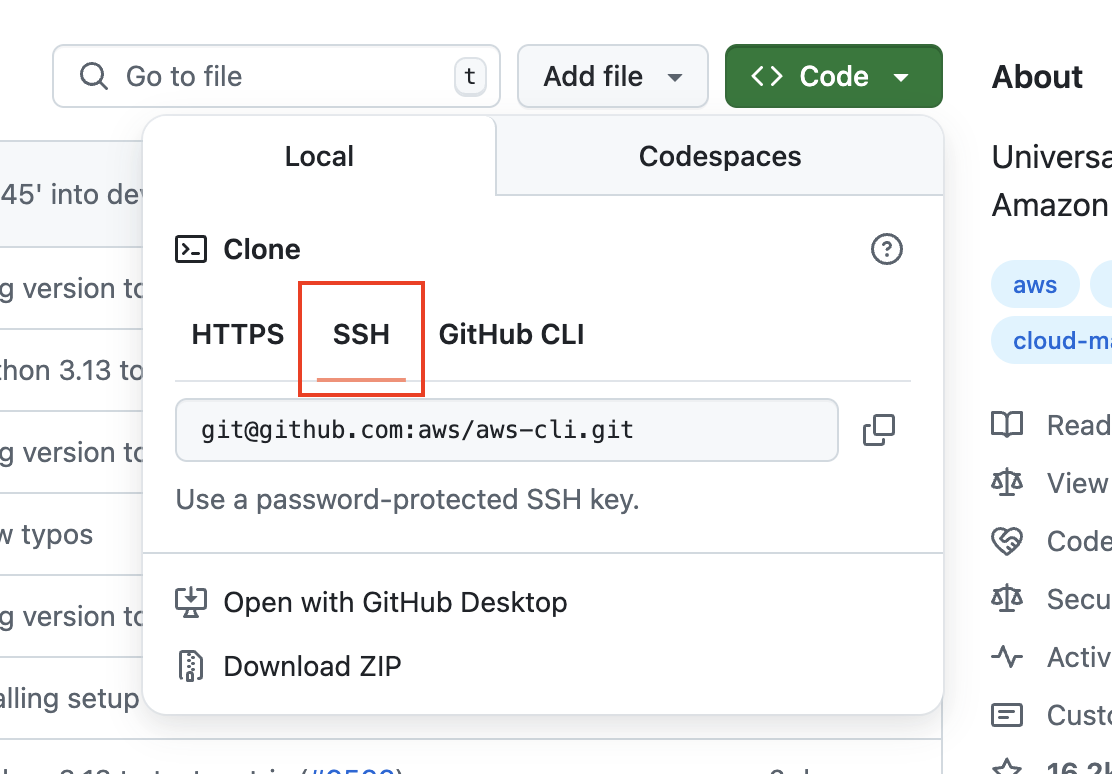
Obtain the SSH URL of a repository on GitHub
As the SSH private key resides on my local device, I’ll demonstrate git clone using SSH on my local instead of the EC2 server.
git clone git@github.com:aws/aws-cli.git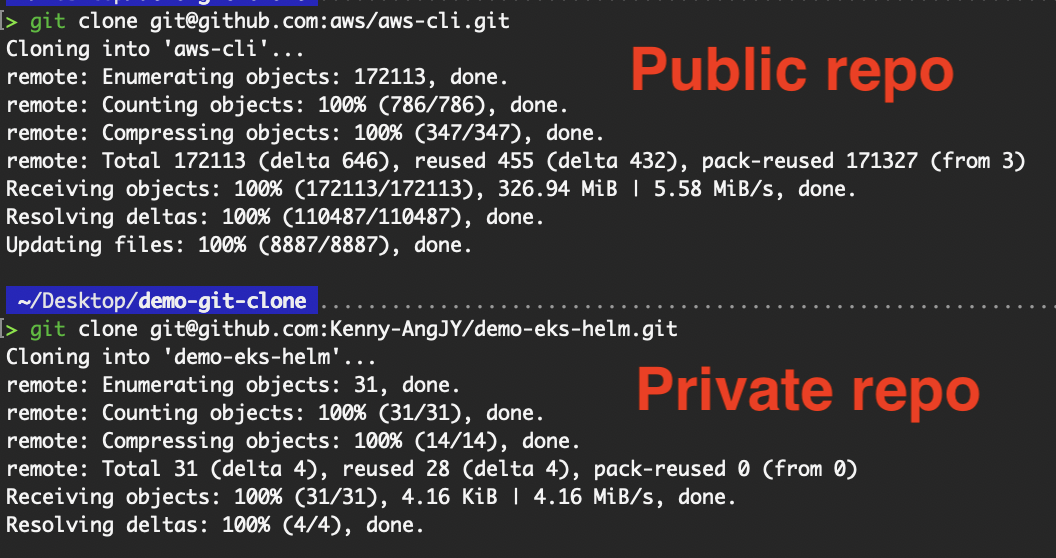
Clone public and private repositories using SSH
We have successfully performed the git clone operation using SSH!
The benefits of SSH include its security and widespread use in organizations, as it enables passwordless authentication, which is ideal for frequent interactions. SSH connections are also resilient to network interruptions and are often faster than HTTPS over long distances.
However, developers commonly encounter issues during SSH key setup as they copy the wrong public key to the Git provider. If you have multiple private keys for different purposes, you need to define in the ~/.ssh/config file which key to use per host. Otherwise, when authenticating to GitHub, the private key meant for Bitbucket might be used, resulting in authentication failure.
Host github.com
  HostName github.com
  User git
  IdentityFile ~/.ssh/id_ed25519
To test connectivity and verify the key being used:
![]()
Verify SSH connectivity
The git clone examples thus far cover the basic functionality that the command provides.
In this section, I will guide you through the command's various options, which allow you to tailor the cloning process of a repository to your local machine. Whether you're working with specific branches or optimizing for speed, understanding these variations will help you use git clone more effectively.
The most straightforward use of git clone, as we have seen, involves cloning a remote repository to your local machine.
# HTTPS protocol
git clone https://github.com/aws/aws-cli.git

# SSH protocol
git clone git@github.com:aws/aws-cli.git
These commands create a folder named “aws-cli” and initialize a local copy of the repository inside it, complete with version history and remote tracking setup.
By default, git clone creates a directory named after the repo. To specify a different target directory name, just provide it as a second argument.
This clones the contents of aws-cli.git into the local folder named my-project-folder:
git clone https://github.com/aws/aws-cli.git my-project-folder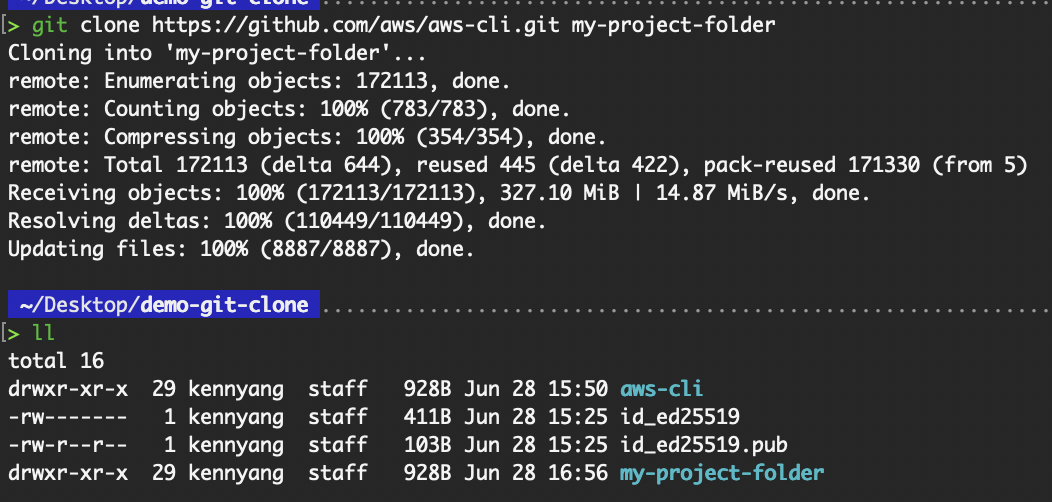
Cloning into a specific folder
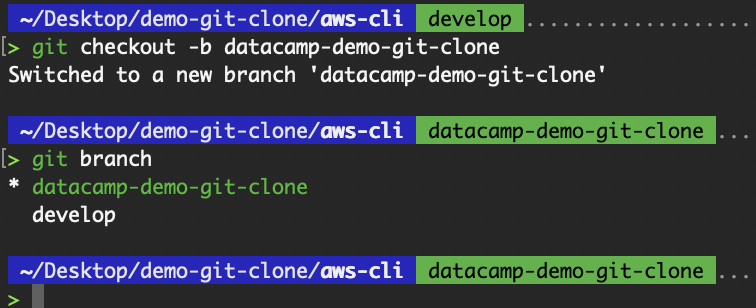
Use the --branch (or -b) flag to check out to the specified branch after cloning all branches from the remote. The specified branch becomes the checked-out “HEAD” with the other branches available locally for checkout.
Using our “aws-cli” repository example, the default branch is develop. Let’s try cloning and checking out to the master branch instead.
# Clone a branch
git clone --branch master https://github.com/aws/aws-cli.git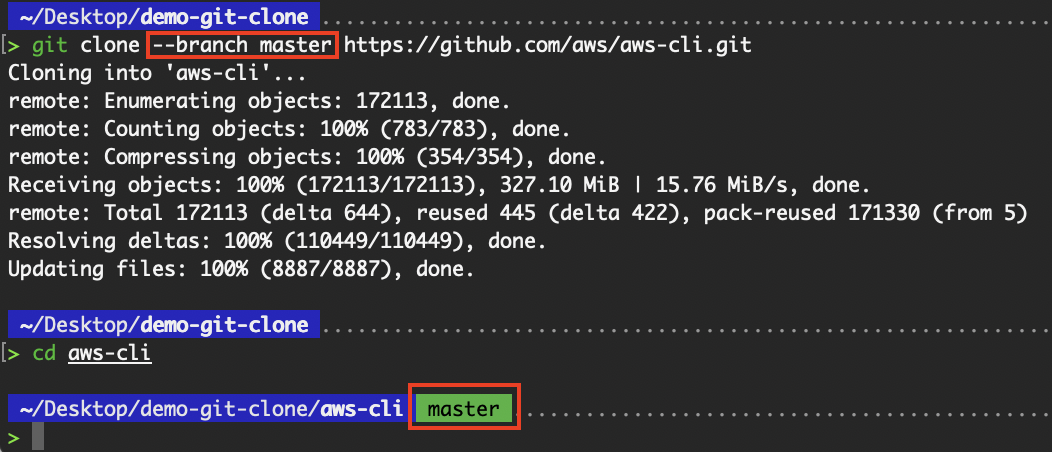
Cloning a specific branch
We can also clone a specific tag:
# Clone a tag (read-only snapshot)
git clone --branch 2.27.43 https://github.com/aws/aws-cli.git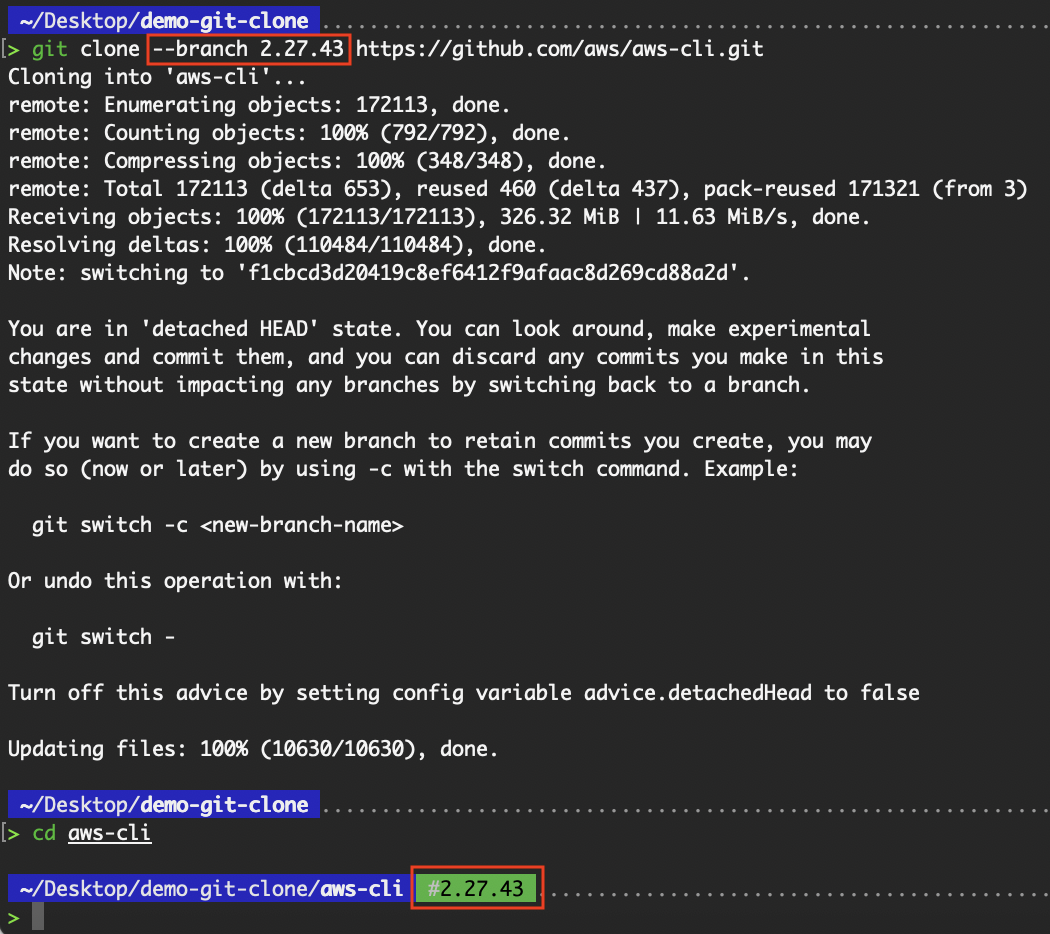
Cloning a specific tag
This flag is useful when working on a specific version or environment-related branch (e.g., staging, hotfix, or release).
If you only need the latest version of the project without the full commit history, use the --depth flag to perform a shallow clone. The --depth flag specifies how many commits you want to clone.
# Download only the latest commit history
git clone --depth 1 https://github.com/aws/aws-cli.git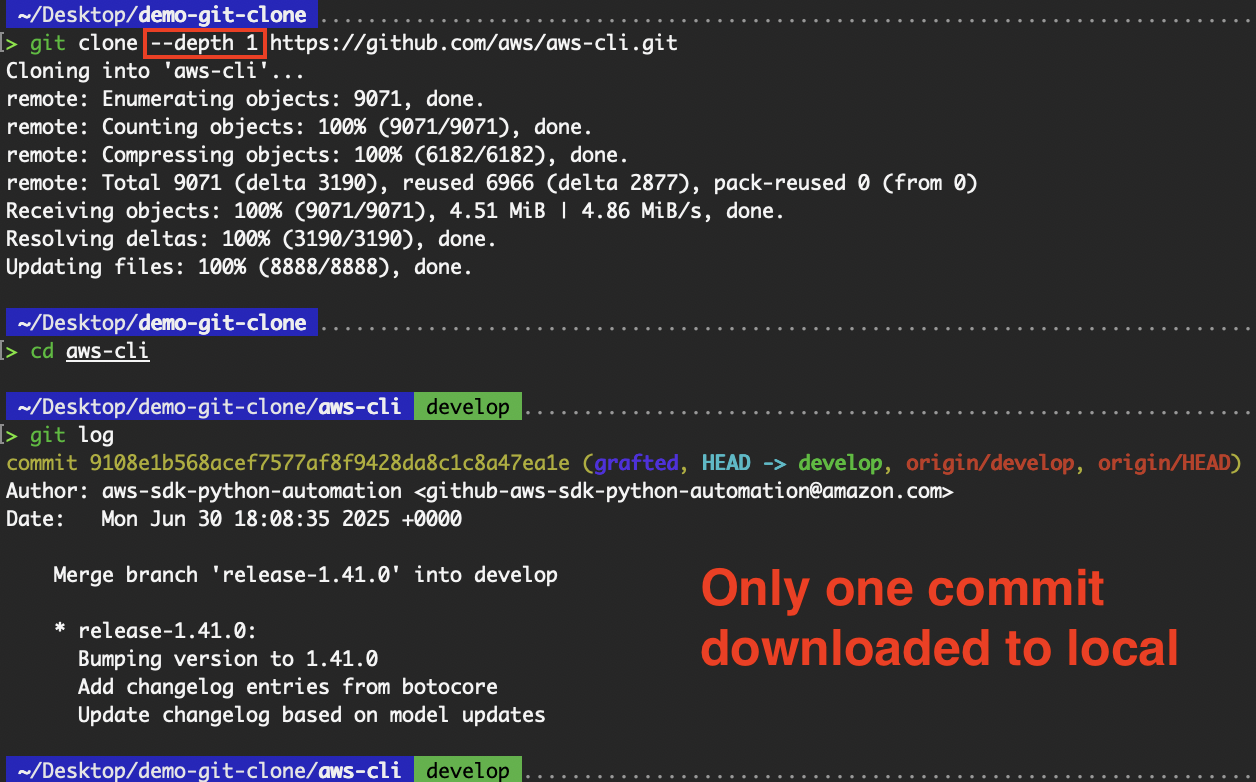 Shallow clone
This speeds up the cloning process and reduces disk usage, ideal for CI/CD pipelines or when you're not interested in the commit history. This is especially useful for the “aws-cli” repository that we have been cloning. As the “aws-cli” repository has a long history of commits, the time difference in including the --depth flag is huge.
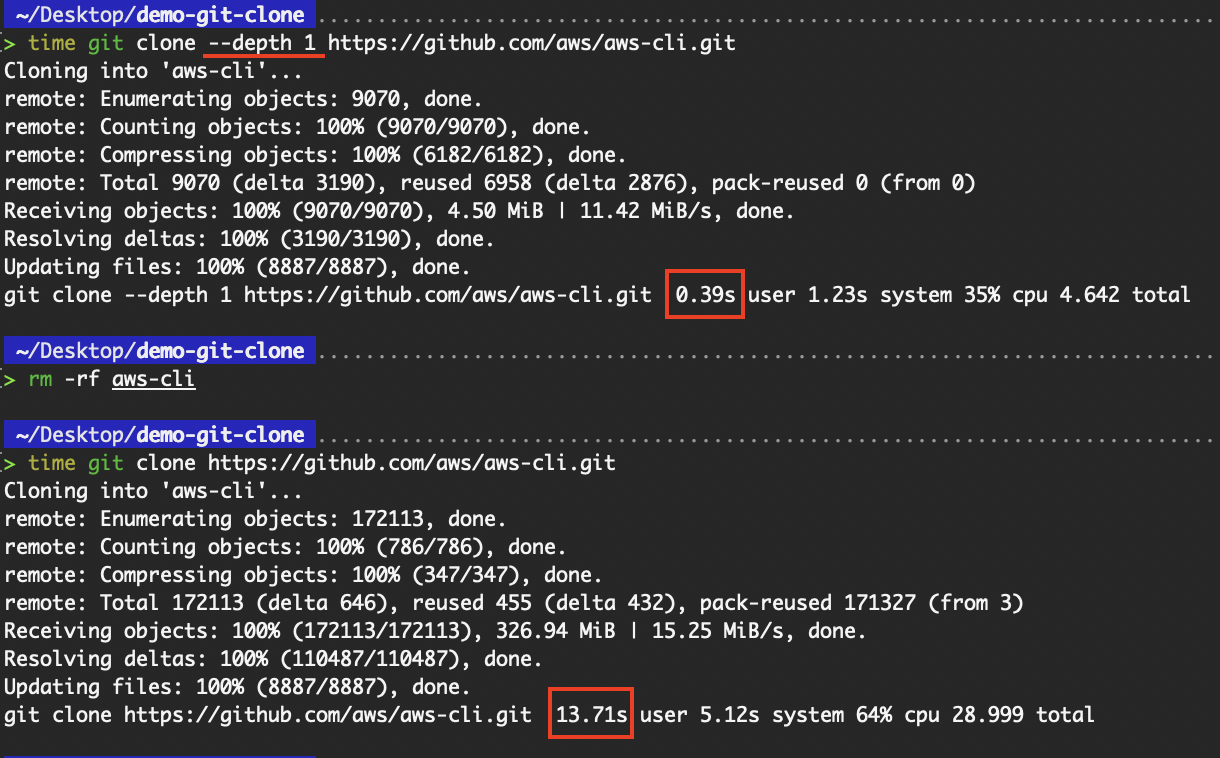 Time difference with and without shallow clone
Omitting the commit history except for the latest helped reduce the amount of information to be downloaded, and as such, reduced the time required.
While the git clone command is most commonly used in its basic form, Git offers several advanced options that provide greater control, efficiency, and customization during the cloning process.
These features are especially useful when dealing with large repositories, managing infrastructure-level repositories, or optimizing for specific development workflows.
In this section, we’ll explore branch-specific operations, shallow and partial clones, repository specializations, and fine-grained cloning configurations that empower both developers and DevOps engineers.
By default, git clone fetches all branches and checks out the default one. However, when working with large repositories or contributing to a specific feature, it’s often more efficient to clone just one branch. This can be achieved using the --single-branch flag.
git clone --branch <branch-name> --single-branch <repo-url>
git clone --branch feature/cliq --single-branch https://github.com/aws/aws-cli.git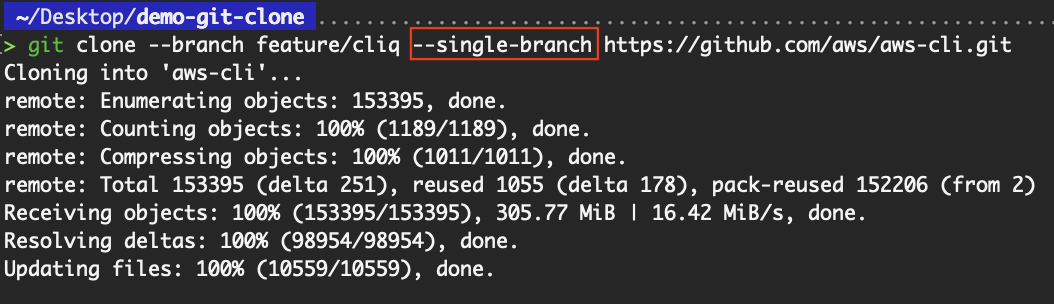 Clone a specific branch
The benefits include reduced download size and time, faster setup for feature-specific development, and avoidance of unnecessary branch history.
This approach is ideal when you want to work on a release branch or avoid downloading all the branches in active CI/CD repositories. If the branch name is not specified in the command, Git will only clone the default branch.
To understand more about cloning a specific branch, check out the Git Clone Branch tutorial.
When we clone a repository, two components are cloned: the repository (.git folder) and the working directory. The working directory is also commonly referred to as the working copy, work tree, or workspace.
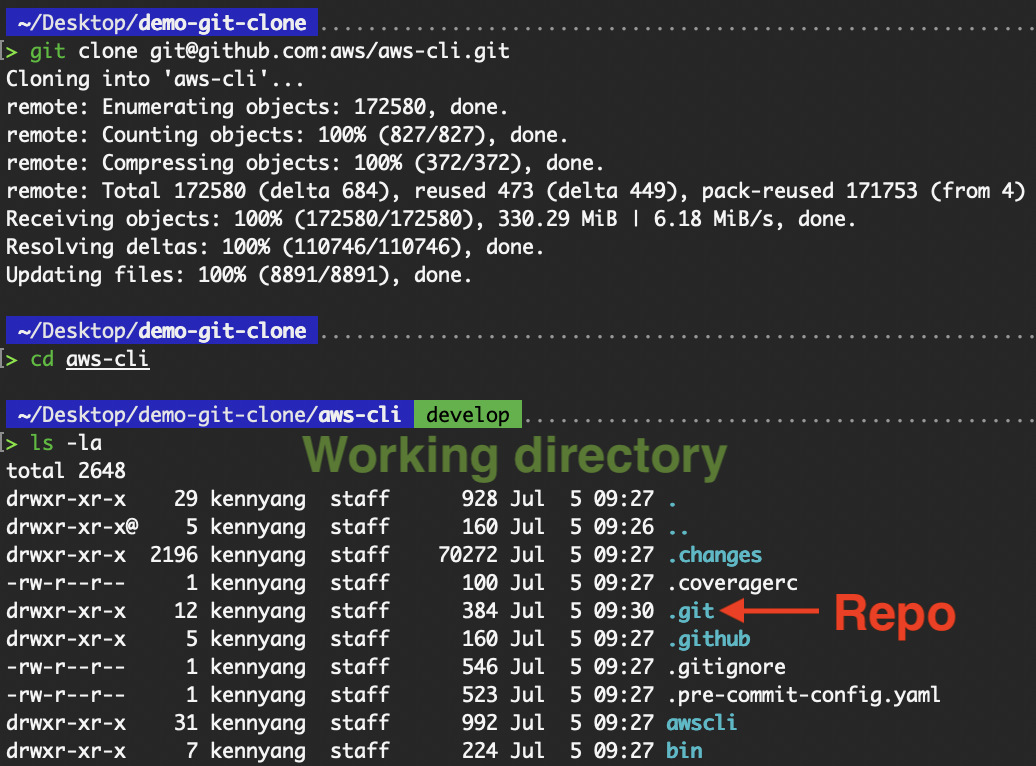
Difference between working directory and repository
The contents of the .git folder are as such:
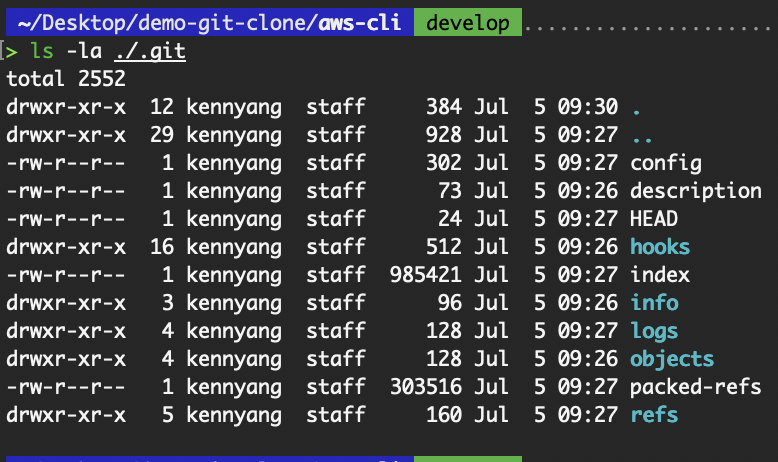
Contents of .git folder
This brings us to the subject of a bare repository.
A bare repository contains only the .git folder and no working directory.
git clone --bare <repo-url>
git clone --bare https://github.com/aws/aws-cli.git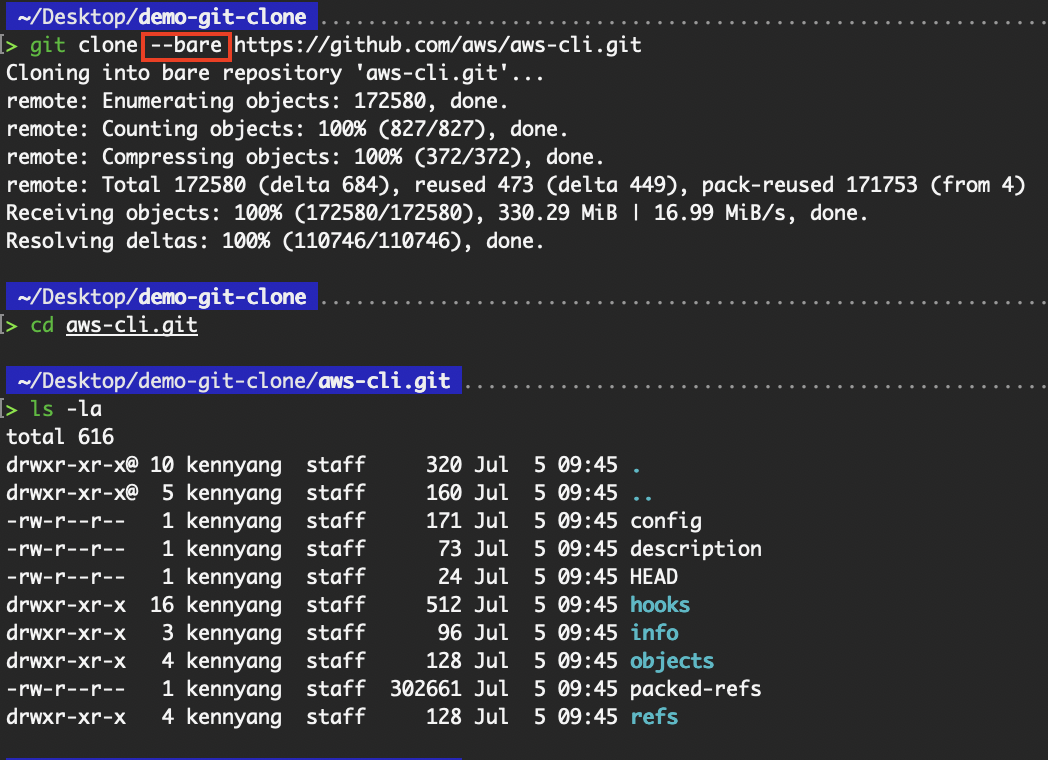
Clone a bare repository
From the above, we can see that the contents of what was cloned using the --bare flag are simply the contents in the .git folder of the non-bare repository. As this is a bare repository, there is no working directory, which means that we are unable to run the git commands, as shown in the following image:
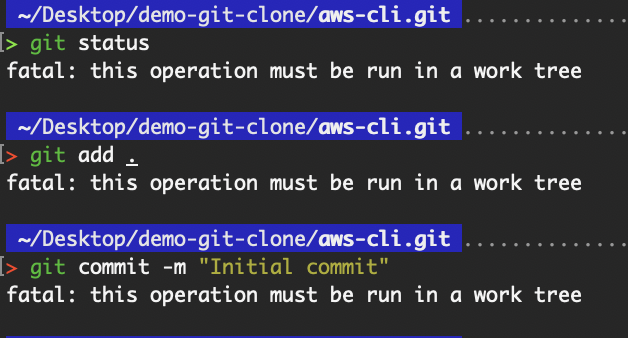 Operation must be run in a work tree
Bare repositories are typically used as a central repository in a shared environment for collaboration or mirroring, rather than active development. To demonstrate cloning from the bare repository, I’ll use the “aws-cli” bare repository that I have on my local.
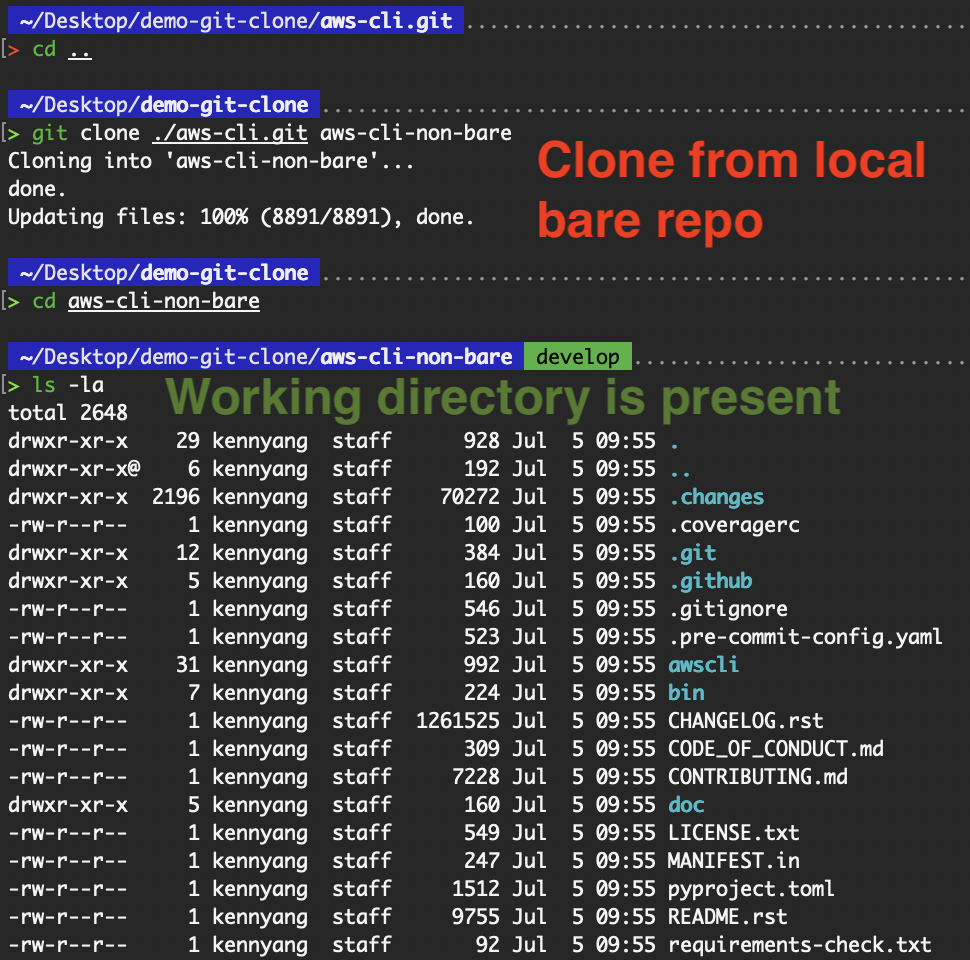
Clone from my local bare repository
We can see that this “aws-cli-non-bare” repository contains the working directory. Run git remote -v to see that it references the bare repository.
The git clone --mirror command sets up a mirror of the source repository. The --mirror flag implies --bare, meaning that the mirror repository doesn’t contain a working directory as well.
git clone --mirror <repo-url>
git clone --mirror https://github.com/aws/aws-cli.git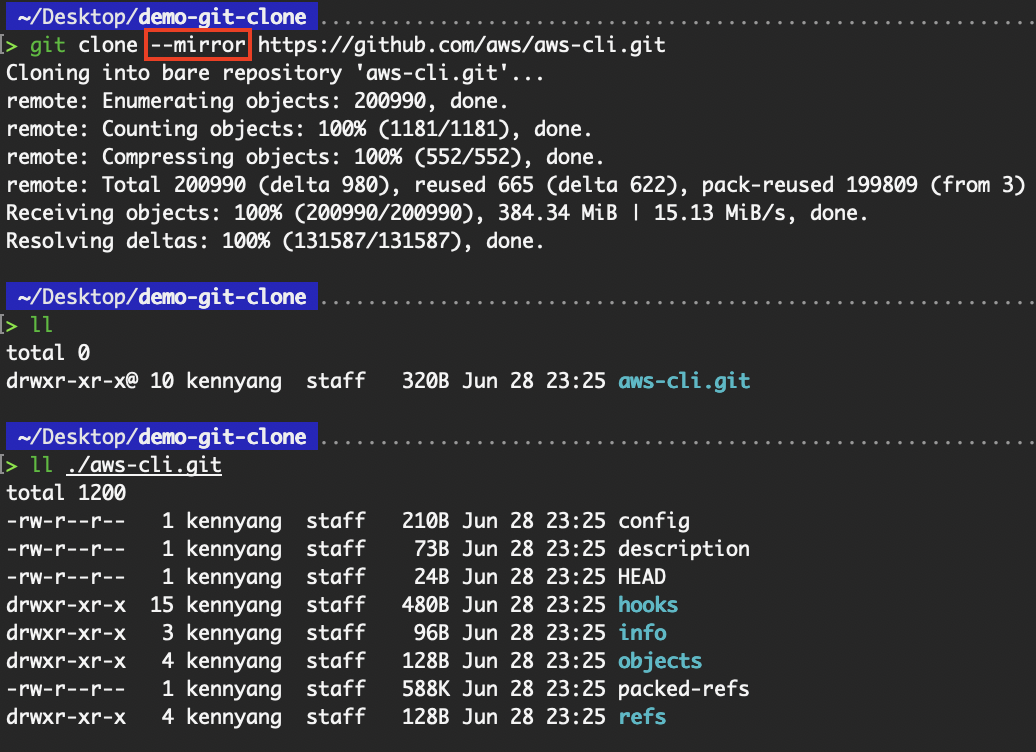
Clone a (central) repository to make a mirror repository
However, compared to --bare, --mirror not only maps local branches of the source to local branches of the target, but it also maps all refs (including remote-tracking branches, notes, etc.) and sets up a refspec configuration such that a git remote update in the target repository overwrites all these refs. This provides us with a more comprehensive copy, including all references (branches, tags, etc.).
You can refer to the GitHub documentation for the complete steps to mirror a repository.
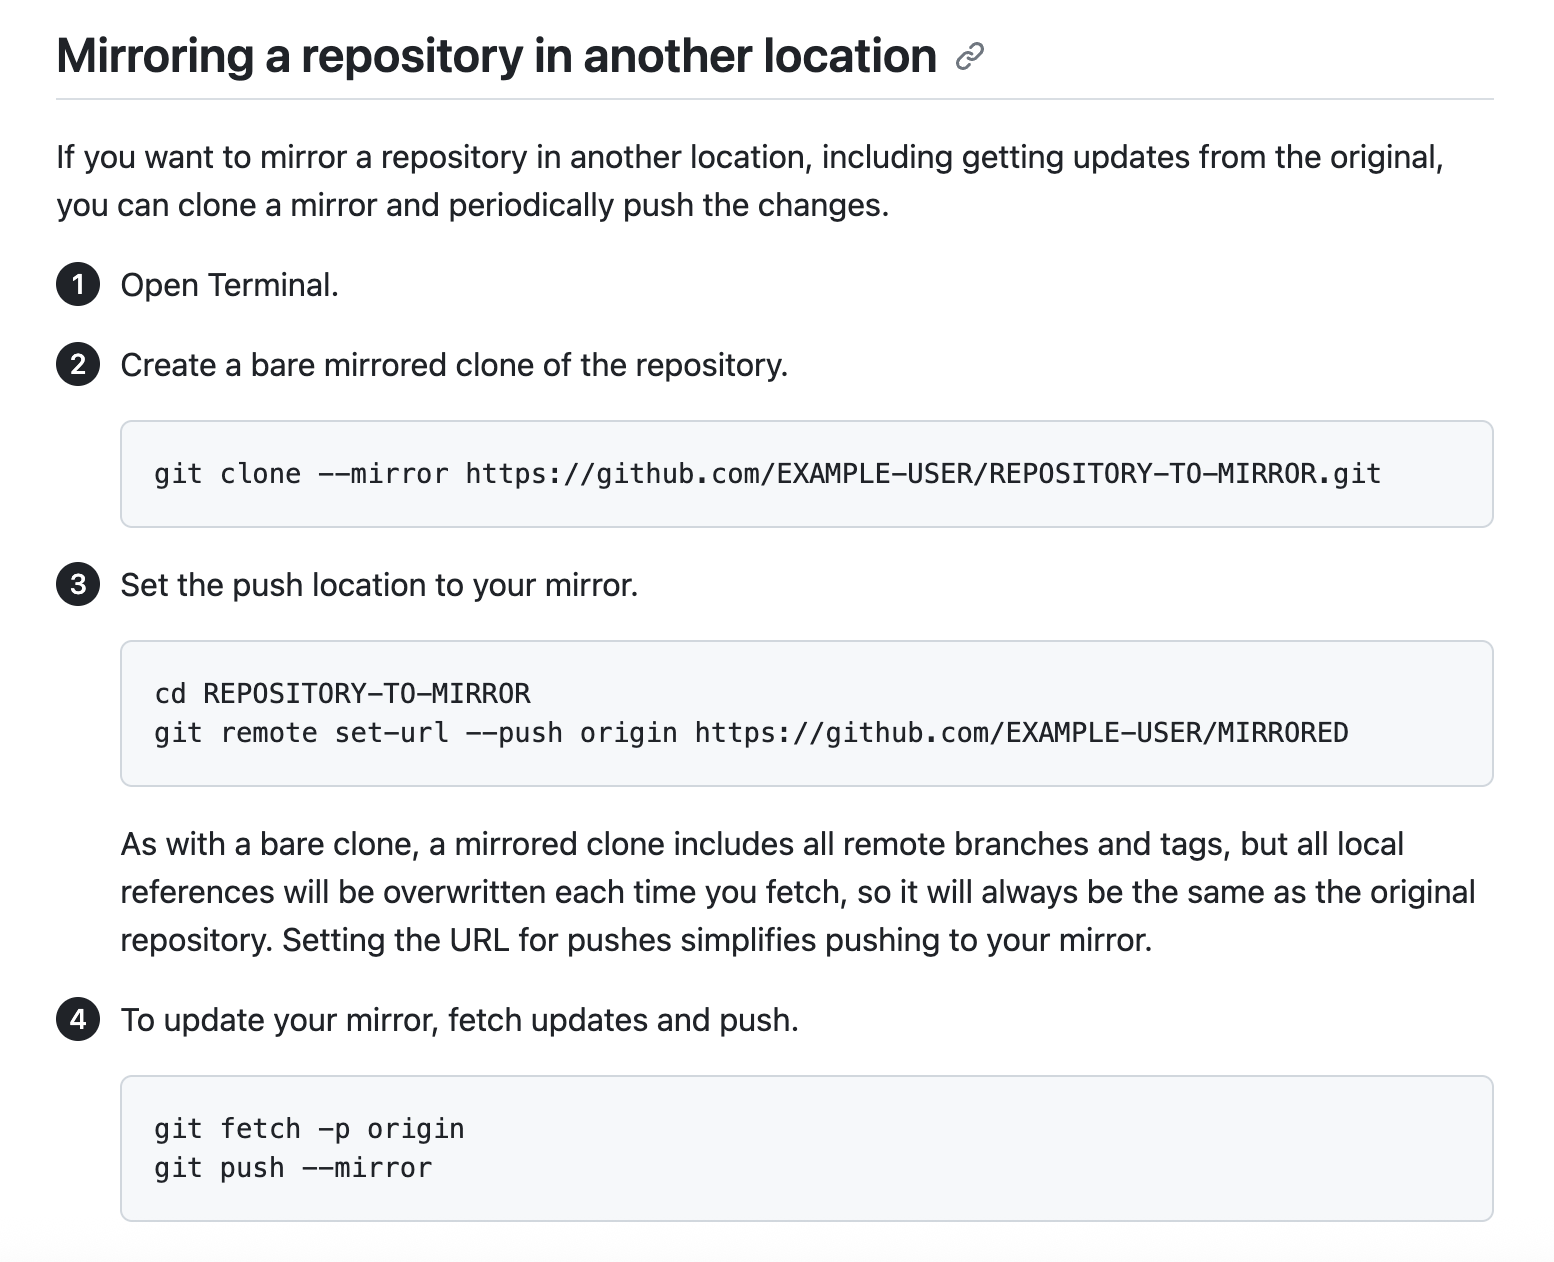
Mirroring a repository in another location. Source: GitHub
Partial clones enable users to fetch only a subset of repository objects using the --filter flag, making them well-suited for developers who only need part of a codebase, especially in environments with bandwidth or disk constraints. A few common examples of the --filter flag are:
--filter=blob:none: skips file content (blobs)--filter=blob:limit=<size>: excludes files of a certain size and above--filter=tree:<depth>: omits all blobs and trees whose depth from the root tree is more than or equal to the defined depth.The --filter=blob:none flag is used to optimize cloning operations by avoiding the immediate download of file contents (blobs).
# Binary Large Objects (BLOB)
git clone --filter=blob:none <repo-url>
git clone --filter=blob:none https://github.com/aws/aws-cli.git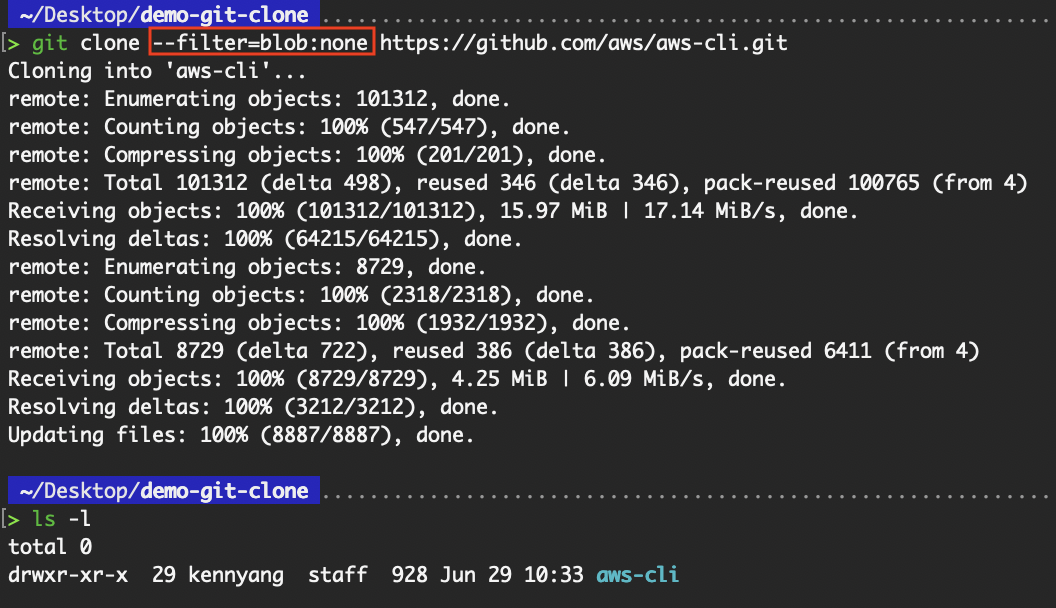
Clone with filter=blob:none
This is especially useful in large repositories or when only a subset of the project is needed. For example, in monorepos, not all teams or developers need the entire codebase.
A frontend engineer working only in frontend/ doesn't need backend services or shared libraries. Using the --filter flag speeds up cloning and reduces storage by deferring blob download until needed (e.g., when the file is opened). The following image shows what Git is doing in the background when I open a file, downloading the file blob on demand.

Git downloads the file blob on demand
Another example would be in CI/CD pipelines. Pipelines often don’t need the full repo history or every file. When combined with sparse-checkout, --filter=blob:none lets the pipeline clone only relevant directories (e.g., deployment scripts).
The --filter=blob:limit=<size> flag is useful for developers who want to avoid downloading large files (blobs) during cloning, while still retrieving smaller files immediately. This is part of Git's partial clone functionality and is particularly helpful when working with repositories that contain mixed-size content.
For example, in some projects, especially those using Git LFS or with committed media assets (e.g., videos, large datasets, game assets), developers may want to skip large files during cloning, thereby speeding up the initial clone while deferring the download of large files until they are explicitly needed.
# Binary Large Objects (BLOB)
git clone --filter=blob:limit=<size> <repo-url>
#  The suffixes k, m, and g can be used to name units in KiB, MiB, or GiB
git clone --filter=blob:limit=<n>[kmg] <repo-url>
git clone --filter=blob:limit=1m https://github.com/aws/aws-cli.git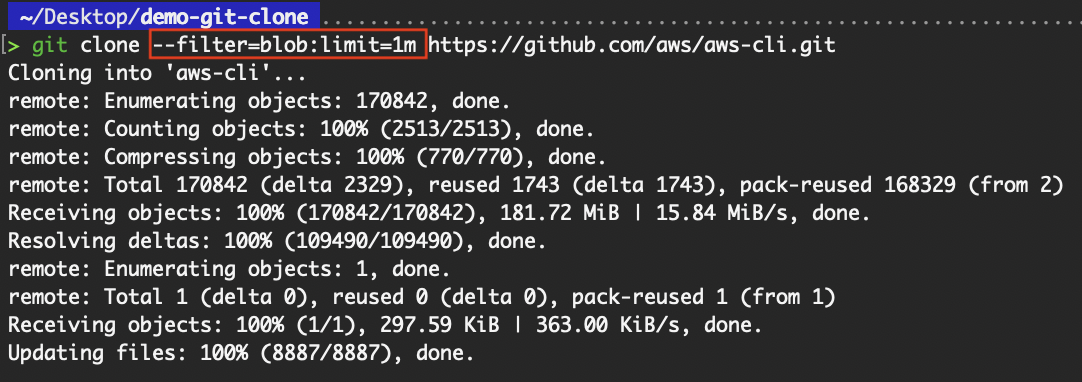
Clone with filter=blob:limit
The --filter=tree:<depth> flag is used to limit how deep into the directory structure Git fetches tree objects during a clone, helping to reduce data transfer size, especially useful when working with deeply nested projects like monorepos. For example, if you want to quickly inspect a large monorepo structure, for auditing, onboarding, or reviewing purposes, downloading deep trees is wasteful.
git clone --filter=tree:<depth> <repo-url>
git clone --filter=tree:0 https://github.com/aws/aws-cli.git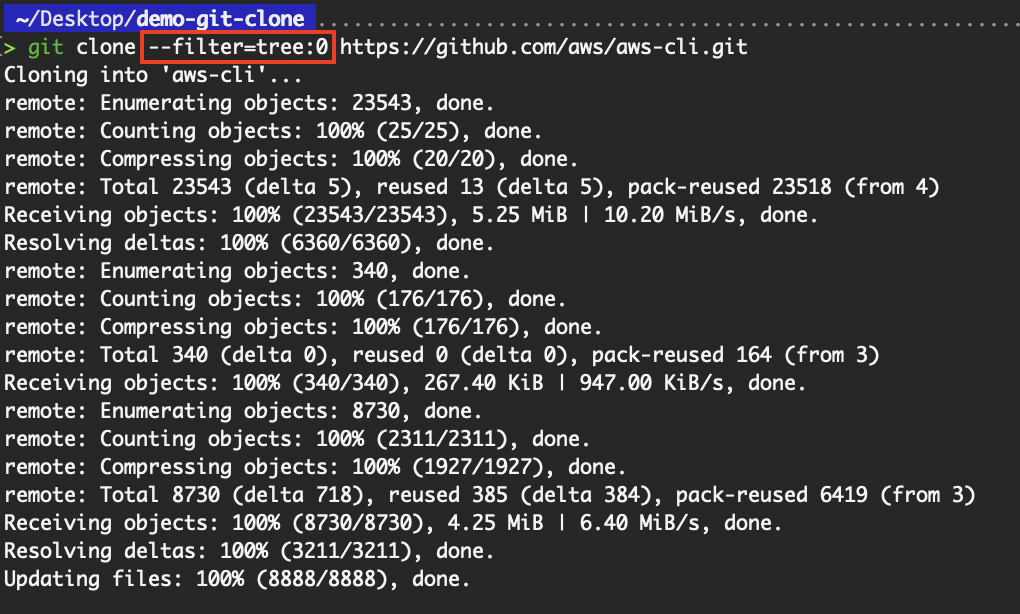
Clone with filter=tree
Do note that the Git server you're cloning from (in this case, GitHub) might only support certain values for the tree filtering depth.

Tree filter allows max depth 0
Git provides several options to customize behavior during cloning:
--origin <name>: sets a custom remote name instead of origin--template <dir>: uses a directory of template files for the initial .git setup--single-branch: avoids fetching other branches--recurse-submodules: automatically initializes and clones submodulesThese options are useful when setting up standardized environments, working with modular repositories, or integrating with deployment tools.
The --origin <name> flag enables developers to customize the name of the remote from which the repository is cloned. By default, Git names the remote origin, but this flag lets you change it to something else during the clone operation.
git clone --origin <remote name> <repo-url>
# Name the remote as “upstream”
git clone --origin upstream https://github.com/aws/aws-cli.git
Rename the remote from origin to upstream
Developers may need to change the remote name for clarity, as they may later need to add another remote (e.g., upstream vs. forked origin). Changing the name of the first remote helps avoid confusion and conflict.
The --template flag allows developers to specify a custom template directory that Git will use when creating the .git directory in the newly cloned repository. Template directories allow you to predefine hooks, configuration files, or directory structures that are automatically applied to the repository during initialization.
# Specify the directory from which templates will be used
git clone --template=<template-directory> <repo>
git clone --template=./git-template https://github.com/aws/aws-cli.git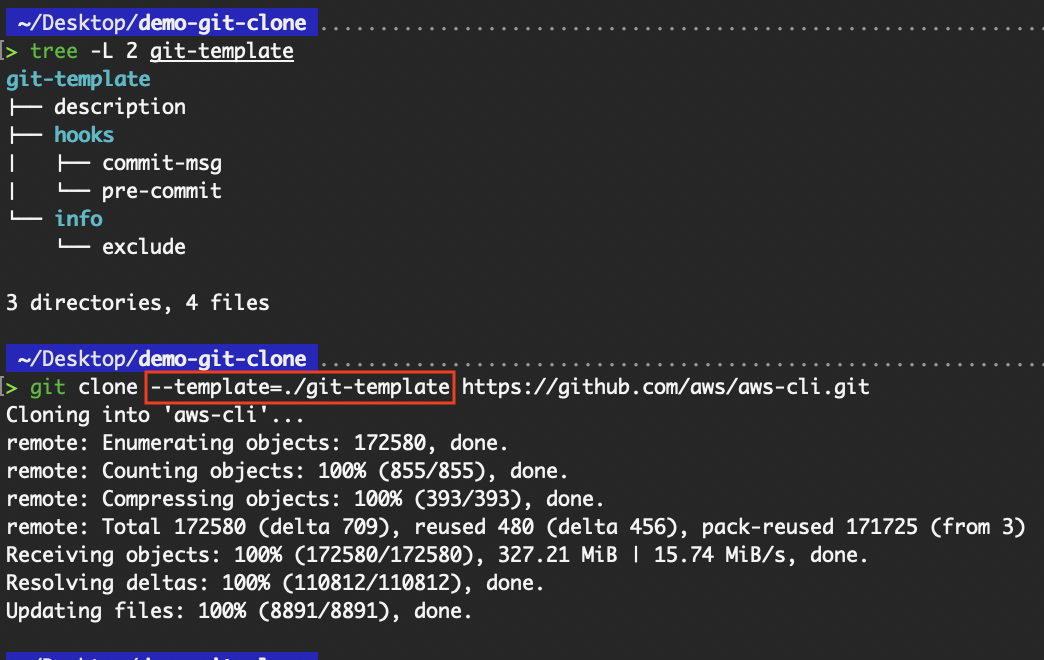
Usage of the --template flag
I will cover the template flag further in the “Template directory application” section.
The --single-branch flag is used to clone only the history of the specified branch, instead of all branches in the remote repository. This can significantly reduce the amount of data cloned, especially in repositories with many long-lived branches or a large commit history.
When you’re assigned to work on a specific feature or release branch (e.g., feature/login-ui, release/v2.0), there's no need to clone the history of other unrelated branches.
git clone --branch feature/login-ui --single-branch <repo-url>

# If you do not specify a branch, Git will clone only the remote's default branch, usually main or master
git clone --single-branch <repo-url>
git clone --single-branch https://github.com/aws/aws-cli.git
A typical git clone tracks all remote branches, as shown in the git branch -r output below.
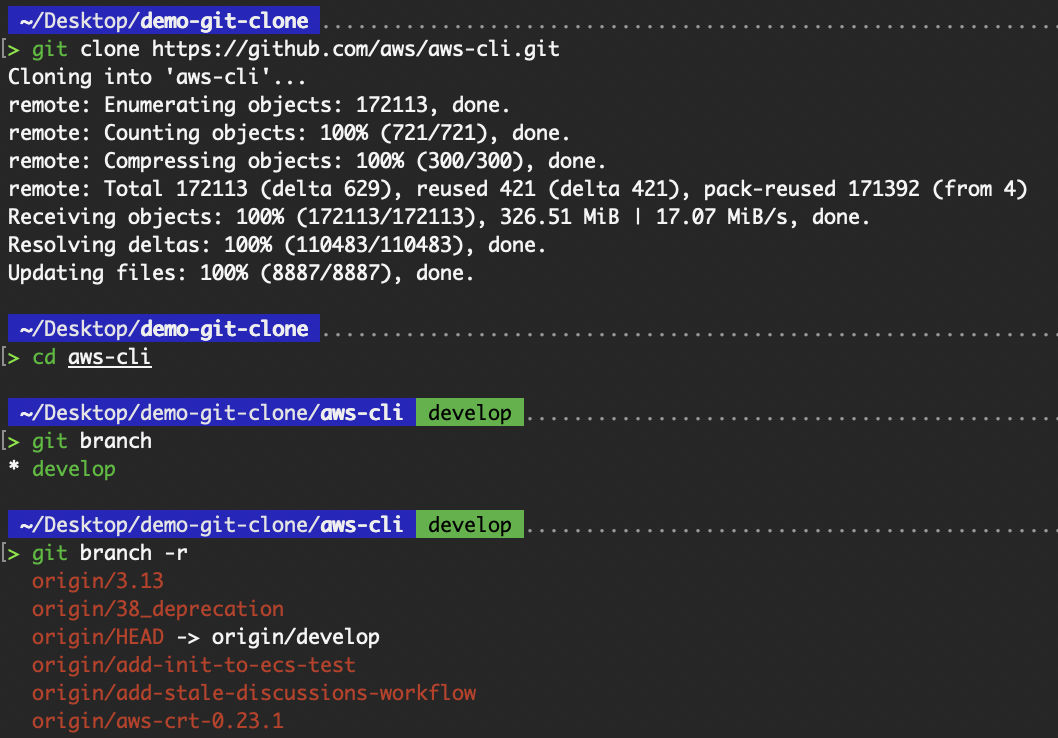
All remote branches are tracked
Whereas the addition of the --single-branch clones only the history of the specified branch.
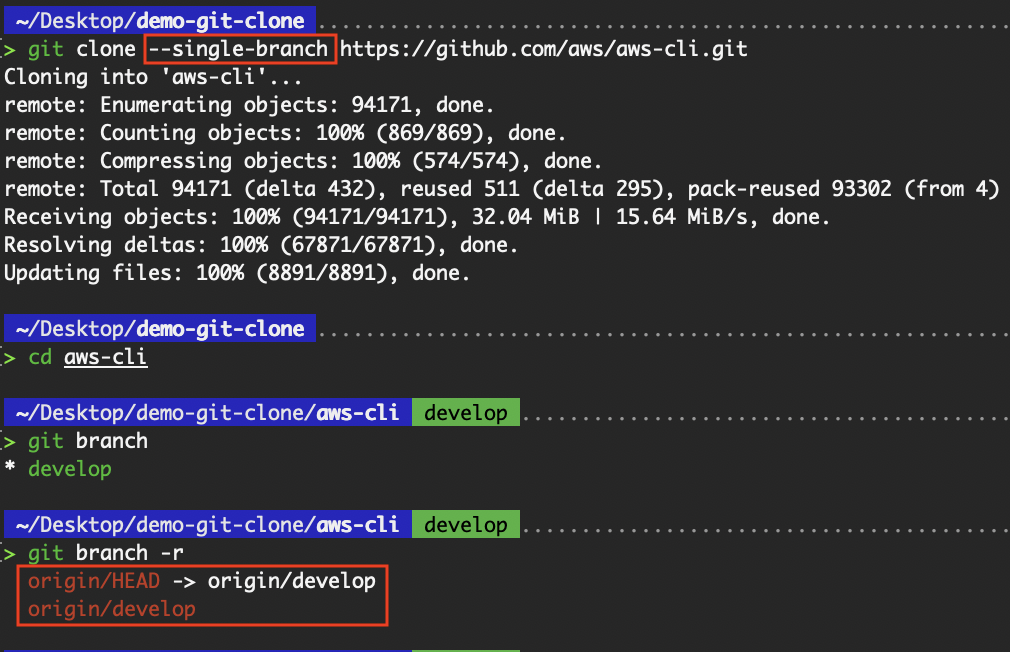
Only the default branch is tracked
Git submodules are a reference to another repository, fixed to a specific commit. It allows you to keep the other Git repository as a subdirectory of your Git repository, often used to include third-party code, shared libraries, or vendor-specific components.
I created a public GitHub repository to demonstrate this concept.
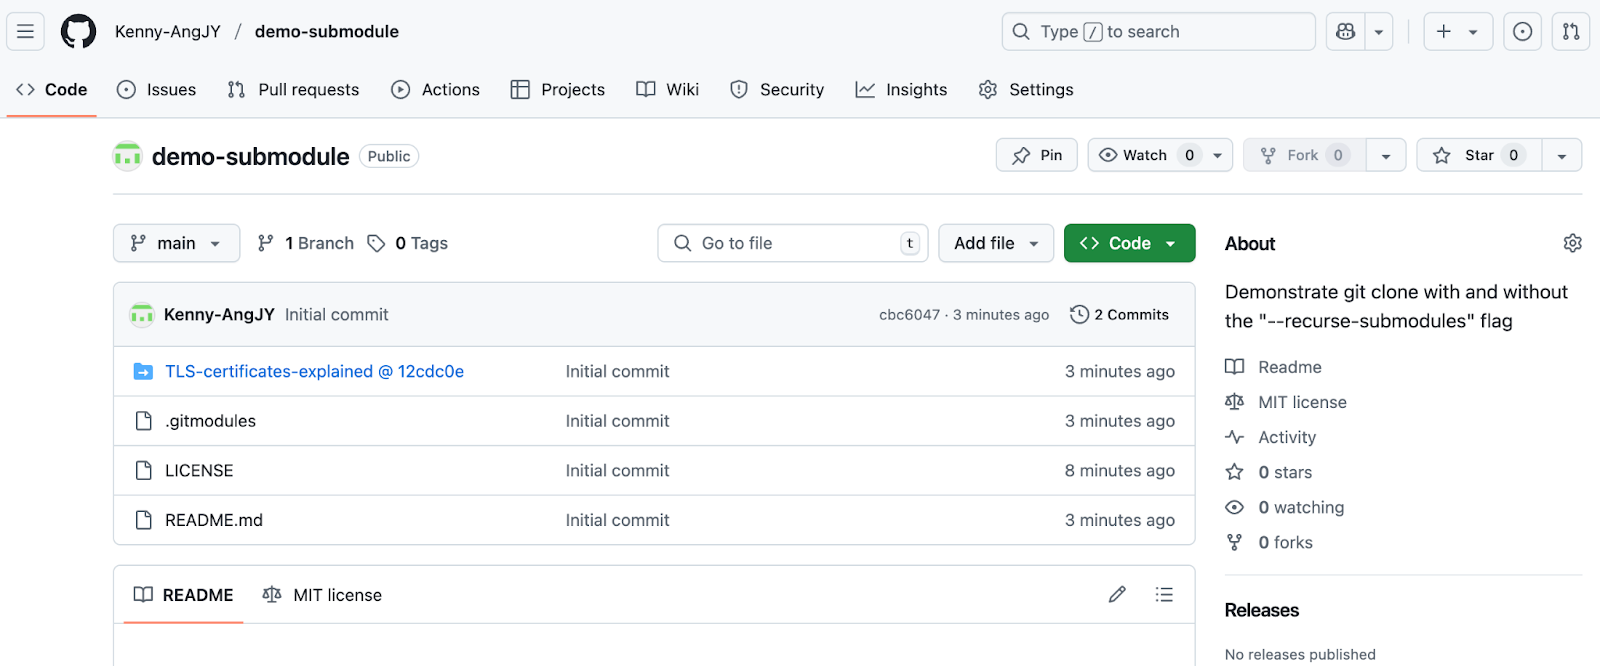
Demonstrate submodules
When we clone a project with a submodule in it, by default, we get the directories that contain the submodules, but not the files within them.
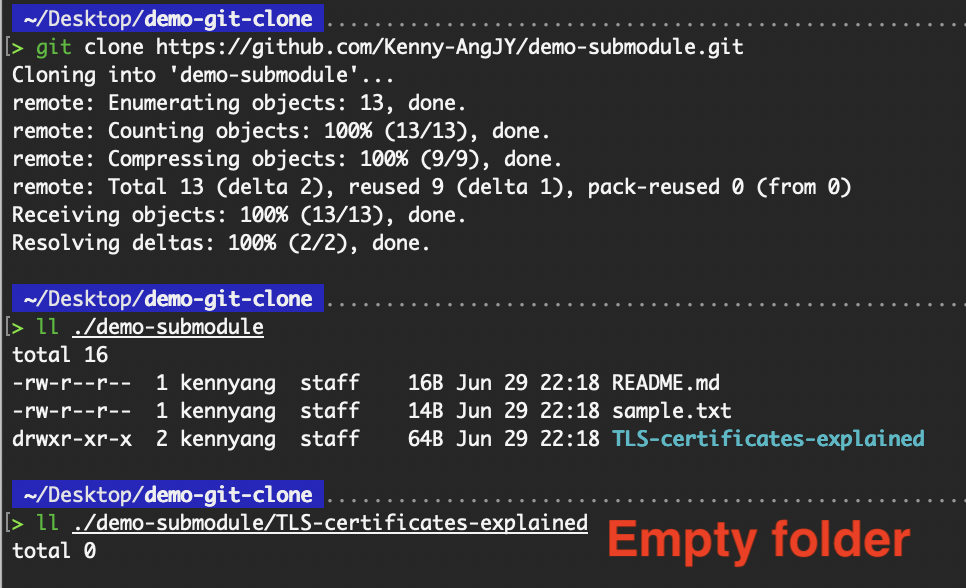
Empty submodule folder
Instead of running git submodule init to initialize your local configuration file, and git submodule update to fetch all the data from that project, we can use the --recurse-submodules flag with the git clone command to automatically initialize and clone all submodules defined in a repository’s .gitmodules file.
git clone --recurse-submodules <repo-url>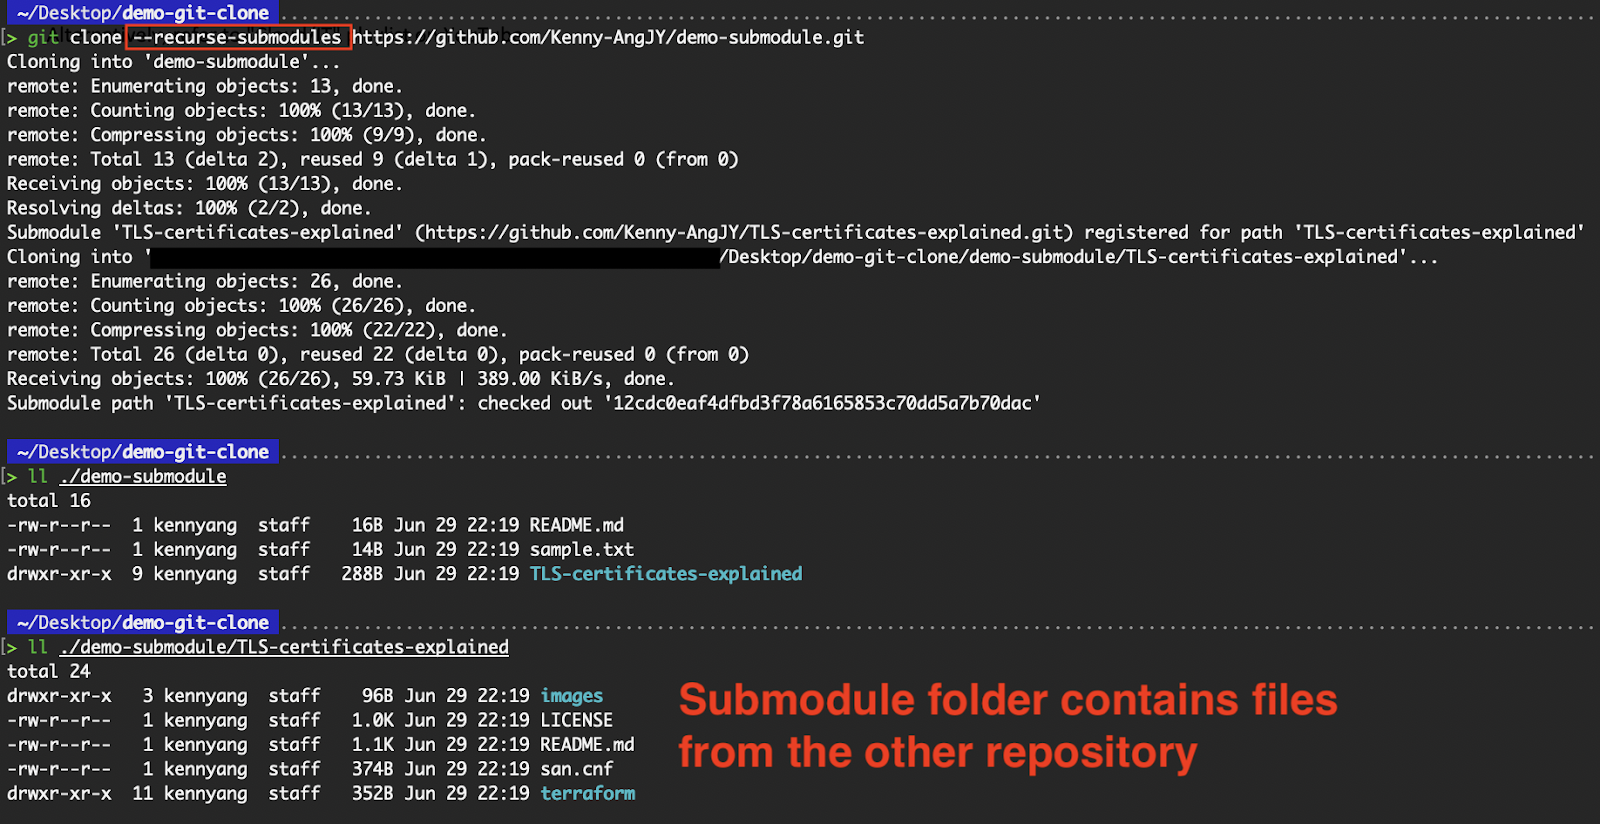
Clone files within the submodule directory
Git allows the use of template directories to define default hooks, configs, and other files during cloning or repository initialization:
The structure of the template directory can be similar to the one below, with hooks/pre-commit containing a shell script hook to block commits without a JIRA ID, and hooks/commit-msg containing the template for commit messages.
/home/devops/git-template/
├── config
├── description
├── hooks/
│   ├── pre-commit
│   └── commit-msg
├── info/
│   └── exclude
After you have defined the necessary files in the template directory, you can use it for your git clone operations.
git clone --template=</path/to/template> <repo-url>
git clone --template=/home/devops/git-template https://github.com/aws/aws-cli.git
This is ideal for:
Template directories streamline team workflows and ensure consistency across cloned repositories.
While the git clone command works the same at its core across all platforms, the experience can differ slightly depending on the operating system.
Environment-specific considerations—such as terminal tools, file path formats, and permission handling—can impact how developers interact with Git. In this section, I’ll walk through the cloning process on Windows, Linux/Ubuntu, and macOS to help you navigate any nuances.
On Windows, developers typically use Git Bash, PowerShell, or Command Prompt to execute Git commands. We can install Git from the downloads page, which comes along with Git Bash, a Unix-like shell tailored for Git usage on Windows.
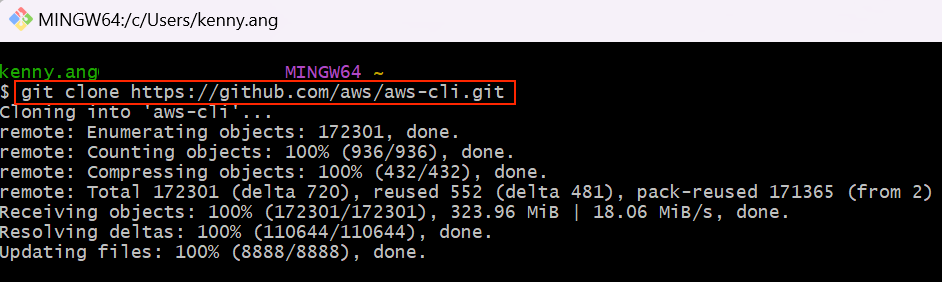
git clone in Git Bash
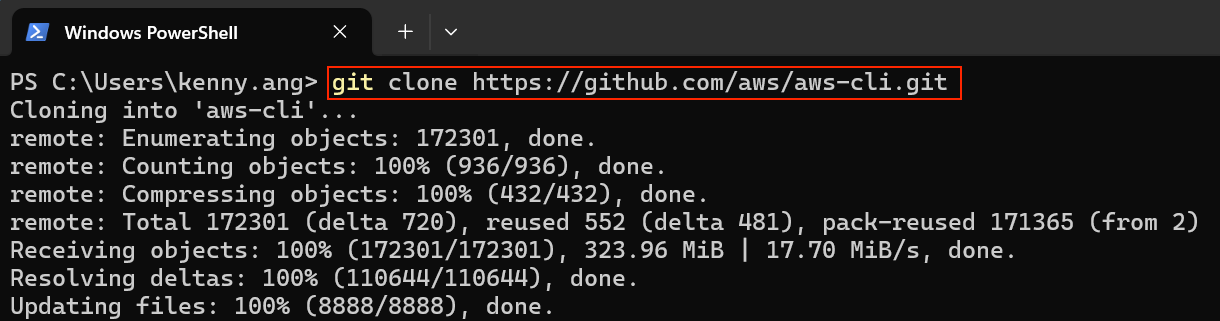
git clone in PowerShell
A few considerations to take note of:
/c/Users/username/), whereas PowerShell and Command Prompt use Windows format (C:\Users\username\).Linux distributions like Ubuntu provide a seamless Git experience through their native terminal. For the following example, I spun up an Ubuntu EC2 instance in AWS and connected to it via SSH.
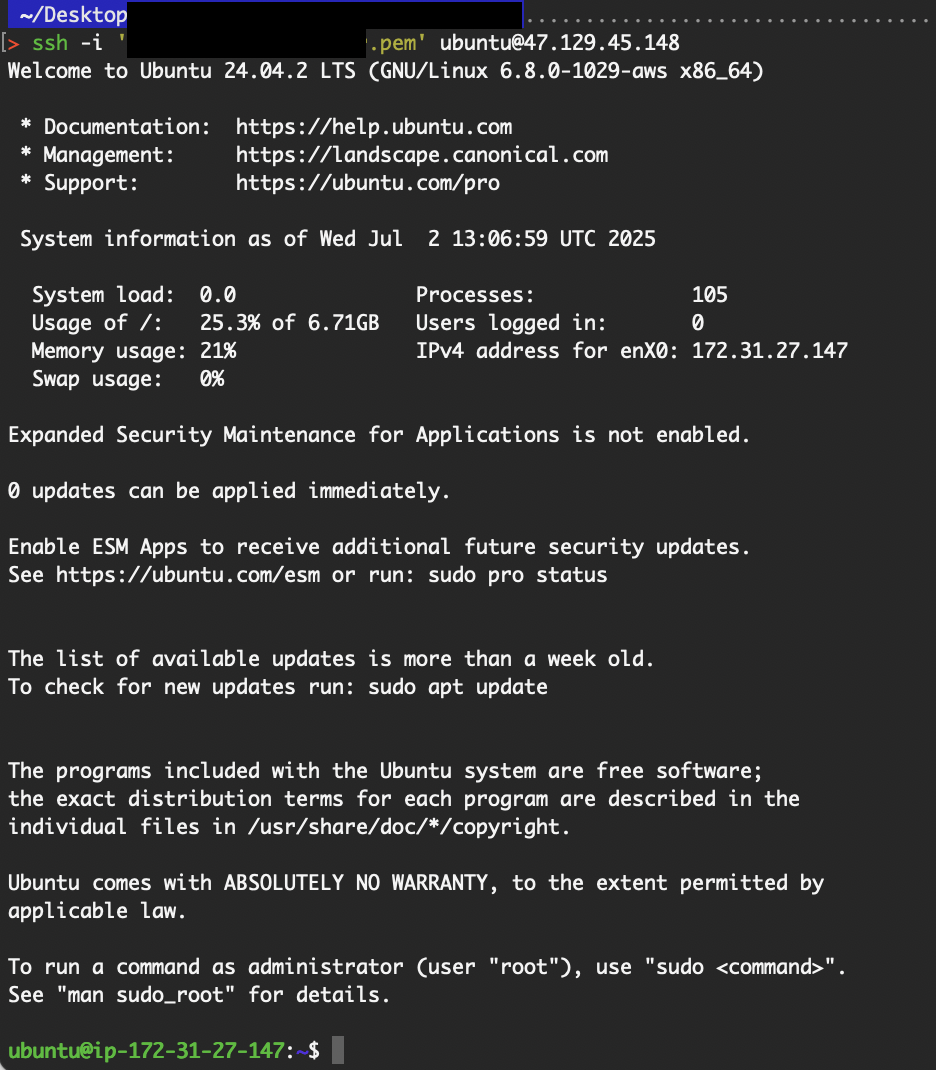
SSH into the Ubuntu EC2 instance
Git has been installed by default. Nonetheless, if it isn’t on yours, simply execute the sudo apt install git command.
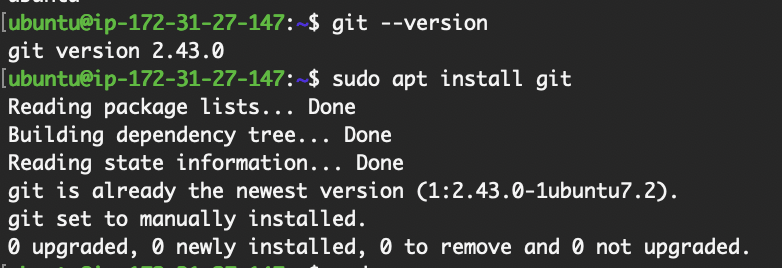
Install git on Ubuntu
Navigate to your desired directory and run the git clone command.
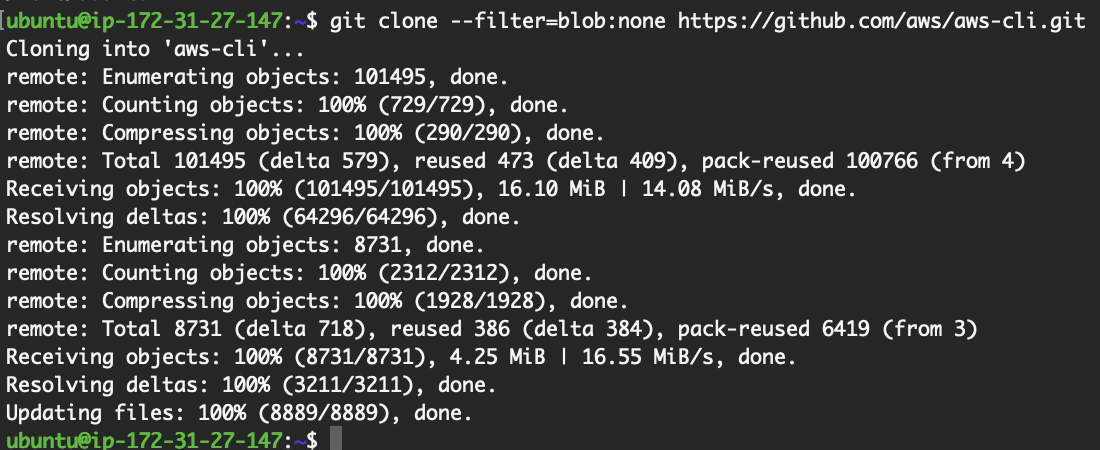
git clone in Ubuntu
A few considerations to take note of:
~/.ssh/id_rsa).macOS offers a Unix-based environment that closely mirrors Linux, making Git operations intuitive. Git is often pre-installed. If not, installing Xcode Command Line Tools (xcode-select --install) will also install Git.
Open Terminal, and run the git clone command.
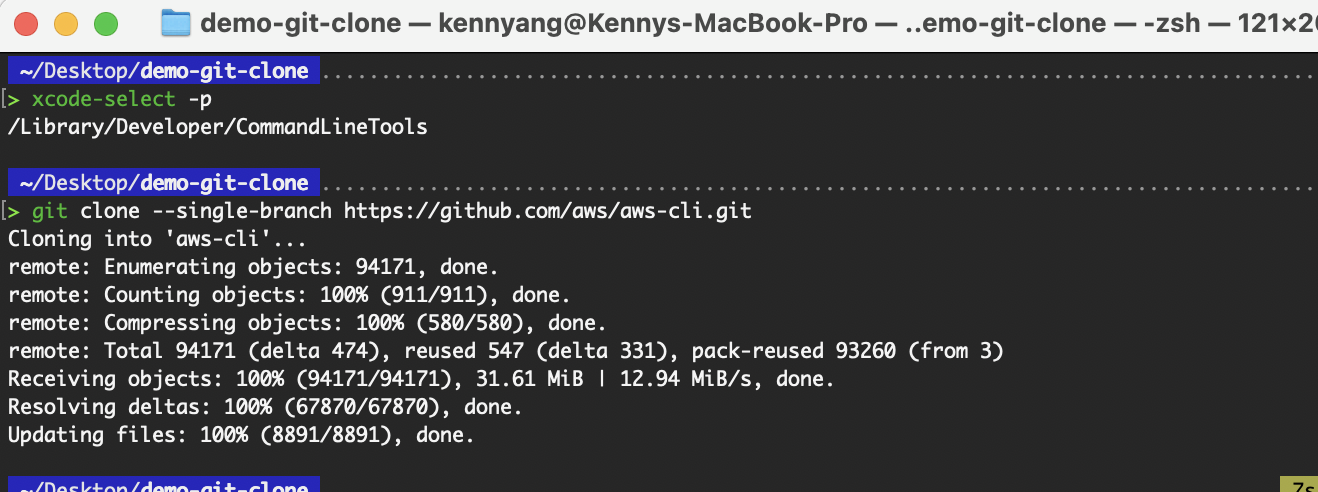 git clone on Mac
A few considerations to take note of:
While git clone is often used for simply obtaining a copy of a repository, its utility extends far beyond that in real-world engineering workflows.
In this section, I examine how cloning strategies can be applied in practical scenarios, each of which requires a tailored approach to maximize efficiency and consistency.
In large organizations, efficient repository cloning is crucial for streamlining developer onboarding and standardizing project setup. The following strategies can be adopted:
--depth=1). Often used to reduce setup time for new developers who don’t need the full commit history.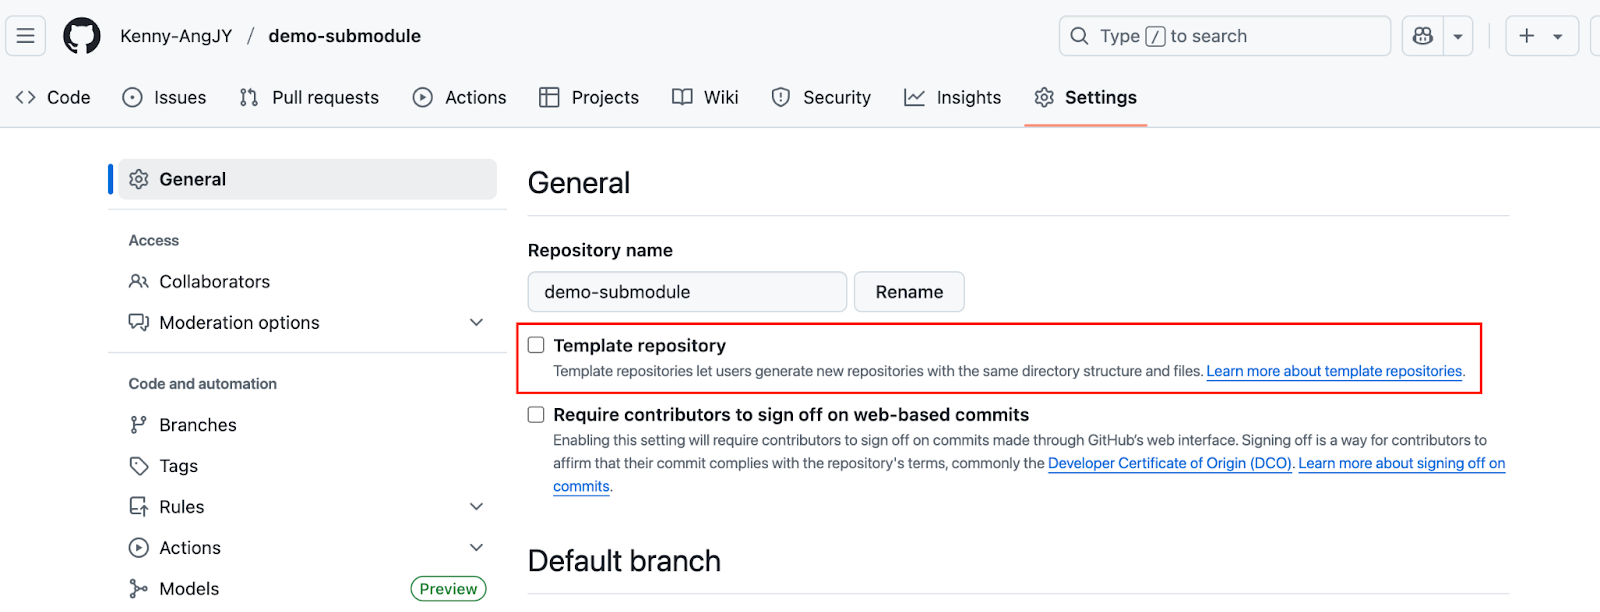
Template repository setting
After enabling it, you will find the “Use this template” button on your repository home page.
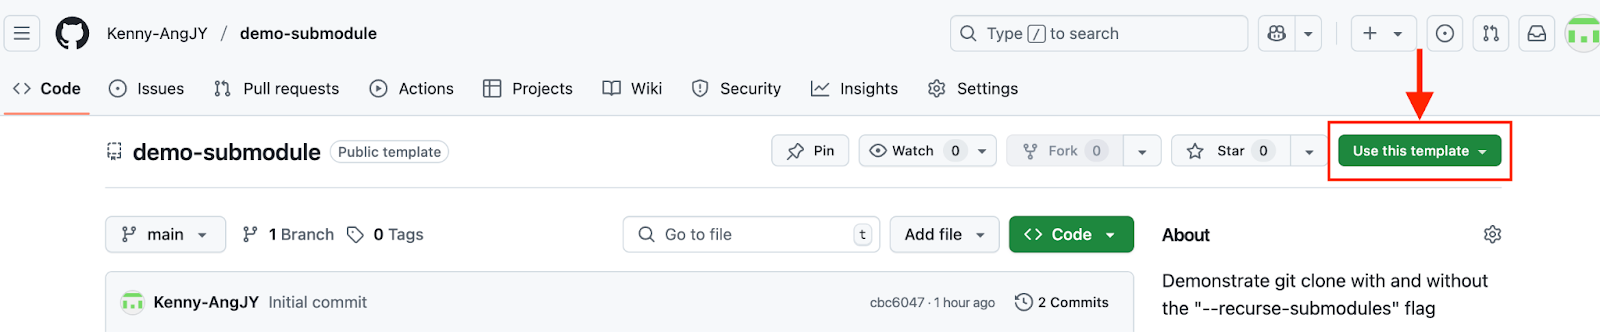
Use the repository as a template
Organizations may migrate repositories between platforms (e.g., GitHub to GitLab) for various reasons, including security, compliance, or financial considerations. The migration will require a mirror clone to ensure a full and complete copy, including all branches, tags, and commit history.
A typical process can be as follows:
# --mirror flag clones all refs and configuration.
git clone --mirror https://source-url.com/your-repo.git
cd your-repo.git
git push --mirror https://target-url.com/your-new-repo.git
This method preserves Git metadata better than a standard clone followed by a push. After migration, update remote URLs and verify access permissions.
In automated environments, optimizing clone operations saves time and reduces resource usage, especially in high-frequency deployments. We can adhere to the following best practices to ensure an efficient pipeline flow:
--depth=1) to speed up job start times.git clone --depth 1 <repository-url>git clone --branch <branch-name> --single-branch <repo-url>git clone operations. Instead of cloning the repository in each stage, cache the working directory after the initial checkout and pass it as an artifact or shared volume to subsequent stages. This approach significantly reduces redundant operations, speeds up pipeline execution, and conserves compute and network resources.
Although git clone is a widely used and straightforward command, developers may occasionally encounter issues during the cloning process, especially in environments with strict authentication controls, custom repository configurations, or limited network access.
In this section, I’ll walk through the common cloning problems and how to resolve them efficiently.
Authentication failures typically occur when accessing private repositories or using expired credentials. Depending on the protocol, HTTPS or SSH, different error messages and fixes apply. For MFA-enabled environments, always prefer SSH or HTTPS with PATs.
For HTTPS, a common error is the authentication failure. This can be a result of using an expired personal access token. If MFA is enabled, another possible reason is that the personal access token was not used as the password.
 HTTPS authentication failure
For SSH, a common error would be the “Permission denied (publickey)” error. This can be due to either the public key not being added to the Git provider’s account or the private key stored on your local device not being in the correct directory.
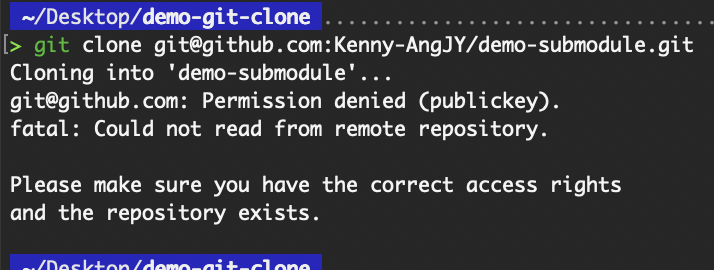 SSH authentication failure
You can validate the connectivity with:
ssh -T git@github.comRarely, when using partial clones (--filter or --depth flags), you might encounter missing objects (e.g., “error: object <sha> is missing”) if Git tries to access parts of the repository that weren’t fetched initially.
I have never encountered this situation before. Nonetheless, you may encounter errors when accessing historical commits, branches, or tags. If this is in a pipeline, build tools or scripts might fail. You can explicitly retrieve the missing data using:
# Have Git refetch all objects from the remote, even if it thinks it already has them.
# For dealing with a broken or corrupted partial clone
git fetch --filter=blob:none --refetch

# Convert a shallow clone into a full clone. Retrieves the rest of the commit history that was omitted during the shallow clone.
git fetch --unshallow

# Obtain a deeper history of the branch
git fetch origin <branch> --depth=50

# Fetches 30 more commits from the current branch’s history. Repeat as needed.
git fetch --deepen=30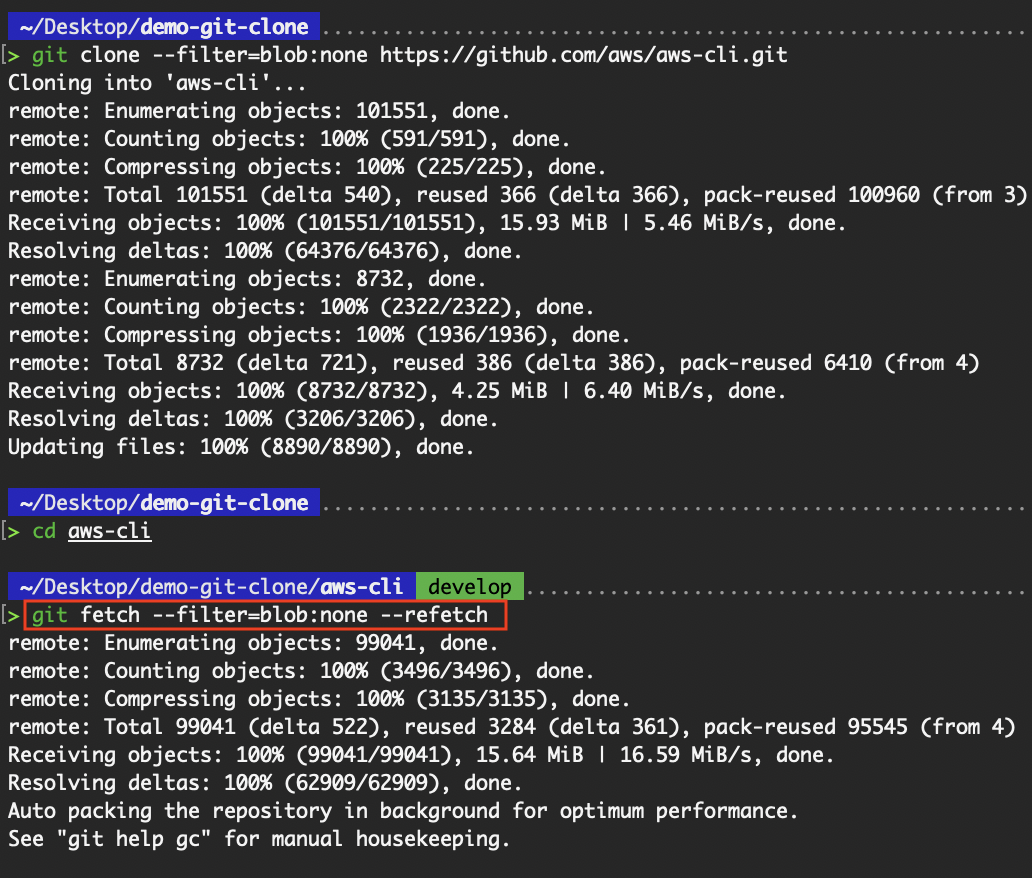
Have Git refetch all objects from the remote
Besides the above issues that you might face during git clone, the following table covers other common errors.
|
Error Message |
Cause |
Fix |
|
Repository not found. |
Wrong URL or lack of access |
Check the repository URL and ensure you have read permissions. |
|
fatal: unable to access '...': SSL certificate problem |
Certificate trust issue |
Use a valid CA or disable SSL verification (not recommended): git config --global http.sslVerify false |
|
RPC failed; curl 56 |
Network instability or large repo |
Increase buffer size: git config --global http.postBuffer 524288000 |
The git clone command may seem simple at first glance, and for many, the basic usage has been enough. However, as this article has shown, it's a foundational tool with far-reaching applications.
We covered how git clone works, explored URL types and protocols, walked through advanced configurations and OS-specific behaviors, and examined real-world scenarios such as CI/CD, enterprise workflows, and common troubleshooting techniques.
Tailoring git clone to your environment—whether for shallow clones in pipelines, repository migrations, or large-scale collaboration—can significantly boost performance and team efficiency. As modern development environments become increasingly complex and distributed, mastering these configurations ensures that you're not only using Git but also using it effectively.
Looking ahead, Git's cloning mechanisms can be improved, such as smarter partial clones, better support for large monorepos, and more intuitive handling of submodules and filters. As Git evolves, staying up to date with these enhancements will empower developers to work faster and more efficiently across any system or scale.
To learn more about Git, I recommend taking the Introduction to Git course. If you want to take your skills to the next level, then the Advanced Git course is for you!
Learn more about Git with these courses!
Course
Course
Course
blog
Srujana Maddula
15 min
Tutorial
Mark Pedigo
Tutorial
Kurtis Pykes
Tutorial
Oluseye Jeremiah
Tutorial
François Aubry
Tutorial
Khalid Abdelaty